Grand Caravan V6-3.3L VIN R (2005)

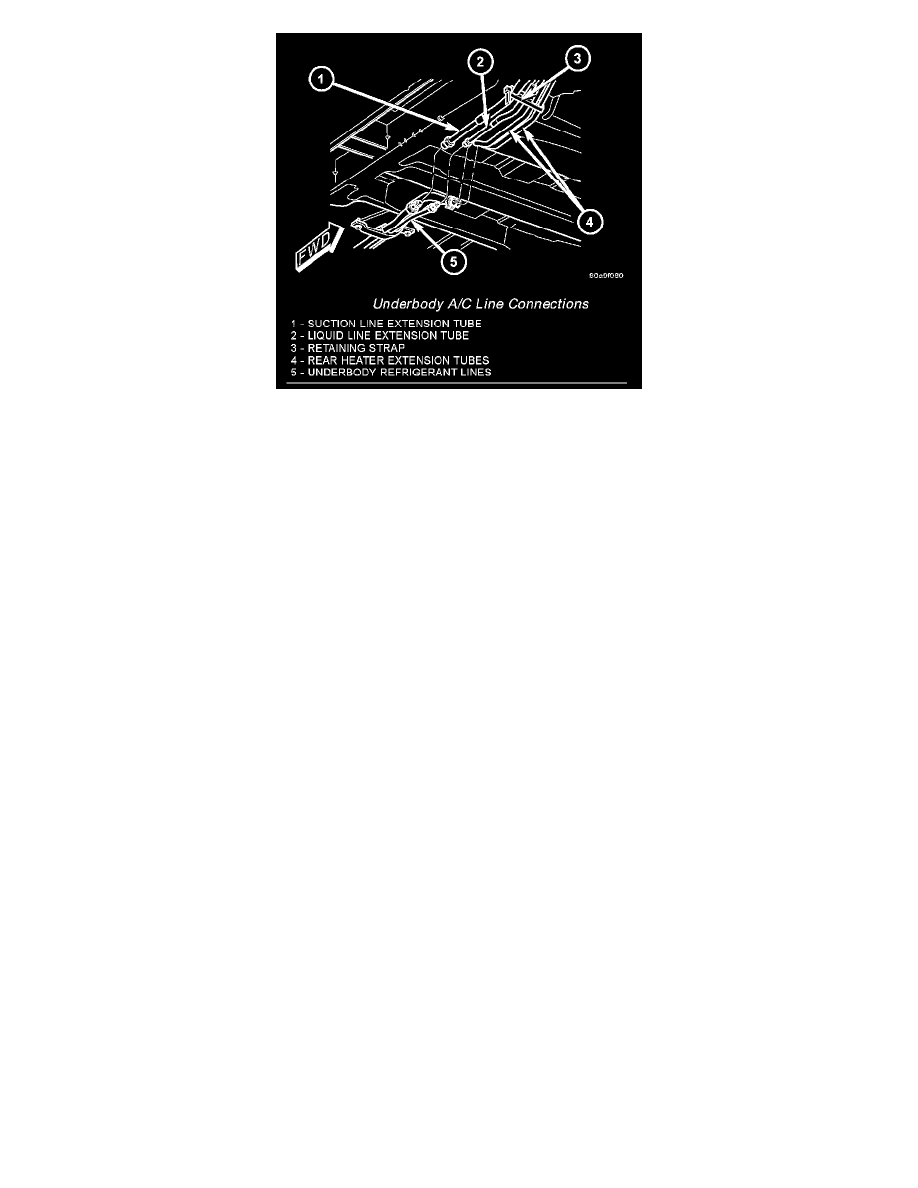
Underbody A/C Line Connections
17. Cut the tie strap located just forward of the connections between the underbody plumbing and the engine compartment plumbing for the rear
heating-A/C system.
18. Disconnect the A/C liquid line extension fitting from the underbody liquid line fitting for the rear A/C system.
19. Remove the O-ring seal from the underbody liquid line fitting and discard.
20. Install plugs in, or tape over the opened liquid line fittings.
21. Lower the vehicle.
22. Remove the rear of the A/C liquid line from the engine compartment.
INSTALLATION
1. Position the rear of the A/C liquid line into the engine compartment.
2. Remove the tape or plugs from the suction line and liquid line fittings and both expansion valve ports.
3. Lubricate new rubber O-ring seals with clean refrigerant oil and install them onto the suction line and liquid line fittings.
4. Reconnect the A/C liquid line and the A/C suction line to the A/C expansion valve.
5. Install the nut that secures the rear of the A/C liquid line and the A/C suction line to the A/C expansion valve. Tighten the nut to 23 N.m (17 ft.
lbs.).
6. Remove the tape or plugs from the liquid line fitting and the receiver/drier outlet port.
7. Lubricate a new rubber O-ring seal with clean refrigerant oil and install it on the liquid line fitting.
8. Reconnect the A/C liquid line to the receiver/ drier.
9. Install the bolt that secures the A/C liquid line to the receiver/drier. Tighten the bolt to 11 N.m (97 in. lbs.).
10. If equipped, reinstall the A/C ground strap eyelet terminal connector onto the weld stud on the top of the right front strut tower (if equipped).
11. If equipped, install the nut that secures the A/C ground strap to the weld stud. Tighten the nut to 12 N.m (106 in. lbs.).
12. Install the A/C pressure transducer.
13. Connect the drain tube to the wiper module drain on the right side of the engine compartment.
14. Install the air cleaner housing and air inlet tube.
15. On RHD models, install the liquid line into the retaining bracket located at the top of the dash panel.
16. If the vehicle is equipped with the optional rear heating-A/C system, go to Step 17. If the vehicle does not have the optional rear heating-A/C
system, go to Step 23.
17. Raise and support the vehicle.
18. Remove the tape or plugs from the A/C liquid line extension fitting and the underbody liquid line fitting.
19. Lubricate a new rubber O-ring seal with clean refrigerant oil and install it on the underbody liquid line fitting.
20. Connect the A/C liquid line extension fitting to the underbody liquid line fitting. Tighten the fittings to 23 N.m (17 ft. lbs.).
21. Install a new tie strap just forward of the connections between the underbody plumbing and the engine compartment plumbing for the rear
heating-A/C system.
22. Lower the vehicle.
23. Reconnect the negative battery cable.
24. Evacuate the refrigerant system.
25. Charge the refrigerant system.
Rear
REMOVAL
WARNING: REFER TO THE APPLICABLE WARNINGS AND CAUTIONS FOR THIS SYSTEM BEFORE PERFORMING THE
