
Grand Caravan V6-3.8L (2009)
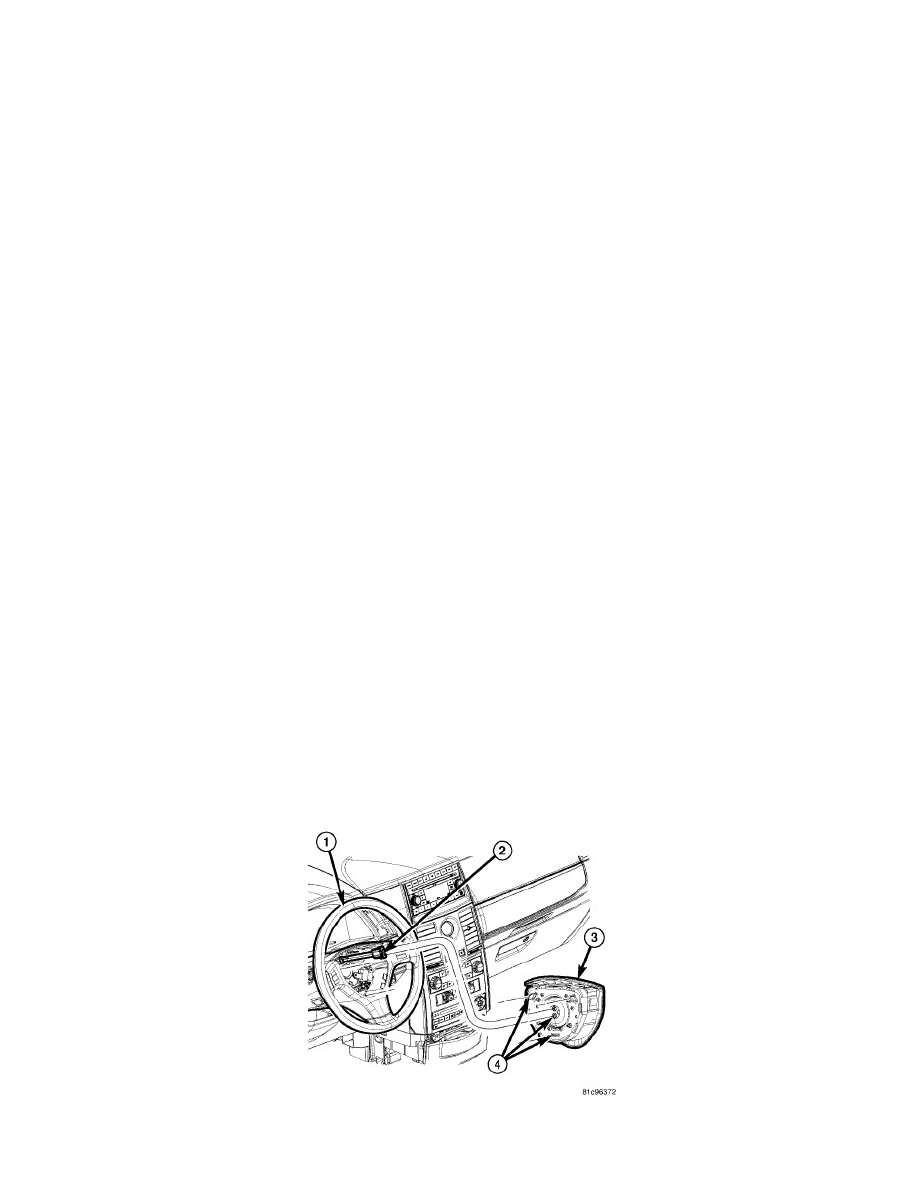
5. Twist the screwdriver handle in either direction far enough to disengage the snap retainer wire loop (4) from the hook of the steering wheel
armature. At the same time, gently pull the driver airbag (3) away from the steering wheel (1) to prevent the retainer from snapping back into place
over the hook once it is disengaged.
6. Repeat 4 and 5 at the other upper (two o'clock or ten o'clock) access hole to disengage the other upper snap retainer wire loop.
7. Repeat 4 and 5 at the lower (six o'clock) access hole to disengage the lower snap retainer wire loop. The lower snap retainer wire loop has a
distinctive V-shape and must always be installed onto the six o'clock hook of the steering wheel armature.
8. Pull the driver airbag away from the steering wheel far enough to access the electrical connections (2) at the back of the airbag housing.
9. Each clockspring driver airbag pigtail wire has a plastic retainer that is pushed onto one of the inflator mounting studs on the back of the airbag
housing. Pull each of these two retainers off of the studs.
CAUTION: Do not pull on the clockspring pigtail wires or pry on the connector insulator to disengage the connector from the driver airbag
inflator connector receptacle. Improper removal of these pigtail wires and their connector insulators can result in damage to the
airbag circuits or the connector insulators.
10. The clockspring driver airbag pigtail wire connectors are secured by an integral lock to the airbag inflator connector receptacles, which are located
on the back of the driver airbag housing. Firmly grasp and pull the lock straight out from the connector insulator, then pull the insulators straight
out from the airbag inflator to disconnect them from the connector receptacles.
11. Remove the driver airbag from the steering wheel.
12. If the driver airbag has been deployed, the clockspring must be replaced and the steering column must be inspected. See: Clockspring Assembly /
Spiral Cable/Service and Repair/Removal and Replacement/Clockspring - Removal. See: Steering and Suspension/Steering/Steering
Column/Testing and Inspection.
Driver Air Bag - Installation
INSTALLATION
WARNING: To avoid serious or fatal injury on vehicles equipped with airbags, disable the Supplemental Restraint System (SRS) before
attempting any steering wheel, steering column, airbag, seat belt tensioner, impact sensor, or instrument panel component
diagnosis or service. Disconnect and isolate the battery negative (ground) cable, then wait two minutes for the system capacitor to
discharge before performing further diagnosis or service. This is the only sure way to disable the SRS. Failure to take the proper
precautions could result in accidental airbag deployment.
WARNING: To avoid serious or fatal injury, use extreme care to prevent any foreign material from entering the driver airbag, or becoming
entrapped between the driver airbag cushion and the driver airbag trim cover. Failure to observe this warning could result in
occupant injuries upon airbag deployment.
WARNING: To avoid serious or fatal injury, the driver airbag trim cover must never be painted. Replacement airbags are serviced with trim
covers in the original colors. Paint may change the way in which the material of the trim cover responds to an airbag deployment.
Failure to observe this warning could result in occupant injuries upon airbag deployment.
NOTE: The following procedure is for replacement of an ineffective or damaged driver airbag. If the airbag is ineffective or damaged, but not
deployed, review the recommended procedures for handling non-deployed supplemental restraints. See: Service and Repair. If the
driver airbag has been deployed, review the recommended procedures for service after a supplemental restraint deployment before
removing the airbag from the vehicle. See: Service and Repair.
1. Position the driver airbag (3) close enough to the steering wheel (1) to reconnect the electrical connections (2) to the back of the airbag housing.