
Eagle L4-150 2.5L (1983)
Axle Bearing: Service and Repair
Front Axle Service
Axle Hub & Bearing
REMOVAL
1. Raise and support vehicle, then remove wheel, caliper and rotor.
2. Remove bolts attaching axle shaft flange to half shaft. Insert wire through half shaft flange bolt holes, then compress half shaft and wrap
wire between boots to prevent half shaft from separating.
3. Remove cotter pin, locknut and axle shaft nut, then the half shaft.
4. Remove steering arm from steering knuckle.
5. Remove caliper anchor plate from steering knuckle, then the three torx head bolts retaining hub assembly using tool J-26359.
6. Remove hub assembly from steering knuckle and clean grease from steering knuckle cavity.
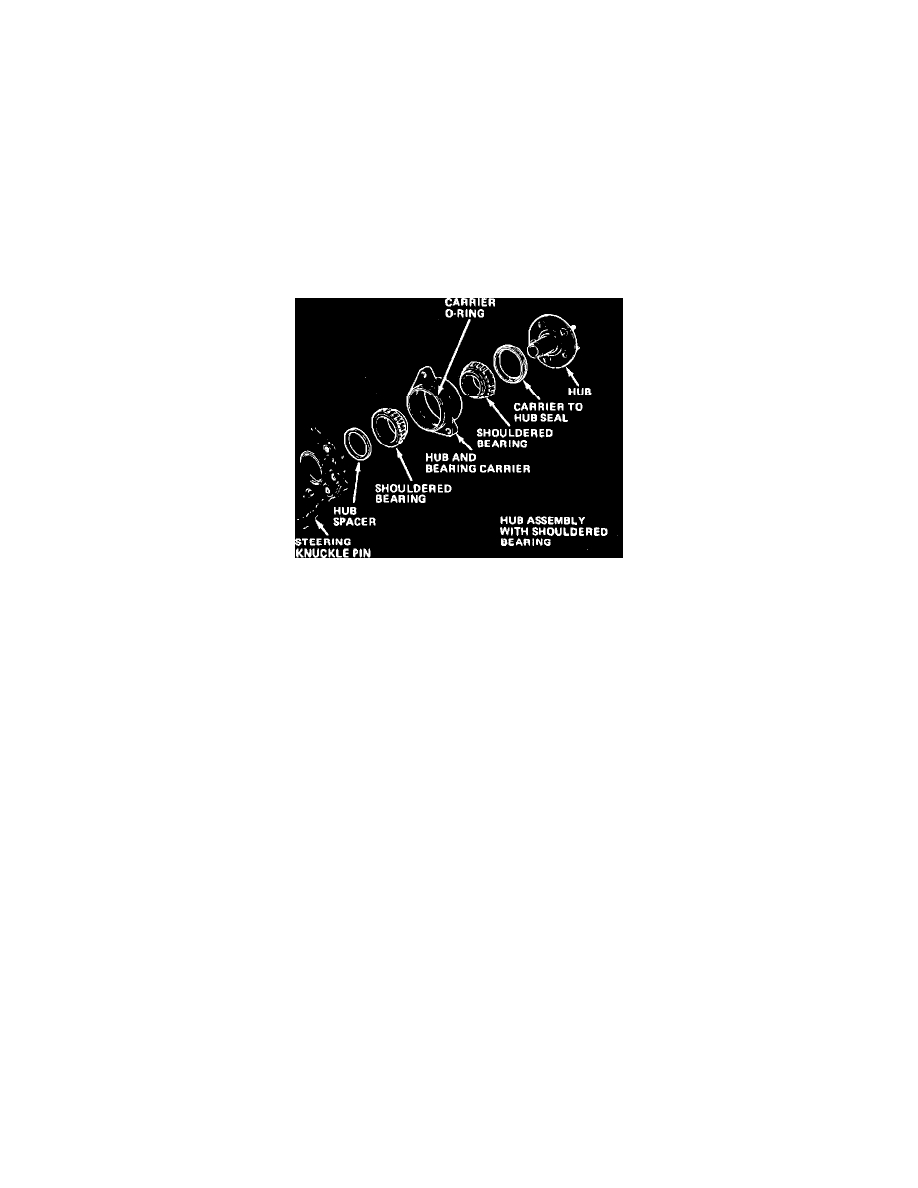
Fig. 4 Disassembled view of axle hub. Eagle
DISASSEMBLE
1. Press hub from bearing carrier, then remove bearings, hub spacer, steering knuckle pin seal, carrier to hub seal, carrier O-ring and bearing spacer,
if equipped.
2. Clean all components and inspect for wear and damage and replace as necessary. If hub incorporates ball bearings, the entire hub assembly
must be replaced if damage to internal components is indicated. If hub incorporates tapered bearings, internal hub components may be
replaced as necessary. Bearings and races must be replaced in matched sets.
3. Press bearing races from hub carrier, if necessary. Install replacement bearing races using a brass drift or suitable press.
ASSEMBLE
1. Fill steering knuckle pin, hub, bearing carrier and lip type seal cavities with lithium base wheel bearing lubricant.
2. Pack bearings with lithium base wheel bearing lubricant, then install bearings into hub carrier.
3. Install seal onto hub side of bearing carrier, then press hub into carrier and install hub spacer on end of hub shaft. Do not install bearing carrier
O-ring at this time.
4. Install inner seal into steering knuckle pin.
5. Install splash shield onto hub and bearing carrier, then install bearing carrier O-ring.
6. Install splash shield and bearing carrier into steering knuckle pin, then install carrier attaching bolts and torque to 75 ft-lbs.
Installation
1. Partially fill hub cavity of steering knuckle with chassis lubricant and install hub assembly onto steering knuckle. Torque hub torx head bolts to 75
ft-lbs.
2. Install caliper anchor plate and torque plate retaining bolts to 100 ft-lbs.
3. Install steering arm onto steering knuckle and torque retaining bolts to 100 ft-lbs.
4. Install half shaft, then the axle flange to shaft bolts and hub nut. Torque half shaft to flange bolts to 45 ft. lbs and hub nut 175 ft-lbs.
5. Install locknut, replacement cotter pin, rotor, caliper and wheel.
Axle Shaft Bearing, Replace
Two different style axle shaft bearings are used on the Eagle front axle. The left side axle shaft uses a ball bearing. The right side axle shaft
uses a needle bearing. On 1985---87 models, removal of the righthand side bearing is the same as that of the lefthand bearing.
1. Remove axle assembly. Refer to Axle, Removal for procedure.
2. Remove axle housing cover and drain lubricant.
3. Remove axle shaft retaining clip, then the axle shaft.