| Diagnosis and Testing Refer to Wiring Diagrams Section 415-00, for schematic and connector information. Special Tool(s) | | Digital Volt - Ohm Meter 105 - R0051 | Inspection and Verification - Verify the customer concern by operating the system.
- Visually inspect for obvious signs of mechanical or electrical damage.
Visual Inspection Chart | Mechanical | Electrical | - Audio unit damage
- Cassette player jammed, not loading
- Compact disc (CD) player jammed, not loading
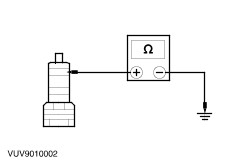
- Antenna/alignment
- Speakers
| - Fuse 36 (15A)
- Loose or corroded connector(s)
| - If an obvious cause for an observed or reported concern is found, correct the cause (if possible) before proceeding to the next step.
- If the concern is not visually evident, verify the symptom and refer to the Symptom Chart.
Self-Diagnostic Mode - To enter the audio unit Self-Diagnostic Mode, switch the audio unit ON. Within four seconds depress the preset buttons 3 and 6 together.
- Release the preset buttons 3 and 6 and the audio unit will enter the Self-Diagnostic Mode.
- To navigate through the audio unit Self-Diagostic Mode, depress the preset button 6 (manual cycle).
- To exit the Self-Diagnostic Mode do not press any button on the audio unit for 10 seconds (manual cycle).
Self-Diagnostic Mode | Test | Message Displayed | Circuit Tested | Description | | 1. FM waveband check. | FM frequency received. | Antenna signal. | Tests signal from the antenna cable. | | 2. Traffic Announcement. | TP. | Traffic announcement volume level. | Allows adjustment of the volume. | | 3.Test speaker circuit left hand front speaker. | 4CH LF for four channel system 2CH LF for two channel system. | Left hand front speaker circuit. | Test speaker circuit. | | 4.Test speaker circuit right hand front speaker. | 4CH RF for four channel system 2CH RF for two channel system. | Right hand front speaker circuit. | Test speaker circuit. | | 5.Test speaker circuit left hand rear speaker. | 4CH LR for four channel system 2CH LR for two channel system. | Left hand rear speaker circuit. | Test speaker circuit. | | 6.Test speaker circuit right hand rear speaker. | 4CH RR for four channel system 2CH RR for two channel system. | Right hand rear speaker circuit. | Test speaker circuit. | | 7. Test communications with compact disc autochanger (if equipped). | CDDJ OK if communications are achieved and NO CDDJ if no communications are achieved. | Compact disc communications circuit. | Test compact disc circuit. | - If the concern is still evident after the Self-Diagnostic Mode, refer to the Symptom Chart.
Symptom Chart Symptom Chart | Symptom | Possible Sources | Action | | The audio unit is inoperative or does not operate correctly | * Fuse(s). * Circuit. * Audio unit. | * | | The display is blank - radio and cassette operates | * Audio unit. | * | | Noisy reception | * Antenna. * Antenna cable. * Audio unit. | * | | Distorted sound from one or more speakers (Not All Speakers) | * Speaker(s). * Circuit. * Audio unit. | * | | No sound from all of the speakers | * Speaker(s). * Circuit. * Audio unit. | * | | The CD player does not operate correctly | * Audio unit. | * | | No sound from one or more of the speakers | * Circuit. * Audio unit. | * | | The CD changer is inoperative or does not operate correctly | * Fuse (s). * Circuit. * CD changer. | * | Pinpoint Tests | PINPOINT TEST A : THE AUDIO UNIT IS INOPERATIVE - DOES NOT OPERATE CORRECTLY | | TEST CONDITIONS | DETAILS/RESULTS/ACTIONS | | A1: CHECK FOR VOLTAGE TO AUDIO UNIT | | | 1 Disconnect Audio Unit C443b. | | | 2 Ignition switch in position I. | | | 3 Measure the voltage between the audio unit C443b pin 1, circuit 29 - MD15 (OG/BK), harness side and ground; and between the audio unit C443b pin 3, circuit 75 - MD15 (YE/GN), harness side and ground. | | | Are the voltages greater than 10 volts? Yes No | | A2: CHECK THE AUDIO UNIT GROUND CIRCUITS FOR OPEN | | | 1 Ignition switch in position 0. | | | 2 Measure the resistance between the audio unit C443b pin 6, circuit 91 - MD15 (BK/GN), harness side and ground; and between the audio unit C443b pin 2, circuit 91 - MD15a (BK/GN), harness side and ground. | | | Are the resistances less than 5 ohms? Yes INSTALL a new audio unit. REFER to Section 415-01 Audio Unit. TEST the system for normal operation. No REPAIR circuit 91 - MD15/91 - MD15a. TEST the system for normal operation. | | A3: CHECK FOR OPEN IN POWER CIRCUIT | | | 1 Ignition switch in position 0. | | | 2 Disconnect Fuse 36 (15A). | | | 3 Measure the resistance between central junction box (CJB) fuse 36 (15A) pin 2, and audio unit C443a pin 1, circuit 29 - MD15 (OG/BK), harness side. | | | Is the resistance less than 5 ohms? Yes INSTALL a new audio unit. REFER to Section 415-01 Audio Unit. TEST the system for normal operation. No REPAIR circuit 29 - MD15. TEST the system for normal operation. | | PINPOINT TEST B : NOISY RECEPTION | | TEST CONDITIONS | DETAILS/RESULTS/ACTIONS | | B1: CHECK THE ANTENNA CABLE SHIELD | | | 1 Ignition switch in position 0. | | | 2 Disconnect the antenna cable from the audio unit. | | | 3 Measure the resistance between the antenna cable ground connector (shield), and ground. | | | Is the resistance less than 1 ohm? Yes No CLEAN and TIGHTEN the audio unit case ground and the antenna mast base connection to the body. If concern persists, INSTALL a new antenna cable. TEST the system for normal operation. | | B2: CHECK THE ANTENNA CENTER CONDUCTOR FOR OPEN | | | 1 Measure the resistance of the center conductor between ends of the antenna cable. | | | Is the resistance less than 1 ohm? Yes No CHECK in - line connectors INSTALL a new antenna cable. TEST the system for normal operation. | | B3: CHECK ANTENNA CABLE FOR SHORT | | | 1 Measure the resistance between the antenna center conductor and the antenna ground (shield). | | | Is the resistance greater than 10,000 ohms? Yes CLEAN and TIGHTEN grounding points at the base of the antenna, audio unit case and battery negative cable to body. If concern persists, INSTALL a new audio unit. REFER to Section 415-01 Audio Unit. TEST the system for normal operation. No INSTALL a new antenna cable. TEST the system for normal operation. | | PINPOINT TEST C : DISTORTED SOUND FROM ONE OR MORE SPEAKERS (NOT ALL SPEAKERS) | | TEST CONDITIONS | DETAILS/RESULTS/ACTIONS | | C1: CHECK THE SPEAKER RESISTANCE | | | 1 Disconnect Inoperative Speaker. | | | 2 Measure the resistance between the inoperative speaker pin 1 and pin 2. | | | Is the resistance 4.0 ohms? Yes No INSTALL a new speaker. REFER to Section 415-03 Speakers. TEST the system for normal operation. | | C2: CHECK SIGNAL SEND FOR SHORT TO GROUND | | | 1 Measure the resistance between the inoperative speaker connector pin 1, circuit 8, harness side and ground. | | | Is the resistance greater than 10,000 ohms? Yes No REPAIR circuit 8. TEST the system for normal operation. | | C3: CHECK SIGNAL RETURN FOR SHORT TO GROUND | | | 1 Measure the resistance between inoperative speaker connector pin 2, circuit 9, harness side and ground. | | | Is the resistance greater than 10,000 ohms? Yes INSTALL a new speaker. REFER to Section 415-03 Speakers. TEST the system for normal operation. If concern persists, INSTALL a new audio unit. REFER to Section 415-01 Audio Unit. TEST the system for normal operation. No REPAIR circuit 9. TEST the system for normal operation. | | PINPOINT TEST D : NO SOUND FROM ALL OF THE SPEAKERS | | TEST CONDITIONS | DETAILS/RESULTS/ACTIONS | | D1: CHECK SPEAKER POSITIVE CIRCUIT FOR SHORT TO GROUND | | | 1 Ignition switch in position 0. | | | 2 Disconnect Audio Unit C443a. | | | 3 Measure the resistance between the following audio unit connector pins and ground: - (LF speaker) C443a pin 1, circuit 8 - MD10 (WH/BK), harness side and ground.
- (LR speaker) C443a pin 3, circuit 8 - MD11 (WH/VT), harness side and ground.
- (RF speaker) C443a pin 5, circuit 8 - MD17 (WH/RD), harness side and ground.
- (RR speaker) C443a pin 7, circuit 8 - MD18 (WH), harness side and ground.
| | | Are the resistances greater than 10,000 ohms? Yes No REPAIR the circuit in question. TEST the system for normal operation. | | D2: CHECK SPEAKER RETURN CIRCUIT FOR SHORT TO GROUND | | | 1 Measure the resistance between the following audio unit connector pis and ground: - (LF speaker) C443a pin 2, circuit 9 - MD10 (BN/YE), harness side and ground.
- (LR speaker) C443a pin 4, circuit 9 - MD11 (BN/WH), harness side and ground.
- (RF speaker) C443a pin 6, circuit 9 - MD17 (BN/RD), harness side and ground.
- (RR speaker) C443a pin 8, circuit 9 - MD18 (BN), harness side and ground.
| | | Are the resistances greater than 10,000 ohms? Yes INSTALL a new audio unit. REFER to Section 415-01 Audio Unit. TEST the system for normal operation. No REPAIR the circuit in question. TEST the system for normal operation. | | PINPOINT TEST E : NO SOUND FROM ONE OR MORE OF THE SPEAKERS | | TEST CONDITIONS | DETAILS/RESULTS/ACTIONS | | E1: CHECK THE SPEAKER RESISTANCE | | | 1 Disconnect Inoperative Speaker. | | | 2 Measure the resistance between the inoperative speaker pin 1 and pin 2. | | | Is the resistance 6.0 ohms? Yes No INSTALL a new speaker(s). REFER to Section 415-03 Speakers. TEST the system for normal operation. | | E2: CHECK SPEAKER CIRCUIT RESISTANCE - SPEAKER DISCONNECTED | | | 1 Disconnect Audio Unit C443a. | | | 2 Measure the resistance between the audio unit C443a and the speaker connector pins for the inoperative speaker(s). - (LF speaker) C443a pin 1, circuit 8 - MD10 (WH/BK), harness side and C938 pin 1, circuit 8 - MD28 (WH), harness side.
- (LF speaker) C443a pin 2, circuit 9 - MD10 (BN/YE), harness side and C938 pin 2, circuit 9 - MD28 (WH), harness side.
- (RF speaker) C443a pin 5, circuit 8 - MD17 (WH/RD), harness side and C937 pin 1, circuit 8 - MD28 (WH), harness side.
- (RF speaker) C443a pin 6, circuit 9 - MD17 (BN/RD), harness side and C937 pin 2, circuit 9 - MD28 (BN), harness side.
- (LR speaker) C443a pin 3, circuit 8 - MD11 (WH/VT), harness side and C939 pin 1, circuit 8 - MD11 (WH/VT), harness side.
- (LR speaker) C443a pin 4, circuit 9 - MD11 (BN/WH), harness side and C939 pin 2, circuit 9 - MD11 (BN/WH), harness side.
- (RR speaker) C443a pin 7, circuit 8 - MD18 (WH), harness side and C1872 pin 1, circuit 8 - MD8 (WH), harness side.
- (RR speaker) C443a pin 8, circuit 9 - MD18 (BN), harness side and C1872 pin 2, circuit 9 - MD8 (BN), harness side.
| | | Is the resistance less than 2 ohms? Yes INSTALL a new speaker. REFER to Section 415-03 Speakers. TEST the system for normal operation. If concern persists, INSTALL a new audio unit.REFER to Section 415-01 Audio Unit. TEST the system for normal operation. No REPAIR the circuit in question. TEST the system for normal operation. | | PINPOINT TEST F : THE CD CHANGER IS INOPERATIVE OR DOES NOT OPERATE CORRECTLY | | TEST CONDITIONS | DETAILS/RESULTS/ACTIONS | | F1: CHECK IN - LINE FUSE | | | 1 Check the 3 amp in - line fuse for the CD changer. | | | Is the fuse OK? Yes No INSTALL a new fuse. TEST the system for normal operation. | | F2: TEST THE AUDIO UNIT TO CD CHANGER HARNESS | | | 1 Disconnect CD changer. | | | 2 Disconnect Audio unit. | | | 3 Carry out the CD changer harness component test. | | | Is the audio unit to CD changer harness OK? Yes No REPAIR or INSTALL a new CD changer harness. TEST the system for normal operation. | | F3: CHECK FOR CORRECT OPERATION OF CD CHANGER | | | 1 Substitute a known good CD changer. | | | 2 Verify correct operation of the substitute CD changer. | | | Do all CD changer functions operate correctly? Yes INSTALL a new CD changer. REFER to Section 415-01 Audio Unit. TEST the system for normal operation. No REMOVE the substitute CD changer. INSTALL the original CD changer. INSTALL a new audio unit. REFER to Section 415-01 Audio Unit.TEST the system for normal operation. | Component Test CD Changer Harness -
NOTE:Refer to the Wiring Diagram, Section 415 - 00 for schematic and connector information. Using a multimeter, test the CD changer harness using the following table as a guide to meter lead placement as well as expected values. | CD Changer C1875 | Audio Unit C433d | Expected Value | | Pin 1 | Pin 1 | Less than 5 ohms | | Pin 3 | Pin 3 | Less than 5 ohms | | Pin 5 | Pin 5 | Less than 5 ohms | | Pin 6 | Pin 6 | Less than 5 ohms | | Pin 7 | Pin 7 | Less than 5 ohms | | Pin 8 | Pin 8 | Less than 5 ohms | | Pin 9 | Pin 9 | Less than 5 ohms | | Pin 10 | Pin 10 | Less than 5 ohms | | Pin 11 | Pin 11 | Less than 5 ohms | | Pin 12 | Pin 12 | Less than 5 ohms | | CD Changer C1875 | Negative Multimeter Lead | | | Pin 1 | Ground | Greater than 10,000 ohms | | Pin 3 | Ground | Greater than 10,000 ohms | | Pin 5 | Ground | Greater than 10,000 ohms | | Pin 6 | Ground | Greater than 10,000 ohms | | Pin 7 | Ground | Greater than 10,000 ohms | | Pin 8 | Ground | Greater than 10,000 ohms | | Pin 9 | Ground | Greater than 10,000 ohms | | Pin 10 | Ground | Greater than 10,000 ohms | | Pin 11 | Ground | Greater than 10,000 ohms | | Pin 12 | Ground | Greater than 10,000 ohms | - If routed here from a Pinpoint Test, return to the Pinpoint Test
|