| Removal Special Tool(s) | | Support Bar, Engine 303-290A (21-140A) | | | Adapter for 303-290A 303-290-01 (21-140-01) | | | Adapter for 303-290A 303-290-03A (21-140-03A) | | | Adapter for 303-290A 303-290-05A (21-140-05A) | General Equipment Transmission jack Retaining strap Removal All vehicles | | -
Remove the battery tray.
For additional information, refer to: Battery Tray (414-01 Battery, Mounting and Cables, Removal and Installation).
| | | -
Remove the air cleaner. For additional information, refer to: (303-12 Intake Air Distribution and Filtering) Air Cleaner - 1.4L Duratorq-TDCi (DV) Diesel (Removal and Installation), Air Cleaner - 1.6L Duratorq-TDCi (DV) Diesel (Removal and Installation). | | | -
Disconnect the powertrain control module (PCM) electrical connector. For additional information, refer to: Powertrain Control Module (PCM) - 1.4L Duratorq-TDCi (DV) Diesel (303-14 Electronic Engine Controls, Removal and Installation), Powertrain Control Module (PCM) - 1.6L Duratorq-TDCi (DV) Diesel (303-14, Removal and Installation). | | | -
Detach the ground cable from the body. | | | -
Disconnect the glow plug relay electrical connector. | | | -
Detach the glow plug relay power supply cables. | | | -
Remove the turbocharger intake air pipe. | | | -
Remove the intake air pipe. | | | -
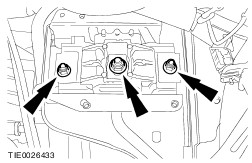
Remove the transaxle upper retaining bolts. - Detach the engine wiring harness bracket from the transaxle.
| | | -
Remove the battery tray support bracket. | | | -
Install the special tools. | | | -
Remove the engine rear mount. | | | -
Remove the engine and transaxle rear mount retaining bracket. | | | -
CAUTION:If brake fluid is spilt on the paintwork, the affected area must be immediately washed down with cold water. Disconnect the clutch slave cylinder supply line. | | | -
Using the special tools, lower the engine and transaxle assembly. | Vehicles with air conditioning | | -
Detach the air conditioning (A/C) pressure pipe bracket from the transaxle. | All vehicles | | -
Remove the front wheels and tires.
For additional information, refer to: Wheel and Tire (204-04 Wheels and Tires, Removal and Installation).
| Vehicles with automated gearshift | | -
Remove the gearshift actuator cover. | | | -
Disconnect the gearshift actuator electrical connector (colored black). | | | -
Disconnect the gearshift actuator electrical connector (colored grey). | | | -
CAUTION:If brake fluid is spilt on the paintwork, the affected area must be immediately washed down with cold water. Disconnect the clutch slave cylinder supply line. | Vehicles without automated gearshift | | -
Remove the gearshift cables cover. | | | -
Detach the gearshift cables from the transaxle. - Detach the gearshift cable and the selector cable from the selector levers.
- Turn the abutment sleeves clockwise and detach the cables from the bracket.
| All vehicles | | -
Disconnect the cooling fan motor and cooling fan resistor electrical connectors. | | | -
Remove the cooling fan motor and shroud. - Release the cooling fan motor and shroud from the retaining brackets.
- Push the cooling fan motor and shroud upwards and then downwards to remove.
| | | -
Disconnect the vehicle speed sensor (VSS) electrical connector (if equipped). | | | -
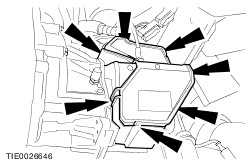
Remove the accessory drive belt cover. | | | -
Remove the engine support insulator. | | | -
Remove the right-hand halfshaft.
For additional information, refer to: Front Halfshaft RH (205-04 Front Drive Halfshafts, Removal and Installation).
| | | -
Remove the left-hand halfshaft.
For additional information, refer to: Front Halfshaft LH (205-04 Front Drive Halfshafts, Removal and Installation).
| | | -
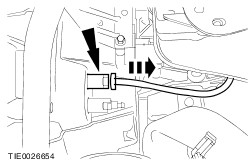
Disconnect the reversing lamp switch electrical connector. | | | -
CAUTION:Over bending of the exhaust flexible pipe may cause damage resulting in failure. Support the exhaust flexible pipe with a support wrap or suitable splint. | | | -
Detach the exhaust flexible pipe from the catalytic converter. - Discard the gasket and nuts.
| | | -
Detach the starter motor lower retaining bolt. | | | -
NOTE:Do not disconnect the starter motor electrical connector. Detach the starter motor and secure it to one side. | | | -
CAUTION:Secure the transaxle with retaining straps on the transmission jack. | | | -
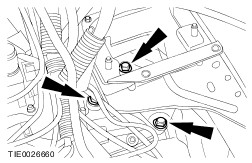
Remove the transaxle left-hand retaining bolts. | | | -
Remove the transaxle right-hand retaining bolts. | |