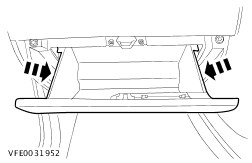
Open the stowage compartment and unscrew and remove the bolts from the lower fascia/crash padding trim.
Remove the lower fascia/crash padding trim.
Unscrew and remove the left-hand bolts from the fascia/crash padding console.
RHD vehicles
NOTE:Turn the steering wheel to gain access to the clips on the upper steering column trim.
Detach the upper steering column trim from the lower steering column trim (steering wheel shown removed for clarity).
Use a narrow screwdriver to release the clips.
Detach the trim.
Remove the lower steering column trim (steering wheel shown removed for clarity).
Release the steering column locking lever.
Unscrew the bolts.
All vehicles
Unscrew and remove the lower bolts from the fascia/crash padding console.
Fully open the glove compartment.
Press the sides towards the centre to release the glove compartment from the stops.
Detach the shaft of the air distribution flap from the adjusting mechanism on the heater core / evaporator housing.
Release the catch and pull out the shaft.
Unscrew and remove the right-hand bolts from the fascia/crash padding console.
CAUTION:Support the screwdriver on suitable padding to avoid damaging the fascia/crash padding console.
Detach the switches from the fascia/crash padding console.
Unplug the connector and remove the switches.
Unscrew and remove the upper bolts from the fascia/crash padding console.
CAUTION:Use adhesive tape on the three segments of the audio unit to ensure that the audio unit is not damaged during removal of the fascia/crash padding console.
Cover the front of the three segments of the audio unit with adhesive tape.
Pull the fascia/crash padding console forwards to gain access to the heater/air conditioning control unit.
Detach the shaft of the air distribution flap from the heater/air conditioning control unit.
Turn the air distribution rotary control while detaching the shaft.
Unscrew and remove the bolt for the temperature flap adjusting mechanism.
CAUTION:Do not kink the actuation cable for the temperature flap adjusting mechanism.
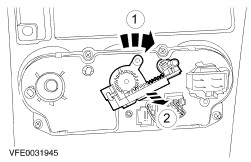
Detach the temperature flap adjusting mechanism from the heater/air conditioning control unit (heater/air conditioning control unit shown from the rear for clarity).
Rotate the adjusting mechanism clockwise.
Pull out the adjusting mechanism.
Unplug the connector from the heater/air conditioning control unit and remove the fascia/crash padding console.
Remove the heater/air conditioning control unit.
Installation
CAUTION:Ensure that the shaft of the air distribution flap engages properly in the adjusting mechanism on the heater core / evaporator housing.
CAUTION:Do not kink the actuation cable for the temperature flap adjusting mechanism.