| Removal and Installation Removal CAUTION:The A/C compressor belt must not be reused as it is designed to be stretched onto the pulleys only once. Failure to follow this instruction may lead to premature failure of the belt. CAUTION:The accessory drive belt must not be reused as it is designed to be stretched onto the pulleys only once. Failure to follow this instruction may lead to premature failure of the belt. | | -
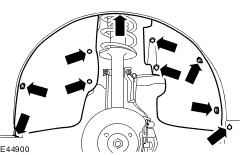
Remove the right-hand front wheel and tire.
For additional information, refer to: Wheel and Tire (204-04 Wheels and Tires, Removal and Installation).
| | | -
Remove the accessory drive belt splash shield. | | | -
Remove the right-hand front splash shield. | | | -
Using a suitable knife, cut and discard the A/C compressor belt and accessory drive belt. | Installation NOTE:Install a new accessory drive belt and A/C compressor belt. | | -
Wipe clean all of the pulleys to make sure that the accessory drive belt does not slip during installation. | | | -
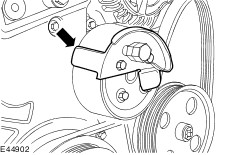
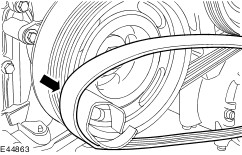
CAUTION:Make sure that the accessory drive belt guide tool is correctly fitted to the crankshaft pulley. The center of the accessory drive belt guide tool must be in the 12 o'clock position and the curved face is closest to the engine. Failure to follow this instruction may result in damage to the accessory drive belt during installation. Install the accessory drive belt guide tool (supplied in the parts kit) to the crankshaft pulley so that the center of the tool is at the 12 o'clock position (engine shown removed for clarity). | | | -
Select first gear or park. | | | -
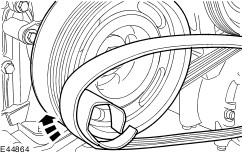
Position the accessory drive belt around the crankshaft pulley, power steering pump pulley and coolant pump pulley in the position shown (engine shown removed for clarity). | | | -
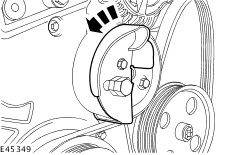
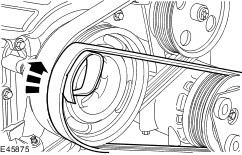
CAUTION:Make sure that an audible click is heard when the accessory drive belt installation tool locking tang is fitted to the coolant pump pulley. Failure to follow this instruction may result in damage to the accessory drive belt during installation. Install the accessory drive belt installation tool (supplied in the parts kit) to the coolant pump pulley in the position shown (engine shown removed for clarity). | | | -
Rotate the accessory drive belt installation tool 90 degrees counterclockwise to the position shown (engine shown removed for clarity). | | | -
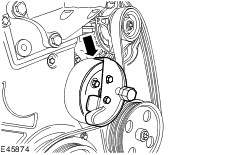
NOTE:Make sure that the accessory drive belt is correctly positioned into the grooves of the pulleys. Slide the accessory drive belt off the coolant pump pulley and reposition around the accessory drive belt installation tool and generator pulley in the position shown (engine shown removed for clarity). | | | -
CAUTION:Make sure that the accessory drive belt is correctly aligned to the accessory drive belt installation tool. Failure to follow this instruction may result in damage to the accessory drive belt. Rotate the accessory drive belt installation tool clockwise by hand until the accessory drive belt tension has increased (engine shown removed for clarity). | | | -
CAUTION:Make sure that the accessory drive belt installation tool does not become trapped between the coolant pump pulley and the accessory drive belt. Failure to follow this instruction may result in damage to the accessory drive belt. CAUTION:Make sure that this step is carried out from in front of the engine mounting. Failure to follow this instruction may result in damage to the accessory drive belt and installation tool. NOTE:Make sure that the accessory drive belt is correctly positioned into the grooves of the pulleys. Install the accessory drive belt. (engine shown removed for clarity). - Using a suitable spanner, rotate the accessory drive belt installation tool approximately 45 degrees clockwise and hold.
- Using a second spanner, continue to rotate the accessory drive belt installation tool clockwise until the the accessory drive belt has been installed.
| | | -
Using a suitable tool release the accessory drive belt installation tool locking tang from the coolant pump pulley. | | | -
Raise and support the vehicle.
For additional information, refer to: Lifting (100-02 Jacking and Lifting, Description and Operation).
| | | -
NOTE:Only turn the engine in the normal direction of rotation. Turn the engine through approximately 90 degrees so the center of the accessory drive belt guide tool is in the 3 o'clock position. | | | -
Remove and discard the accessory drive belt guide tool. | | | -
NOTE:Only turn the engine in the normal direction of rotation. Turn the engine through 720 degrees. | | | -
Check that the accessory drive belt is correctly positioned into the grooves of the pulleys. - Repeat step 16 if the accessory drive belt is misaligned.
- Discard the accessory drive belt installation tools.
| | | -
Install the A/C compressor belt installation tool (supplied in the parts kit) to the crankshaft pulley at the 7 o'clock position (engine shown removed for clarity). | | | -
Install the A/C compressor belt around the A/C compressor pulley, under the crankshaft pulley and around the A/C compressor belt installation tool. | | | -
Rotate the A/C compressor belt installation tool clockwise by hand until the A/C compressor belt tension has increased. | | | -
NOTE:Only turn the engine in the normal direction of rotation. NOTE:Guide the A/C compressor belt onto the crankshaft pulley by hand as the crankshaft pulley is rotated. Turn the engine until the A/C compressor belt installation tool is at the 3 o'clock position. | | | -
Remove the A/C compressor belt installation tool. | | | -
NOTE:Only turn the engine in the normal direction of rotation. Turn the engine through 360 degrees. | | | -
Check that the A/C compressor belt is correctly positioned in the grooves of the pulleys. - Repeat step 23 if the A/C compressor belt is misaligned.
- Discard the A/C compressor belt installation tool.
| | | -
Install the right-hand front splash shield. | | | -
Install the accessory drive belt splash shield. | | | -
Install the right-hand front wheel and tire.
For additional information, refer to: Wheel and Tire (204-04 Wheels and Tires, Removal and Installation).
| | |