| Removal and Installation Special Tool(s) | | Disconnect tool, spring-lock coupling 3/8" (red) 310-026 (23-023 A) | | | Disconnect tool, spring-lock coupling 5/8” (black) 412-038 (34-003) | Removal | | -
Evacuate the air conditioning (A/C) system.
For additional information, refer to: Klimaanlage entleeren, evakuieren und befüllen (412-00, General Procedures).
| | | -
Raise and support the vehicle.
For additional information, refer to: Anheben mit Hebebühne (100-02, Description and Operation).
| | | -
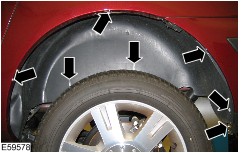
Remove the left-hand rear wheelhouse cover. | | | -
Detach the front inlet and outlet line of the auxiliary evaporator from the rear wheelhouse. | | | -
CAUTION:Close off the refrigerant lines to prevent entry of contamination. Use the special tool to detach the rear inlet and outlet line of the auxiliary evaporator from the front inlet and outlet line of the auxiliary evaporator. | | | -
CAUTION:Close off the refrigerant lines to prevent entry of contamination. Use the special tool to detach the rear inlet and outlet line of the auxiliary evaporator from the front inlet and outlet line of the auxiliary evaporator. | | | -
Detach the load space trim on the left-hand side.
For additional information, refer to: Linke Verkleidung - Laderaum (501-05, Removal and Installation).
| | | -
CAUTION:Close off the refrigerant lines and the expansion valve to prevent contamination. Remove the rear inlet and outlet line of the auxiliary evaporator. - Detach the rubber aperture gasket from the wheel house and pull the refrigerant line out through the opening.
| Installation | | -
NOTE:Install new refrigerant line O-rings. NOTE:Coat the refrigerant line O-rings with clean refrigerant oil before installation. Install the components in reverse order. | | |