
LTD Wagon V8-302 5.0L (1986)
Heater Core Case: Service and Repair
With Automatic Temperature Control (ATC)
REMOVAL
1. Disconnect the negative (ground) cable from the battery negative (-) terminal.
2. Disconnect the heater hoses from the heater core tubes and position for minimum coolant loss.
3. Plug the heater core tubes securely to prevent coolant leakage from the heater core during plenum removal.
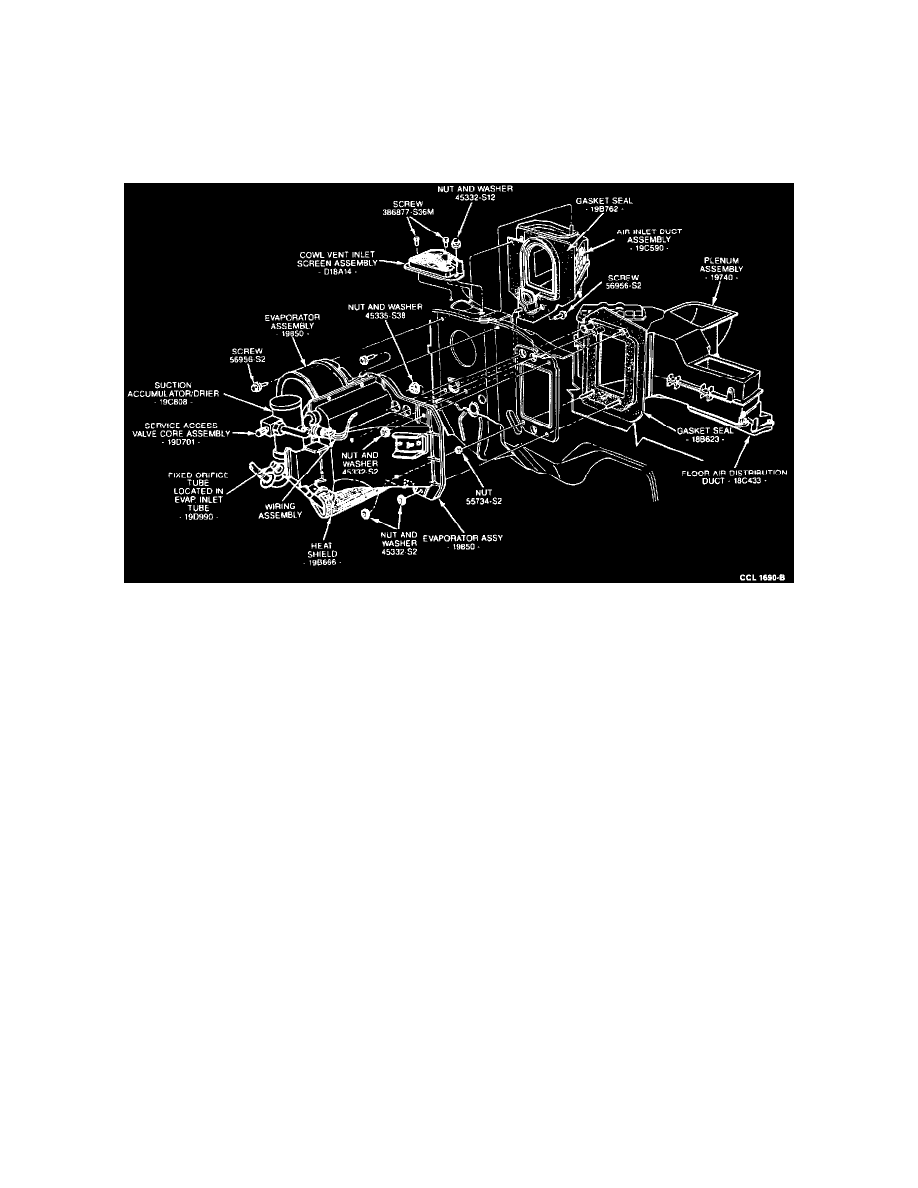
Plenum And Air Inlet Duct Removal
4. Remove one bolt located below the windshield wiper motor attaching the left end of the plenum to the dash panel.
5. Remove one nut retaining the upper left corner of the evaporator case to the dash panel.
6. Disconnect the control system vacuum supply hose from the vacuum source and push the grommet and vacuum supply hose into the passenger
compartment.
7. Remove the three glove compartment hinge screws, disconnect the check strap, and remove the glove compartment.
8. Loosen the right door sill plate and remove the right side cowl trim panel.
9. Remove the bolt attaching the lower right end of the instrument panel to the side cowl.
10. Remove the instrument panel pad.
11. Disconnect the temperature control cable from the ATC sensor.
12. Disconnect the vacuum harness line connector from the ATC sensor harness and disconnect electrical plug from ATC servo plug.
13. Disconnect the ATC sensor tube from the sensor and evaporator case connector.
14. Disconnect the vacuum jumper harness at the multiple vacuum connector near the floor air distribution duct.
15. Disconnect the white vacuum hose from the outside-recirculate door vacuum motor.
16. Remove two screws attaching the passenger (rear) side of the floor air distribution duct to the plenum. It may be necessary to remove the two
screws attaching the partial (lower) panel door vacuum motor to the mounting bracket to gain access to the right screw.
17. Remove one plastic push fastener retaining the floor air distribution duct to the left end of the plenum and remove the floor air distribution duct.
18. Remove two nuts from the two studs along the lower flange of the plenum.
19. Carefully move the plenum rearward to allow the heater core tubes and the stud at the top of the plenum to clear the holes in the dash panel. Then,
remove the plenum from the vehicle by rotating the top of the plenum forward, down and out from under the instrument panel. Carefully pull the
lower edge of the instrument panel rearward as necessary while rolling the plenum from behind the instrument panel.
INSTALLATION
1. Route the vacuum supply hose through the dash panel and seat the grommet in the opening.
2. Position the plenum under the instrument panel with the register duct opening up and the heater core tubes down. Rotate the plenum up behind the
instrument panel and position the plenum to the dash panel. Insert the heater core tubes and mounting studs through their respective holes in the
dash panel and the plenum.
3. Install two nuts on the studs along the lower flange of the plenum.
4. Install one bolt below the windshield wiper motor to attach the left end of the plenum to the dash panel.
5. Install one nut to retain the upper left corner of the evaporator case to the dash panel.
6. Position the floor air distribution duct to the plenum and install two screws and the plastic push fastener.