| Removal and Installation 2. Remove the components in the order indicated in the following illustration(s) and table(s). 1 - Center console side trim screws 2 - Center console side trim 3 - Center console extension side screws 5 - Gear lever housing cover 7 - Dashboard console upper screws 8 - Center console extension upper screws 10 - Center console bracket screws 13 - Connector for center vent nozzle air outlet temperature sensor 3. To install, reverse the removal procedure. Removal Details Item 4 : Gear lever gaiter | | -
Pull the gear lever gaiter upwards in order to access the gear lever housing cover. | Item 6 : Clock console | | -
Remove the passenger's side footwell trim. | | | -
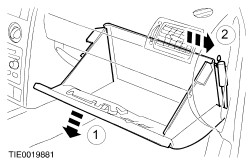
Detach the opening damper from the glove compartment. - Open the glove compartment in order to access the opening damper.
- Push the upper part of the opening damper away from the glove compartment.
| | | -
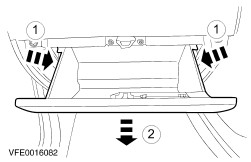
Remove the glove compartment. - Press the sides towards the center to release the glove compartment.
- Pull the glove compartment out of the hinges.
| | | -
CAUTION:Release the clock console retaining clips though the glove compartment aperture in order to prevent damage to the dashboard. CAUTION:Support the screwdriver on suitable padding to avoid damage to the dashboard console. Detach the clock console from the dashboard console. | Item 9 : Center console extension Item 12 : Dashboard console | | -
Remove the center screws from the dashboard console. | Item 14 : Center vent nozzle air outlet temperature sensor | | -
Turn the center vent nozzle air outlet temperature sensor counter-clockwise through 90 degrees and remove. | |