| Removal and Installation Suitable draw cord with a minimum length of three meters Knife Removal | | -
Remove the A-pillar trim panel.
For additional information, refer to: A-Pillar Trim Panel (501-05 Interior Trim and Ornamentation, Removal and Installation).
| | | -
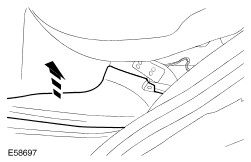
Detach the scuff plate trim panel. | | | -
Detach the scuff plate trim panel (to aid removal lift the rear seat cushion). | | | -
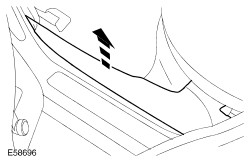
Detach the door opening weatherstrips from the B-pillar. | | | -
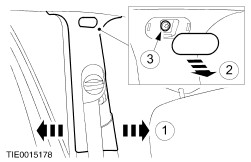
Detach the B-pillar upper trim panels from the B-pillar and position them to one side (left-hand shown right hand similar). - Detach the locating tangs from the B-pillar lower trim panel.
- Remove the screw cover.
- Remove the retaining screw.
| | | -
Remove the lower B-pillar trim panel. | | | -
Remove the scuff plate trim panel. | | | -
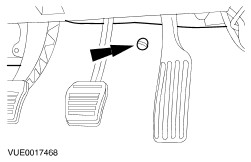
Remove the drivers side carpet retaining clip. - Position the carpet to one side.
| | | -
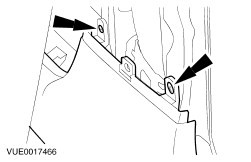
Remove the floor console side trim panel. - Remove the retaining screw.
- Detach the retaining clips.
| | | -
Disconnect the microphone cable electrical connector. | | | -
Detach the microphone cable from the floor. | | | -
- Feed the microphone cable under the carpet.
| | | -
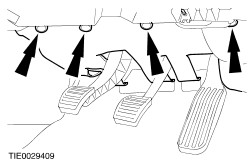
Detach the instrument panel lower panel from the instrument panel. - Remove the retaining screws.
- Detach the retaining clips.
| | | -
Remove the insulation pad (if equipped). | | | -
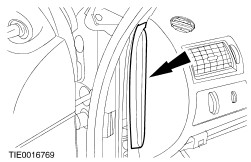
Remove the instrument panel side trim panel. | | | -
NOTE:Do not place excessive strain on the headlamp switch wiring harness. Remove the headlamp switch. - Release the locking tangs.
- Detach the headlamp switch from the Instrument panel.
- Disconnect the headlamp switch electrical connector.
| | | -
Remove the instrument panel register from the instrument panel register duct. - Release the locking tangs.
- Remove the instrument panel register from the instrument panel register duct.
| | | -
Remove the instrument panel register duct. - Remove the retaining bolt.
- Remove the instrument panel register duct from the blower motor duct.
| | | -
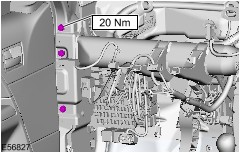
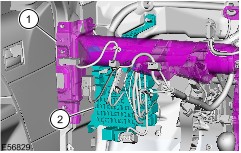
Remove the in-vehicle crossbeam retaining bolts (instrument panel shown removed for clarity). | | | -
Remove the central junction box (CJB) retaining bolts (instrument panel shown removed for clarity). | | | -
Detach the CJB. (instrument panel shown removed for clarity). - Lever the in-vehicle crossbeam.
- Detach the CJB and position to one side.
| | | -
Remove the headliner wiring harness retaining clip. | | | -
Detach the noise vibration harshness (NVH) material from the body. | | | -
Detach the microphone cable from the headliner wiring harness. | | | -
CAUTION:Make sure the microphone cable does not become trapped between the NVH material and the body when pulling up through the instrument panel. Failure to follow this instruction may result in damage to the microphone cable. NOTE:Do not place excessive strain on the microphone wiring harness. | | | -
Remove the overhead console.
For additional information, refer to: Overhead Console (501-12 Instrument Panel and Console, Removal and Installation).
| | | -
CAUTION:Take care not to damage the headliner. NOTE:The remaining section of the microphone cable will remain glued to the headliner. Using a suitable knife, cut the microphone cable in the positions shown (headliner shown removed for clarity). - Discard the microphone cable
| Installation | | -
NOTE:Make sure the safety belt shoulder height adjuster locking control is correctly located on the safety belt shoulder height adjuster. NOTE:Using suitable tape, secure the microphone cable to the headliner next to the original microphone cable. To install, reverse the removal procedure. | | |