| Removal and Installation Ford approved diagnostic tool NOTE:If a new PCM is being installed connect the diagnostic tool. Upload the PCM configuration information using the programmable modules installation routine prior to commencing the removal of the PCM. | | -
Using the diagnostic tool, perform the PCM configuration procedure. | | | -
Disconnect the battery negative cable.
For additional information, refer to: Battery Disconnect and Connect (414-01 Battery, Mounting and Cables, General Procedures).
| | | -
Remove the passenger’s side front side trim. | 4. Remove the components in the order indicated in the following illustration(s) and table(s). 5. To install, reverse the removal procedure. NOTE:If a new PCM is being installed connect the diagnostic tool. Download the PCM configuration information using the programmable modules installation routine after the installation of the PCM. NOTE:If the PCM is replaced, always perform each adjustment procedure using the following steps. | | -
Using the diagnostic tool, perform the PCM data reset procedure. | | | -
Perform engine immobilize programming programming.
For additional information, refer to: Engine Immobilizer Programming (419-01B Anti-Theft - Passive, General Procedures).
3 | | | -
CAUTION:Continuously cranking the engine for over 30 s can damage the battery and the starter. Continue cranking the engine for 30 s and stop for 5-10 s until the engine starts. | | | -
Turn the engine switch to the off position. | | | -
Turn the engine switch to the ON position (Engine off). | | | -
Using the diagnostic tool, perform the KOEO self-test procedure. | | | -
Turn the engine switch to the off position. | | | -
Using the diagnostic tool, perform the KOER self-test procedure. | | | -
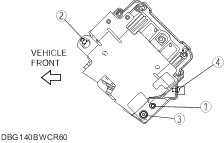
Turn the engine switch to the off position. | Removal Details Item 1 : PCM Cover | | -
Drill the set bolt using a drill bit with a diameter larger than the shank until the head is removed. - If the shank remains, remove it using locking pliers.
| | | -
Clean all foreign material from the PCM connectors. | Installation Details Item 1 : PCM Cover | | -
Tighten the PCM cover bolts in the order indicated in the figure. - Install new set bolts to No. 2, 3 and 4 locations in the figure, and tighten them until the neck of the bolt breaks off.
| |