CAUTION:Do not remove the overdrive one-way clutch. Damage to the clutch may occur if it is removed.
NOTE:The overdrive one-way clutch is serviced with the overdrive center shaft component.
Remove the overdrive center shaft from the overdrive ring gear.
Remove the retaining ring.
While rotating counterclockwise remove the overdrive center shaft from the ring gear.
Clean and inspect the overdrive one-way clutch and overdrive center shaft.
Inspect for cracks in the roller cage and wear on the roller clutch and the press fit of the one-way clutch to the overdrive center shaft.
Inspect the one-way clutch.
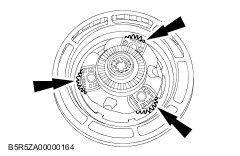
Temporarily insert the overdrive planetary gear carrier component into the one-way clutch rollers for verification of the one-way clutch.
The planetary gear must rotate counterclockwise and hold when rotated clockwise.
Remove the planetary gear carrier component.
NOTE:Individual parts of the planetary carriers are not serviceable.
Before installing a planetary component, the shaft retaining pins should be checked for adequate staking. Check the pins and shafts in the planetary assemblies for loose fit and/or complete disengagement. Install a new planetary component if necessary.
Inspect the pinion gears for damaged or excessively worn teeth and for free rotation.
Inspect the overdrive one-way clutch inner race and the inner and outer races for scored or damaged surface areas where the rollers contact the races.
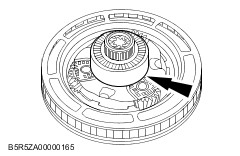
Remove and inspect the No.2 overdrive planetary thrust bearing on the nose of the overdrive planetary gear carrier component.
NOTE:Inspect the sun gear for damaged or worn teeth.
Remove the carrier adapter.
CAUTION:Do not attempt to remove the thrust bearing (No.12) from behind the pinion gears.
Remove and inspect the overdrive sun gear.
Inspect the thrust bearing (No. 12) for damage.
Assembly
NOTE:Thoroughly clean all parts and blow dry with moisture-free compressed air.
NOTE:Use petroleum jelly to hold the thrust bearing (No.2) in place.
Install the No.2 overdrive planetary thrust bearing.
CAUTION:Make sure that the No.12 bearing is in place in the overdrive planetary prior to installing the overdrive sun gear.
Install the overdrive planetary gear carrier into the center shaft and overdrive.
CAUTION:Adapter part number must not be visible after installation.
Install the overdrive sun gear with the recessed gear teeth facing toward the adapter.
NOTE:Inspect the sun gear for damaged or worn teeth.
Install the carrier adapter.
Install the overdrive center shaft and one-way clutch.
Install the overdrive center shaft and one-way clutch.