| In-vehicle Repair Special Tool(s) | | Installer, Differential Bearing Cone 205-066 (15-033) | | | Adapter for 205-066 205-066-02 (15-033-02A) | | | Preload Gauge 205-067 (15-041) | | | Universal Flange Holding Wrench 205-072 (15-030A) | | | Installer, Differential Bearing Cone 205-073 (15-034) | | | Installer, Drive Pinion Seal 205-077 (15-047A) | | | Remover, Differential Bearing Cone 205-176 (15-074) | | | Remover, Bearing/Gear 205-310 (15-091) | | | Remover, Bearing/Gear 205-311 (15-092) | | | Socket, Bearing Retainer 307-325 (17-072) | Removal | | -
Remove the differential case.
For additional information, refer to: Differential Case - VIN Plate Axle Code: E/F/H/J/K/L/R (205-02A Rear Drive Axle/Differential, In-vehicle Repair).
| | | -
Remove the drive pinion flange and drive pinion seal.
For additional information, refer to: Drive Pinion Flange and Drive Pinion Seal - VIN Plate Axle Code: E/F/H/J/K/L/R (205-02A Rear Drive Axle/Differential, In-vehicle Repair).
| | | -
NOTE:Measure and make a note of the removed shims thickness. Remove the drive pinion. - Use a soft-faced hammer, tap the drive pinion and remove it through the rear of the differential housing.
- Remove the thrust washer.
- Remove and discard the outer bearing cone.
- Remove the drive pinion outer bearing shims.
| | | -
Using the special tools, remove the drive pinion inner bearing cone. - Discard the bearing cone.
| | | -
Remove the drive pinion inner bearing shim(s). | | | -
Note the numbers etched on the drive pinion: - Matched pair number – this number will also be found on the differential ring gear.
- Best height setting number.
| Installation | | -
NOTE:The best height setting number is etched on the drive pinion. Calculate the required inner bearing shim thickness. Note the best height setting figure etched on both the old and new drive pinion and adjust the new shim thickness by adding or subtracting the value shown in the table from the original inner bearing shim thickness to compensate for the difference of these two figures. Pinion Shim Adjustment (inches) | Old Pinion Marking | New Pinion Marking | | -10 | -8 | -5 | -3 | 0 | +3 | +5 | +8 | +10 | | +10 | +0.020 | +0.018 | +0.015 | +0.013 | +0.010 | +0.007 | +0.005 | +0.002 | 0 | | +8 | +0.018 | +0.016 | +0.013 | +0.011 | +0.008 | +0.005 | +0.003 | 0 | -0.002 | | +5 | +0.015 | +0.013 | +0.010 | +0.008 | +0.005 | +0.002 | 0 | -0.003 | -0.005 | | +3 | +0.013 | +0.011 | +0.008 | +0.006 | +0.003 | 0 | -0.002 | -0.005 | -0.007 | | 0 | +0.010 | +0.008 | +0.005 | +0.003 | 0 | -0.003 | -0.005 | -0.008 | -0.010 | | -3 | +0.007 | +0.005 | +0.002 | 0 | -0.003 | -0.006 | -0.008 | -0.011 | -0.013 | | -5 | +0.005 | +0.003 | 0 | -0.002 | -0.005 | -0.008 | -0.010 | -0.013 | -0.015 | | -8 | +0.002 | 0 | -0.003 | -0.005 | -0.008 | -0.011 | -0.013 | -0.016 | -0.018 | | -10 | 0 | -0.002 | -0.005 | -0.007 | -0.010 | -0.013 | -0.015 | -0.018 | -0.020 | | | | -
Install the inner bearing shim(s). | | | -
Using the special tool, install the drive pinion inner bearing cone. | | | -
NOTE:The original outer bearing shim pack value must be increased or decreased by the same value as the adjustment made to the inner bearing shim pack. NOTE:If the inner bearing shim pack has been increased, the outer bearing shim pack must be increased by the same amount. If the inner bearing shim pack has been decreased, the outer bearing shim pack must be decreased by the same amount. Install an outer bearing shim pack. | | | -
Install the drive pinion. | | | -
Using the special tool, install the drive pinion outer bearing cone. | | | -
NOTE:Do not install the drive pinion seal at this stage. NOTE:Do not install a new drive pinion flange locknut at this stage. Using the special tool, install the thrust washer and drive pinion flange. | | | -
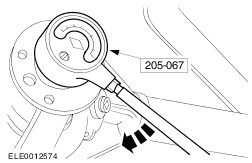
NOTE:The turning torque value should be between 2.8 Nm and 5.8 Nm. NOTE:If the measured turning torque value exceeds specification increase the outer bearing shim pack thickness as necessary. If the measured turning torque value is lower than specification decrease the outer bearing shim pack thickness as necessary. Using the special tool, measure the drive pinion turning torque. - Adjust the outer bearing shim pack to obtain the drive pinion turning torque specification.
| | | -
Using the special tool, remove the drive pinion flange. | | | -
Install the drive pinion flange and drive pinion seal.
For additional information, refer to: Drive Pinion Flange and Drive Pinion Seal - VIN Plate Axle Code: E/F/H/J/K/L/R (205-02A Rear Drive Axle/Differential, In-vehicle Repair).
| | | -
Install the differential case.
For additional information, refer to: Differential Case - VIN Plate Axle Code: E/F/H/J/K/L/R (205-02A Rear Drive Axle/Differential, In-vehicle Repair).
| | |