
Liberty 4WD V6-3.7L (2009)
6. Remove the glove box from the instrument panel. See: Body and Frame/Interior Moulding / Trim/Glove Compartment/Service and
Repair/Instrument Panel Glove Box - Removal.
7. Remove the grab handle from the instrument panel. See: Body and Frame/Interior Moulding / Trim/Glove Compartment/Service and
Repair/Instrument Panel Glove Box - Removal
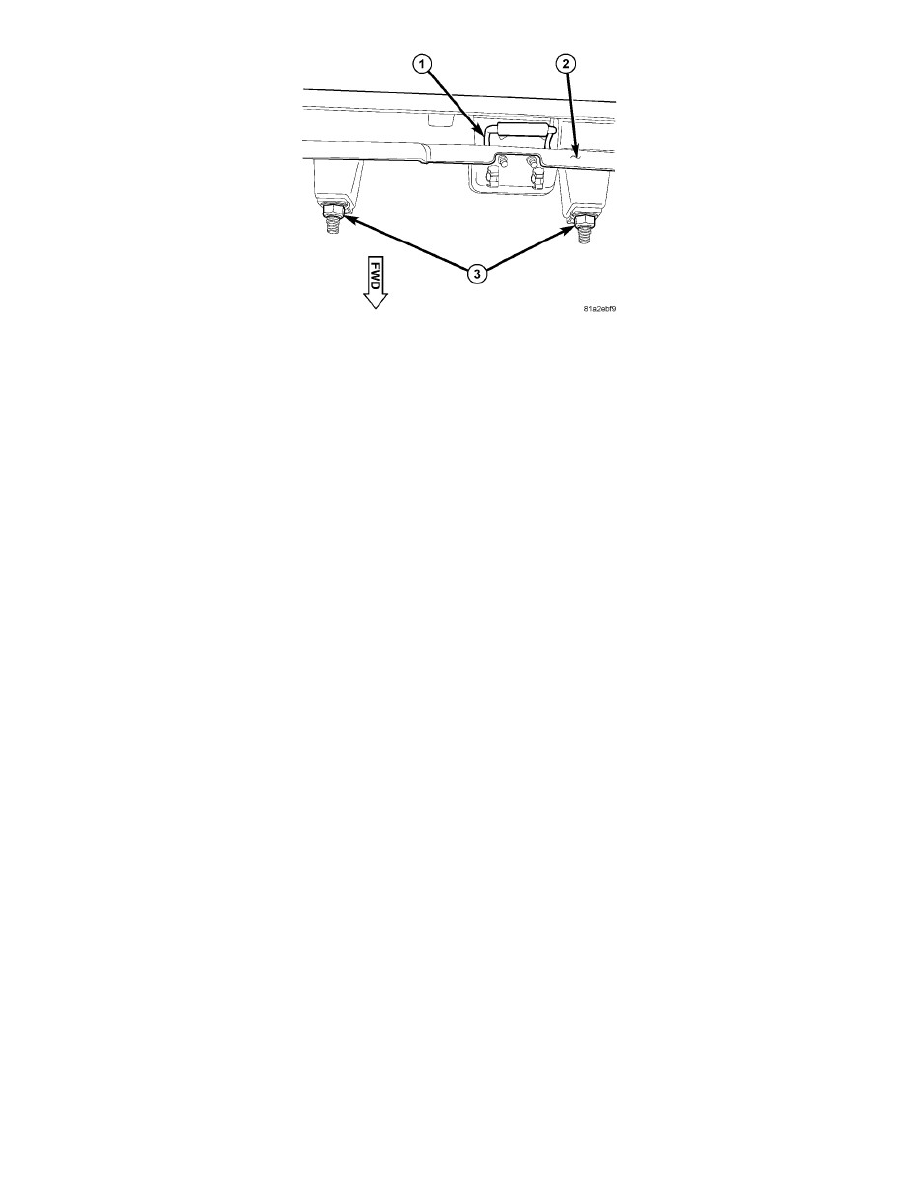
8. Reach up into the instrument panel above the upper glove box opening (2) to access and remove the two nuts (3) that secure the passenger airbag
lower studs to the instrument panel base trim on each side of the glove box latch striker (1).
9. Using a trim stick or another suitable wide flat-bladed tool, gently pry the lower edge of the passenger airbag door rearward away from the upper
glove box opening reinforcement far enough to disengage the snap features on the door from the receptacles in the instrument panel base trim.
10. Grasp the lower edge of the passenger airbag door and gently pull the door and airbag rearward far enough to disengage the upper snap features
from the receptacles in the instrument panel base trim and to access the two instrument panel wire harness connections to the airbag inflators at
each side of the airbag housing.
CAUTION: Do not pull on the instrument panel wire harness take outs or pry on the connector insulators to disengage the connectors from the
passenger airbag inflator connector receptacles. Improper removal of these take outs and their connector insulators can result in
damage to the airbag circuits or connector insulators.
11. The instrument panel passenger airbag wire harness connectors are secured by integral latches to the airbag inflator connector receptacles, which
are located on the sides of the passenger airbag housing. Depress the latches on each side of each connector insulator and pull the insulators
straight out from the airbag inflator to disconnect them from the connector receptacles.
12. Remove the passenger airbag, airbag door and instrument panel bracket from the instrument panel as a unit.
Passenger Air Bag - Installation
INSTALLATION
WARNING: Disable the Supplemental Restraint System (SRS) before attempting any steering wheel, steering column, airbag, Occupant
Classification System (OCS), seat belt tensioner, impact sensor or instrument panel component diagnosis or service. Disconnect
and isolate the negative battery (ground) cable, then wait two minutes for the airbag system capacitor to discharge before
performing further diagnosis or service. This is the only sure way to disable the SRS. Failure to follow these instructions may
result in accidental airbag deployment and possible serious or fatal injury.
WARNING: To avoid serious or fatal injury, use extreme care to prevent any foreign material from entering the passenger airbag, or becoming
entrapped between the passenger airbag cushion and the passenger airbag door. Failure to observe this warning could result in
occupant injuries upon airbag deployment.
WARNING: To avoid serious or fatal injury, the passenger airbag door must never be painted. Replacement passenger airbag units are
serviced with doors in the original colors. Paint may change the way in which the material of the airbag door responds to an
airbag deployment. Failure to observe this warning could result in occupant injuries upon airbag deployment.
NOTE: The following procedure is for replacement of an ineffective or damaged passenger airbag. If the airbag is ineffective or damaged, but
not deployed, review the recommended procedures for handling non-deployed supplemental restraints. See: Service and Repair . If the
passenger airbag has been deployed, review the recommended procedures for service after a supplemental restraint deployment
before removing the airbag from the vehicle. See: Service and Repair .