seat Workshop Repair Guides

SEAT Workshop Service and Repair Manuals

Secondary shaft: adjustment > < Secondary shaft: Assembly overview
Secondary shaft: Disassembling and assembling
Consult the equivalence table for tools and equipment according to applicability among Seat / VW / Audi / Skoda → Chapter.
   
Special tools and workshop equipment required
t  Base -A 81124-, see equivalent → Anchor
t  Extractor kit -T20140 -, see equivalent → Anchor
t  Extractor kit -U 40100B -, see equivalent → Anchor
t  Kit (case) -U 40200A-
t  Kit (case) -U 40300-

   
Remove the outer track of the small roller bearing .
–  Place adapter -T20140/1- on clutch casing and screw extractor shaft into adapter -T20140/20 - until claws expand.
–  Work nut -1- until outer track of small roller bearing is extracted.
  Note
Release the claws and then expand again after the outer ring has been pulled out by approx.1 mm so that it sits completely on the base of the outer ring.
  E35-0186
Install the outer track of the small roller bearing
–  Fit the ring under the outer track and using the adapter -U 40200/10- and the adapter -U 40200/12- fit the outer track of the small roller bearing.
  E35-0030
Removing the small roller bearing
–  Put the layshaft in a vice with protected jaws -A-, so that the 4th gear mesh is facing the vice screw.
–  Place adapter -T20022/48- under the roller bearing and tighten hard.
  E35-0154
Install the small roller bearing
–  Install flat base -U 40100/3- below the 4th gear mesh, and position adapter -U 40200/19- side A oriented towards the small roller bearing.
  E35-0155
Remove bush for needle bearing, the 4th gear mesh, synchromesh unit of 3rd and 4th gear, 3rd gear mesh and 2nd gear mesh from layshaft.
–  Install base plate -U 40100/3- below the gear of the 2nd gear, and position the adapter -U 40300/2- as shown in the drawing.
  E35-0033
Remove bush for gear needle roller bearing, synchromesh unit for 1st and 2nd gear and 1st gear mesh from layshaft.
–  Remove the safety ring with pliers -A 81124-.
  E35-0172
Removing the large roller bearing
  E35-0035
Install the large roller bearing
installation position
The roller bearing side with the smaller diameter must face adapter -U 40200/18-.
  E35-0036
Check wear on synchromesh rings of 1st, 3rd and 4th gears
–  Before checking for wear, thoroughly clean the synchromesh rings and their corresponding gears.
–  Place synchromesh ring on the corresponding pinion cone. Press the synchromesh ring on the gear, and measure the clearance „a“ with a feeler gauge.
  V35-0975
Synchroniser ring
Dimension „a“ on
new
synchromesh
Wear limit
1st gear
3rd gear
4th gear
1,0 ... 1.7 mm0.5 mm

   
Disassemble and assemble the synchromesh assembly of the 1st and 2nd gear
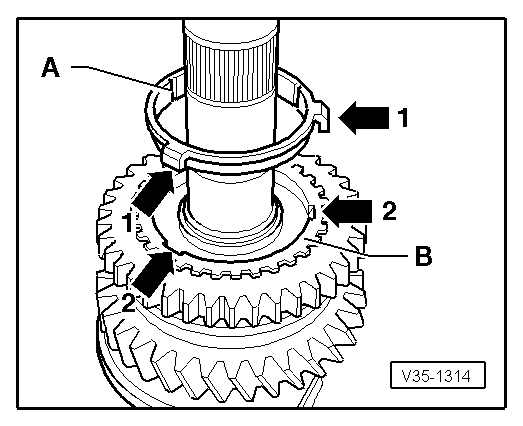
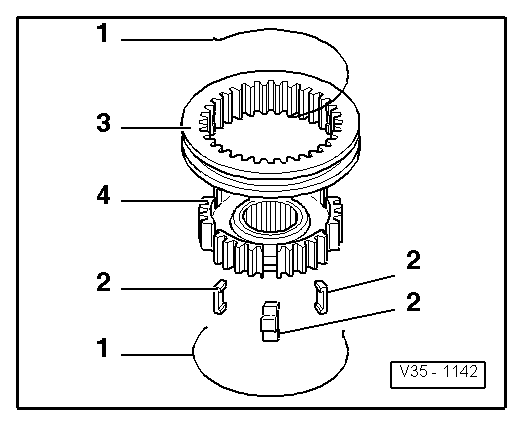
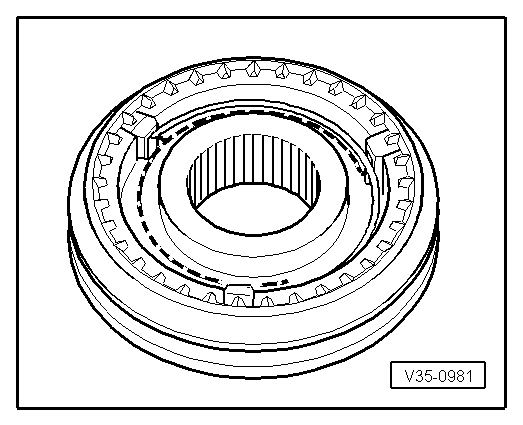
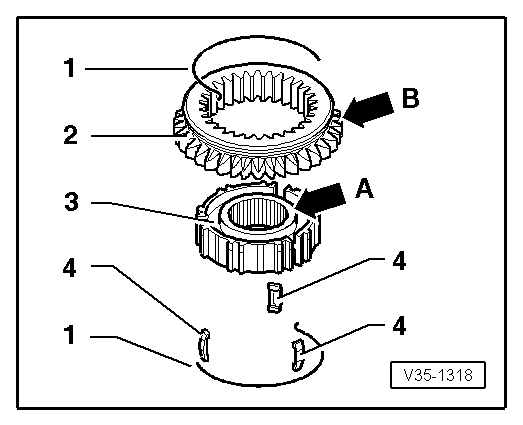
–  To remove the synchromesh assembly of the 1st and 2nd gear, remove the springs -1- and move the sliding sleeve -2- completely upwards.
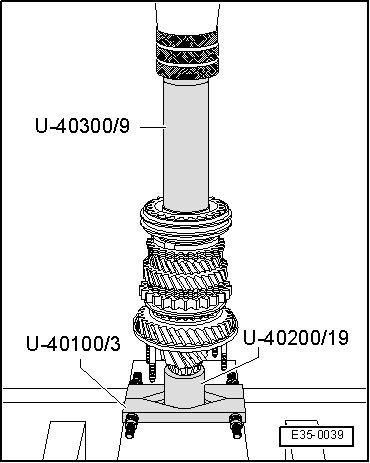
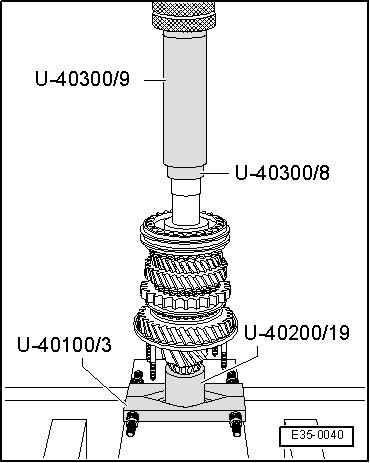
Fit the synchromesh assembly of 1st and 2nd gear in the following way:
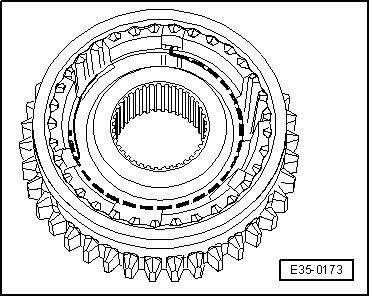
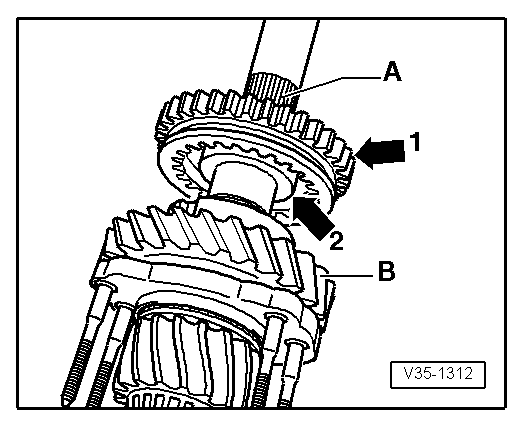
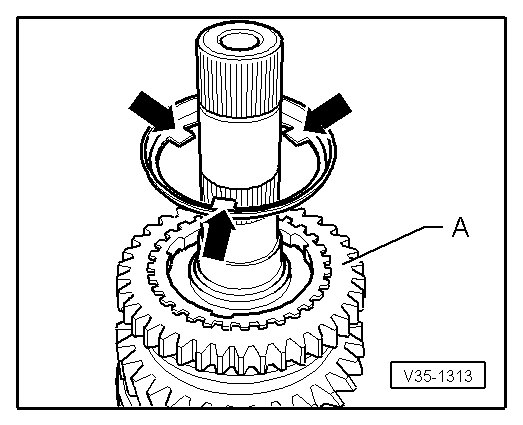
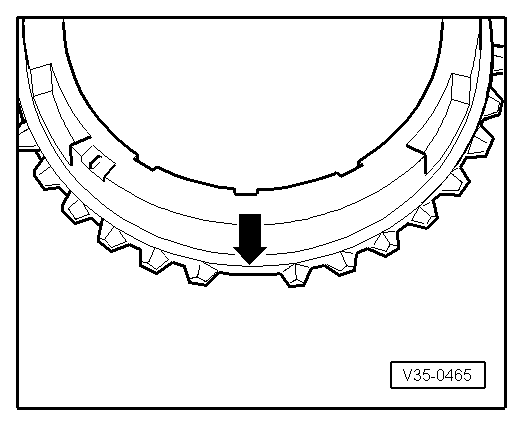
–  Place the mobile sleeve -2- on the synchromesh hub -3-, so that the grooves for the locking pins -4- on both components coincide.
installation position
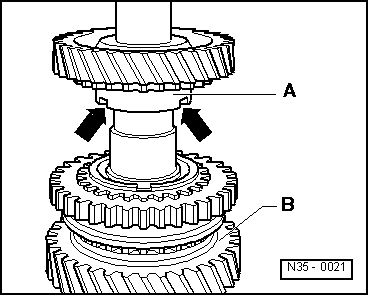
Install the mobile sleeve on the synchromesh hub, so that after assembly they are situated with the widest collar on the synchromesh hub -A-, and the outer cogs on the slide -B- facing opposite directions.
  V35-1318
Assemble the synchromesh assembly of the 1st and 2nd gear
–  The sliding sleeve must be fitted onto the synchromesh hub.
–  Fit locking elements and install springs separated 120°. The angled ends of the springs must be inside the locking keys.
  E35-0173
Installation position of the synchromesh unit of 1st and 2nd gear
–  The teeth -1- of the sliding sleeve must be orientated towards the cogs -A- for seating the synchromesh unit of 3rd and 4th gear.
–  The collar -2- of the synchromesh hub must be orientated towards the mesh -B- of 1st gear.
  V35-1312
Install the synchromesh assembly of the 1st and 2nd gear on the secondary shaft
–  Fit the 1st gear synchromesh ring on the 1st gear mesh.
–  Place the base plate -U 40100/3- with the adaptor - U 40200/19- with side A facing conical roller bearing.
–  Turn synchromesh gear so that the cut-outs coincide with the locking keys.
–  After installing the synchromesh unit, fit the safety ring using pliers - A 81124-.
  E35-0037
Identification of the rings for the 1st and 2nd gear
–  1st and 2nd gear synchromesh 3 recesses -arrows-.
  E35-0174
Check the inside synchromesh ring of 2nd gear for wear
–  Before checking for wear, thoroughly clean the synchromesh rings and their corresponding gears.
–  Place synchromesh ring on the corresponding pinion cone. Press the synchromesh ring on the gear, and measure the clearance „a“ with a feeler gauge.
  V35-1138
Synchroniser ring
Dimension „a“ on
new
synchromesh
Wear limit
2. gear0,75 ... 1.25 mm0.3 mm

   
Check the outside synchromesh ring of 2nd gear for wear
–  Before checking for wear, thoroughly clean the synchromesh rings and their corresponding gears.
–  Place synchromesh ring on the corresponding pinion cone. Press the synchromesh ring on the gear, and measure the clearance „a“ with a feeler gauge.
  V35-1137
Synchroniser ring
Dimension „a“ on
new
synchromesh
Wear limit
2. gear1,2 ... 1.8 mm0.5 mm

   
Installation position of middle synchromesh ring for 3rd gear
–  The projections -arrows- must be orientated towards the 1st gear mesh -A-.
  V35-1313
Installation position of inner synchromesh ring for 2nd gear
–  The projections -arrows 1- of the 2nd gear interior synchromesh ring -A- must fit into the grooves -arrows 2- of the synchromesh ring -B-.
  V35-1314
Installation position of 2nd gear pinion
–  The collar -A- of the 2nd gear mesh must be orientated towards the 1st gear mesh -B-.
–  The recesses -arrows- of the pinion of 2nd gear -A- must fit into the projections of the middle synchromesh ring.
  N35-0021
Install bush for gear needle roller bearing
–  Install the gear needle roller bearing for the 2nd gear mesh and the thrust washer.
–  Place the base plate -U 40100/3- with the adaptor - U 40200/19- with side A facing conical roller bearing.
–  Place the adapter -U 40300/8- with side B orientated towards the bush and the adapter -U 40300/9- between the pressure plate and the adapter -U 40300/8-.
  E35-0038
Disassembling and assembling the synchromesh unit of 3rd and 4th gears
–  To remove the synchromesh assembly of the 3rd and 4th gear, remove the springs -1- and move the sliding sleeve -3- completely upwards.
Fit the synchromesh assembly for 3rd and 4th gear in the following way:
–  Place the mobile sleeve -3- on the synchromesh hub -4-, so that the grooves for the locking pins -2- on both components coincide.
  V35-1142
Assemble the synchromesh assembly of the 3rd and 4th gear
–  The sliding sleeve must be fitted onto the synchromesh hub.
–  Fit locking elements and install springs separated 120°. The angled ends of the springs must be inside the locking keys.
  V35-0981
Installation position of the synchromesh unit of 3rd and 4th gear
–  The bevelled edge collar -arrow- on the synchromesh hub must face the 4th gear mesh.
  V35-1145
Installation of synchromesh assembly of 3rd and 4th gear on secondary shaft
–  Place the base plate -U 40100/3- with the adaptor - U 40200/19- with side A facing conical roller bearing.
–  Turn synchromesh gear so that the cut-outs coincide with the locking keys.
  E35-0039
Identification of synchromesh rings for 3rd and 4th gear
–  3rd and 4th gear synchro ring: 3 teeth are needed -arrow-.
  V35-0465
Install bush for gear needle roller bearing
–  Place the base plate -U 40100/3- with the adaptor - U 40200/19- with side A facing conical roller bearing.
–  Place the adapter -U 40300/8- with side B orientated towards the bush and the adapter -U 40300/9- between the pressure plate and the adapter -U 40300/8-.
  E35-0040
Install bush for gear needle roller bearing
–  Fit attack washer before installing bush for gear needle roller bearing.
–  Place adapter -U 40300/3- with adapter -U 40200/19- with side A orientated towards roller bearing.
–  Locate adapter -U 40300/8- with side A facing the bush.
  E35-0041

Secondary shaft: adjustment > < Secondary shaft: Assembly overview