seat Workshop Repair Guides

SEAT Workshop Service and Repair Manuals

Drive shaft with constant velocity joint: repairs > < Removing
Fitting
Fitting
The assembly operations are carried out in the reverse order of the disassembly with some exceptions.
Before fitting clean the remains of paint and/or corrosion on the screw thread of the exterior joint.
   
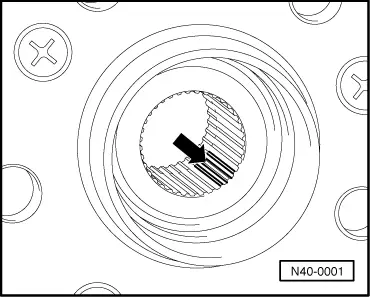
The points of the cogs -arrow- are slightly flattened. This is to avoid the existence of play between the flanks of the exterior joint cogs and the hub.
Fit the dodecagonal nut
  Note
t  To tighten the dodecagonal nut, use the retightening angle measurement tool -T20030-.
t  If the tool is not available, the dodecagonal nut can be tightened using the following method.
–  Oil the contact surface of the dodecagonal nut and tighten as much as possible.
–  Lower the vehicle until the wheels partially touch the ground.
–  Tighten the dodecagonal nut using a torque of 200 Nm and loosen by one turn.
–  Turn the nut to a torque of 50 Nm to begin.
  N40-0001
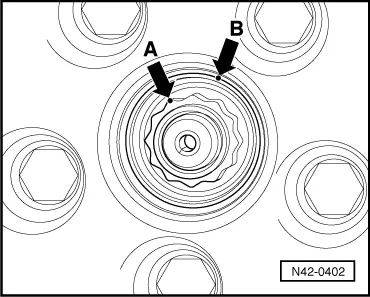
–  Mark the head of the nut with a line -Arrow A-.
–  Mark a second line -arrow B- on the edge of the wheel hub, over the following notch.
–  Continue to turn the dodecagonal nut until the marks coincide.
  N42-0402
Tightening torques:
CV joint to gearbox attachment.45 Nm
Tripod joint housing to gearbox40 Nm
Self-locking dodecagonal nut
Use a new nut
50 Nm + 1/8 turn (45º)
Attaching the wheel110 Nm

Grease the joints
  Note
t  Quantity of grease: for the constant velocity joint exterior and interior, apply 90 grams of -G 000 603- to each one.
t  Grease distribution for the exterior constant velocity joint: introduce half of the grease into the joint; the other half should be distributed evenly over the dust guard.
t  When replacing the dust guard, if necessary, grease the joint.
t  Removing and fitting the articulated half shafts → Chapter.
   

Drive shaft with constant velocity joint: repairs > < Removing