Leon Mk2
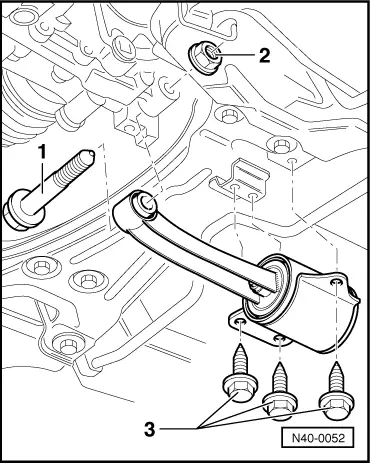
| I - Overview of assembly: Subframe, Swinging arm |
 Note
Note| t | If the vehicle has to be moved when the articulated half-shaft has been removed, an exterior articulation must be fitted instead of the half-shaft and tightened to 50 Nm to avoid damage to the wheel bearing. |
| t | No welding or straightening work can be done on the support and guide elements of the suspension system. |
| t | Always replace self-locking nuts following their removal. |
| t | Always replace corroded bolts/nuts. |

| 1 - | Support |
| q | Unscrewing and screwing → Fig. |
| 2 - | Hexagonal nut |
| q | 50 Nm |
| q | Replace after removing |
| q | Apply tightening torque to the hexagonal nut, immobilizing → Item the hexagonal nut so that the rubber tubing does not get twisted. |
| 3 - | Hexagonal nut |
| q | 20 Nm +90° (1/4 turn) tighten again |
| q | Replace after removing |
| 4 - | Hexagonal nut |
| 5 - | Subframe |
| q | Disassembly and assembly of subframes with swinging arm → Chapter |
| 6 - | Nut with retainer |
| q | The nut with retainer cannot be mended. If the nut is damaged all of the support must be replaced |
| 7 - | Rear bush for the swinging arm |
| q | Replace → Chapter, Swinging arm bonded rubber bushes: replacement |
| q | Note installation position |
| 8 - | Plate with nuts |
| 9 - | Hexagonal nut |
| q | 35 Nm |
| q | Replace after removing |
| 10 - | Swinging arm ball joint |
| q | Verification → Chapter |
| q | Removing and installing → Chapter |
| q | Before removing it, mark the fitting position, if the swinging arm is to be replaced, it must be adjusted in the enlarged orifice, and the convergence must be checked → Chapter, wheel alignment |
| q | Fitting position for the 13" running gear → Chapter |
| q | Fitting position for the 14" running gear → Chapter |
| 11 - | Hexagon head bolt |
| q | 20 Nm +90° (1/4 turn) tighten again |
| q | Replace after removing |
| 12 - | Hexagon head bolt |
| q | M12×1,5x80 |
| q | 70 Nm +180° (1/2 turn) tighten again |
| q | Replace after removing |
| 13 - | Spreader rivet |
| 14 - | Deflector |
| 15 - | Front socket for the swinging arm |
| q | Replace → Chapter, Swinging arm bonded rubber bushes: replacement |
| 16 - | Hexagon head bolt |
| q | M12×1,5x100 |
| q | 50 Nm +180° (1/2 turn) tighten again |
| q | Replace after removing |
| 17 - | Swinging arm |
| q | Removing and installing → Chapter |
| 18 - | Hexagonal nut |
| q | M12×1,5x100 |
| q | 70 Nm +180° (1/2 turn) tighten again |
| q | Replace after removing |