seat Workshop Repair Guides

SEAT Workshop Service and Repair Manuals

Steering knuckle: repairs > < Wheelhouse bearing housing with wheel bearing/wheel hub unit
Wheel bearing assembly (steel): Removing and installing
Consult the equivalence table for tools and equipment according to applicability between Seat / VW / Audi / Skoda → Chapter.
   
Special tools and workshop equipment required
t  Hub cover extractor -VW 637/2-, see equivalency → Anchor
t  Puller sleeve -3241/4-, see equivalency → Anchor
t  Torque wrench -V.A.G 1332-, see equivalent → Anchor.
t  Torque wrench -V.A.G 1410-, see equivalent → Anchor.
t  Socket and key -T40027-

Removal:
–  Remove wheel.
   
–  Tap gently to detach grease cap from its seat.
  A42-0095
–  Pry off grease cap.
–  Fit wheel and lower vehicle onto its wheels.
  A42-0096
–  Loosen mounting bolt on hub only 90° otherwise the wheel hub can be damaged.
  WARNING
The vehicle must be on wheels while the screw is loosened and tightened.
Accident risk
–  Remove wheel.
–  Disassembly the brake disk → Brake system; Rep. gr. 46.
  Note
t  Tie up brake caliper to body with wire.
t  Do not suspend the brake caliper from the brake hose.
–  Remove coil spring → Chapter.
  A42-0248
–  Unscrew mounting bolts -1- from wheel hub.
–  Unscrew mounting bolts -3- on heat shield from brake disc and remove shield.
–  Remove wheel bearing and wheel hub -2-
  Note
If the wheel bearing/wheel hub can be pulled out manually from the wheel bearing housing, the wheel bearing is okay and can be reused.
  A42-0250
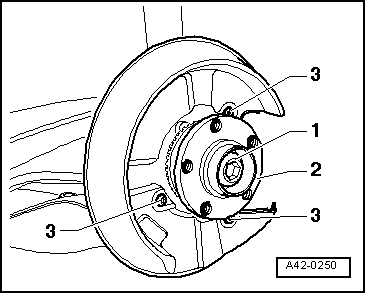
–  Unbolt speed sensor -2-.
–  Mark position of eccentric bolt -1- at top of wheel bearing housing.
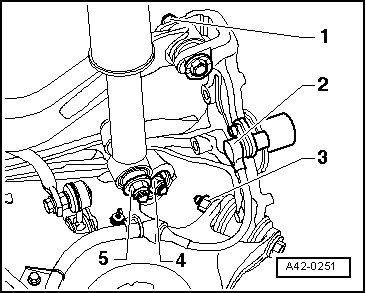
–  Detach the illustrated bolt connections in the following sequence: Item 5, Item 3, Item 4, Item 1.
–  Take out wheel bearing housing.
Installation
Installation is carried out in the reverse sequence; note the following:
  Note
t  Replace bolts and self-locking nuts ⇒ instructions in the exploded view from page → Chapter.
t  Bonded rubber bushes can only be turned to a limited extent. The mountings of the suspension links must therefore only be tightened when the suspension is in the unladen position → Chapter.
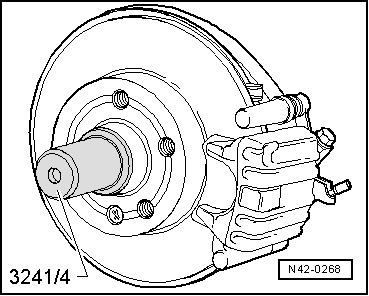
–  If required, install new wheel bearing and wheel hub unit ⇒ See note on page → Anchor.
  A42-0251
–  Tighten bolt connections -1-, -3-, -4- and -5-.
–  Install the speed sensor -2 - → Item.
–  Screw heat shield, brake caliper and brake disc to wheel bearing housing → Brake disc; Rep. gr. 46 .
  A42-0251
–  First tighten the bolt -1- with a stipulated tightening torque. Avoid angular retightening (retightening if the vehicle on its wheels) → Item.
–  Install coil spring → Chapter.
Tightening torques:
t  Item 1 - (set eccentric bolt to previously marked position) → Item
t  Items. 3 and 4 - → Item
t  Item 5 - → Item
–  Tighten bolt -1 - → Anchor to specified tightening torque → Item.
  A42-0250
–  Drive in new grease cap.
–  Mount the wheels and the tighten the wheel bolts → Running gear, axles, steering; Rep. gr. 44
  Note
t  Always renew damaged (dented) grease caps.
t  Damaged (dented) grease caps may allow moisture to enter the bearing. Therefore, always use the tool shown in the illustration.
–  Wheel alignment → Chapter
Setting of the running gear must be done with an alignment stand recommended by SEAT.
  N42-0268

Steering knuckle: repairs > < Wheelhouse bearing housing with wheel bearing/wheel hub unit