skoda Workshop Repair Guides

Skoda Workshop Service and Repair Manuals

Removing and installing the bracket without the master cylinder (Fabia II 2011 ?; Roomster 2011 ?) > < Removing
Install
Install
Installation is performed in the reverse order, pay attention to the following points:
  Note
   
Replace self-locking nuts -1- and -2- for bracket -3- on front wall.
–  Install the clutch pedal switch -F36- → Chapter.
  N30-10123
–  If present, install crash strut -A-. To do so, tighten fixing screws -arrows- to tightening torque → Item.
–  Install the footwell vent → Heating and Air Conditioning; Rep. gr.87.
  S30-0216
Vehicles with start-stop system:
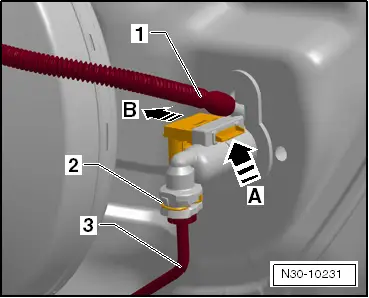
–  Insert the clutch position sender -G476- with connected electrical plug connection up to the stop on the master cylinder.
l  The clutch position sender must lock in place -arrow A-.
–  For checking, pull at clutch position sender-arrow B-.
Continued for all vehicles
–  Press in tube-hose line -3- onto the connection of the master cylinder, until the locking clip -2- is heard to click into position.
–  Fit return hose -1- on the master cylinder.
–  For checking, pull on the line.
–  Bleed the clutch control → Chapter.
–  If removed, install the engine control unit at the front wall → Engine; Rep. gr.23.
–  Install battery → Electrical System; Rep. gr.27.
–  Install air filter housing → Engine; Rep. gr.23.
  N30-10231
Tightening torques
Bracket/clutch pedal to front wall 1) → Item
Master cylinder to front wall 1) → Item

1) Replace self-locking nut.
   

Removing and installing the bracket without the master cylinder (Fabia II 2011 ?; Roomster 2011 ?) > < Removing