
Fabia Mk2
| Summary of components - foot controls (Fabia II 2011 ►; Roomster 2011 ►) |
 Note
Note| t | Summary of components - Hydraulics → Chapter. |
| t | After the battery earth strap is disconnected and connected, carry out additional operations → Electrical System; Rep. gr.27. |
| t | Grease all bearing points and contact surfaces with Polycarbamide Grease -G 052 142 A2-. |

| 1 - | Front wall |
| q | with mount for bearing bracket and master cylinder |
| 2 - | Bushing |
| q | for the top location hole in the bracket |
| q | The bushings for the bottom location hole in the bracket are located in the master cylinder |
| 3 - | Bearing bracket |
| q | removing and installing with master cylinder → Chapter |
| q | removing and installing without master cylinder → Chapter |
| 4 - | 25 Nm |
| q | for bracket on front wall |
| q | self-locking |
| q | 3 pieces |
| q | always replace → Electronic Catalogue of Original Parts |
| 5 - | Clutch pedal switch -F36- |
| q | removing and installing → Chapter |
| 6 - | Crash strut |
| q | is attached to the steering column |
| 7 - | 9 Nm |
| q | for crash strut -Pos. 6- at steering column |
| 8 - | Stop |
| q | for the clutch pedal |
| 9 - | Bearing bolt |
| q | always replace → Electronic Catalogue of Original Parts |
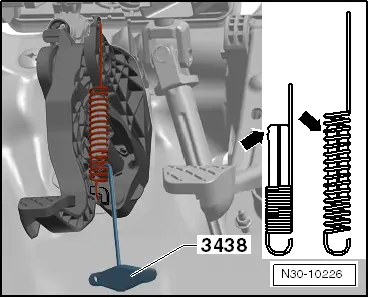
| 10 - | Over-centre helper spring |
| q | depending on the equipment version, a tension spring or an over-centre helper spring is installed |
| q | Assign components via the → Electronic catalogue of original parts |
| q | removing and installing → Chapter |
| 11 - | Clutch pedal |
| q | Removing and installing the over-centre helper spring → Chapter |
| q | removing and installing with tension spring → Chapter |
| 12 - | Bushing |
| 13 - | Tension spring with vibration damper |
| q | depending on the equipment version, a tension spring or an over-centre helper spring is installed |
| q | Assign components via the → Electronic catalogue of original parts |
| q | is inserted on the bracket -Pos. 3- and on the clutch pedal |
| q | removing and installing → Fig. |
| 14 - | Cap |
| 15 - | Support |
| q | only replace if the master cylinder has been removed |
| q | removing and installing → Chapter |
| 16 - | Master cylinder |
| q | removing and installing → Chapter |
| 17 - | Clamp |
| q | to remove and install the tube-hose line pull out retaining clip up to the stop |
| q | is pulled out from the side on certain master cylinders |
| 18 - | Gasket |
| q | always replace → Electronic Catalogue of Original Parts |
| q | stick onto the master cylinder |
| 19 - | Tubing |
| q | out of plastic → Fig. |
| 20 - | Clutch position sender -G476- |
| q | for vehicles with start-stop system |
| q | Assign components via the → Electronic catalogue of original parts |
| q | removing → Fig. |
| q | installing → Fig. |
| q | can be checked in the „targeted fault finding“ → Vehicle diagnostic tester |
|
|