skoda Workshop Repair Guides

Skoda Workshop Service and Repair Manuals

Switching off the fuel delivery unit using the crash signal > < Checking fuel operating pressure
Venting air from the fuel system
Special tools and workshop equipment required
t  Remote control, e.g. -V.A.G 1348/3A- with adapter cable -V.A.G 1348/3-2-
t  Adapter -V.A.G 1318/20-
t  Adapter -V.A.G 1318/20-1-
t  Current flow diagram
–  Remove cover from the fuse holder.
   
–  Remove fuse for protection of injection valves from the fuse carrier below the dash panel according to current flow diagrams → Current flow diagrams, Electrical fault finding and Fitting locations.
–  Connect the remote control -V.A.G 1348/3A- to the corresponding fuse holder and to battery positive (+) with the combination of adapter cables from the measuring tool set.
For vehicles Roomster
–  Remove engine cover with air filter → Chapter upwards.
Continued for all vehicles
  S20-0290
–  Unscrew the ventilation valve cap -arrow- on the fuel strip.
  S20-0108
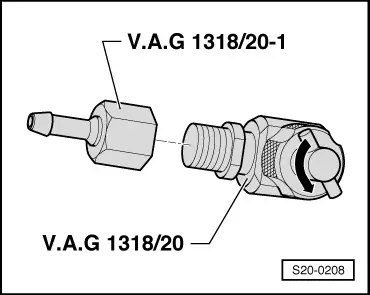
–  Screw adapter -V.A.G 1318/20-1- onto adapter -V.A.G 1318/20- (T-piece).
–  Turn the valve at T-piece anti-clockwise, until it is fully opened.
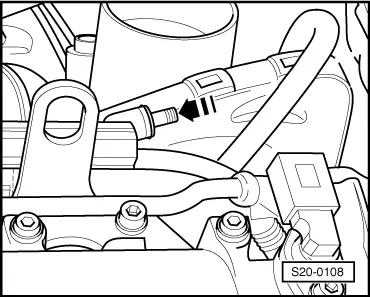
–  Screw adapter -V.A.G 1318/20- fully onto the vent valve on the fuel strip.
–  Connect hose with catch pan to adapter -V.A.G 1318/20-1-.
–  Screw valve at T-piece clockwise up to the stop into the vent valve.
–  Check the adapter and hose connections for leaktightness.
–  Activate remote control -V.A.G 1348/3A-.
–  As soon as fuel flows out of the hose without bubbles, unscrew valve at T-piece anti-clockwise, until no more fuel escapes.
–  Cover ventilation valve with a clean cloth.
–  Throttle the bleeder hose and pull off from adapter -V.A.G 1318/20-1-.
–  Unscrew adapter -V.A.G 1318/20- (T-piece) from the vent valve on the fuel strip.
–  Screw cap onto the vent valve on the fuel strip.
  S20-0208

Switching off the fuel delivery unit using the crash signal > < Checking fuel operating pressure