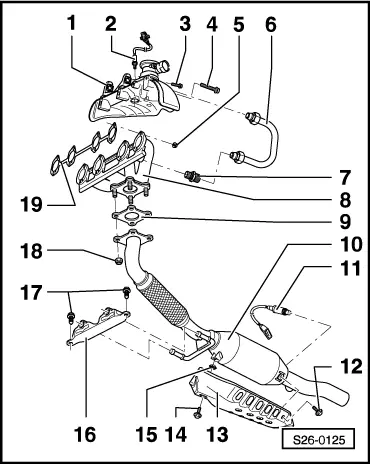
| Exhaust manifold, exhaust pipe with catalytic converter and attached parts |
| For engine with identification characters AEG, APK, AQY and AZH |
| –
| only for engines AQY, AZH |
| –
| only for engines AQY, AZH |
| 6 - | Bolted connection, 35 Nm |
| –
| only for engines AQY, AZH |
| 7 - | Lambda probe 1 downstream of catalytic converter -G39-, 50 Nm |
| –
| the thread of new lambda probes must be coated with assembly paste |
| –
| for re-used lambda probe, only coat the thread with hot bolt paste - G 052 112 A3-; the hot bolt paste -G 052 112 A3- must not get into the slots of the probe body |
| –
| use lambda probe wrench for removing and installing |
| –
| 4-pin for engines with identification characters AEG, APK and AQY |
| –
| 6-pin for engines with identification characters AZH |
| –
| for lambda probe and lambda probe heater |
| 9 - | Lambda probe 2 after catalytic converter -G130-, 50 Nm |
| –
| only for engines AQY, AZH |
| –
| the thread of new lambda probes must be coated with assembly paste |
| –
| for re-used lambda probe, only coat the thread with hot bolt paste - G 052 112 A3-; the hot bolt paste -G 052 112 A3- must not get into the slots of the probe body |
| –
| use lambda probe wrench for removing and installing |
| –
| only for engines AQY, AZH |
| –
| Contacts 3 and 4 gilded |
| –
| for lambda probe and lambda probe heater |
| 11 - | to the central silencer |
| 12 - | Front exhaust pipe with catalytic converter |
| –
| to remove, disconnect plug connection for lambda probe -pos. 10- and remove cable from fixtures |
| –
| coat with hot bolt paste -G 052 112 A3 - before inserting |
| –
| Observe fitting position: Slot for lambda probe points to the rear |
| For engine with engine code AZJ |

Note | The decoupling element in the front part of the exhaust pipe should not be bent by more than 10° - danger of damaging it. |
| 2 - | Lambda probe 1 downstream of catalytic converter -G39-, 50 Nm |
| –
| the thread of new lambda probes must be coated with assembly paste |
| –
| for re-used lambda probe, only coat the thread with hot bolt paste - G 052 112 A3-; the hot bolt paste -G 052 112 A3- must not get into the slots of the probe body |
| –
| use lambda probe wrench for removing and installing |
| –
| for secondary air injection system |
| 7 - | Bolted connection, 35 Nm |
| 10 - | Front exhaust pipe with catalytic converter |
| 11 - | Lambda probe 2 after catalytic converter -G130-, 50 Nm |
| –
| the thread of new lambda probes must be coated with assembly paste |
| –
| for re-used lambda probe, only coat the thread with hot bolt paste - G 052 112 A3-; the hot bolt paste -G 052 112 A3- must not get into the slots of the probe body |
| –
| use lambda probe wrench for removing and installing |
| –
| for catalytic converter |
|
|
|
