| Preparations for installing the window |
| Prepare flange for fitting: |
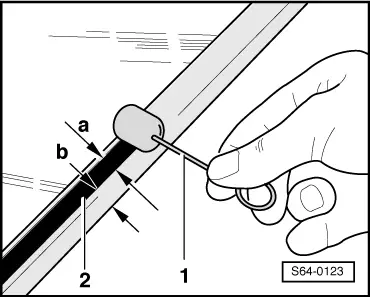
| –
| Cut back hardened PUR with the aid of e.g. the glass scraper -SC - 170- or the straightening knife -SB - 531- to approx. 1 mm thickness. |
| –
| Apply a thin coat of activator to the cut back glue layer. |
| –
| Allow activator to work in for at least 10 minutes. |

Note | t
| The remainder of the hardened adhesive cement serves as a base for newly applied adhesive cement. Keep the surfaces to be glued clean and free from grease. |
| t
| Only cut back the adhesive surface shortly before the installation. |
| t
| The activator must not come into contact with paintwork, otherwise it will be damaged. |
| t
| If the flange was only partly replaced or if the paintwork was damaged clean this area again after painting and treat with primer. |
| Work sequence for undamaged cut-out window: |
| –
| Cut back hardened PUR with the aid of e.g. the glass scraper -SC - 170- or the straightening knife -SB - 531- to approx. 1 mm thickness. |
| –
| Apply a thin coat of activator to the cut back glue layer. |
| –
| Allow activator to work in for at least 10 minutes. |
Note | t
| The remainder of the hardened adhesive cement serves as a base for newly applied adhesive cement. Keep the surfaces to be glued clean and free from grease. |
| t
| Only cut back the adhesive surface shortly before the installation. |
| t
| When cutting back the hardened PUR, do not damage the sealing nor the ceramic layer. |
| t
| Do not prime the adhesive surface and do not treat with cleaning agent. |
| Work sequence for a new window: |
| –
| Clean the window in the adhesive area all around with cleaning solution -D 009 401 04-. |
| –
| Apply primer -D 009 200 02-. |
Note | The ceramic layer on the windows is not a primer! It is absolutely essential to prime with -D 009 200 02- before applying the sealing material. |
|
|
|