Skoda Workshop Service and Repair Manuals
HOME
FEATURES
MENU
INDEX
ABOUT US
Removing and installing bottom trim panel of pillar C >
< Removing and installing top trim panel of pillar C (Octavia Combi II - vehicles without head airbag)
Octavia Mk2
Body
Body Work
Trim, noise insulation
Pillar and side trim panels
Removing and installing top trim panel of pillar C (Octavia Combi II - vehicles with head airbag)
Removing and installing top trim panel of pillar C (Octavia Combi II - vehicles with head airbag)
Removing and installing top trim panel of pillar C (Octavia Combi II - vehicles with head airbag)
WARNING
Safety regulations should be observed when handling the airbag units
→ Chapter
.
Disconnect battery earth strap
→ Electrical System
→ Rep. gr.27
.
Note
Violent disassembly of the upper trim panel for pillar C poses the risk of triggering the head airbag.
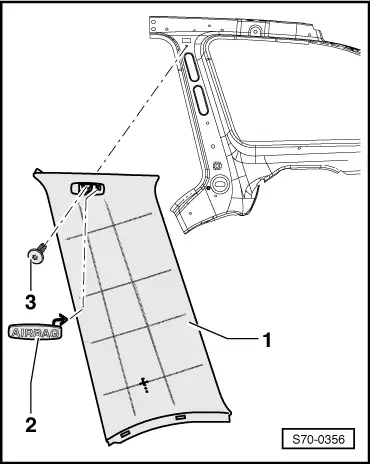
Removing:
–
Removing supports of the luggage compartment cover
→ Chapter
.
–
Lever out cap (Pos. 2).
–
Release screw
-3-
(3 Nm).
–
Unclip top trim panel of pillar C (Pos. 1) from pillar C.
Installing:
–
Installation is carried out in the reverse order; pay attention to the following points:
t
Pay attention to the sequence when connecting the battery
→ Electrical System
→ Rep. gr.27
.
Body
Body Work
Trim, noise insulation
Pillar and side trim panels
Removing and installing top trim panel of pillar C (Octavia Combi II - vehicles with head airbag)
Removing and installing bottom trim panel of pillar C >
< Removing and installing top trim panel of pillar C (Octavia Combi II - vehicles without head airbag)
 Note
Note WARNING