skoda Workshop Repair Guides

Skoda Workshop Service and Repair Manuals

Removing and installing heating element for additional air heatingZ35 > < Removing and installing parts of the heater unit - Part 3
Removing and installing heat exchanger
Special tools and workshop equipment required
t  Hose clamp -MP 7-602-
t  Hose clamp -T30096-
t  Pneumatic gun, commercially available
Removing
–  On vehicles with air conditioning system, switch on the ignition and set the highest possible temperature.
–  Switch off the ignition and all electrical components.
  DANGER!
The coolant temperature can be over 100 °C when the engine is warm. The cooling system is under pressure - risk of scalding!
Before repairs, reduce pressure and temperature if necessary.
   
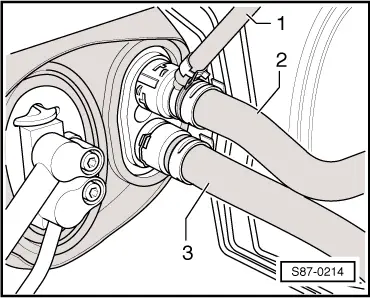
–  Pinch off coolant hose -1- with the hose clamp -MP 7-602-.
–  Pinch off coolant hoses -2- and -3- with hose clamp -T30096-.
  Note
If the heat exchanger is replaced, the coolant must be replaced. In this case let the coolant drain → Engine → Rep. gr.19, without pinching off the coolant hoses.
–  Separate the quick couplings at the heat exchanger.
  S87-0214
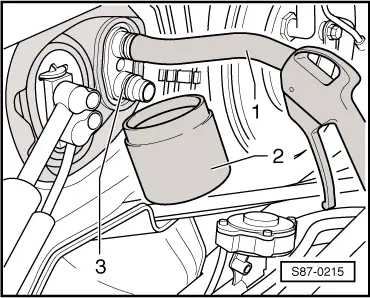
–  Place the hose -1- a little onto the upper connection.
–  Hold a container -2- below the lower connection -3-.
–  Carefuly blow with a pneumatic gun the remaining coolant out of the heat exchanger into the container -2-.
  S87-0215
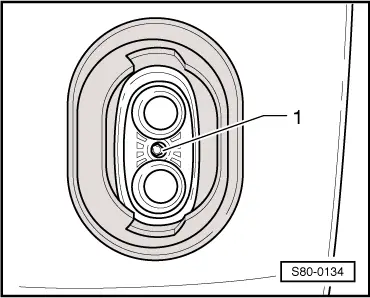
–  Unscrew screw -1- between the heat exchanger connections (hexagon; 6 mm).
–  Remove the side cover of the centre console on the left side → Body Work → Rep. gr.68.
–  Remove left footwell vent → Chapter.
  S80-0134
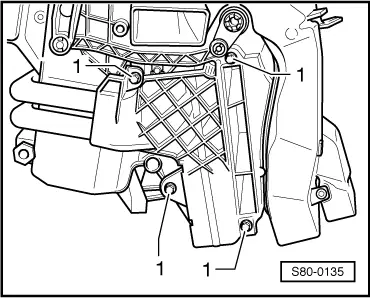
–  Unscrew screws -1- and remove the heat exchanger trim panel.
–  Cover the floor covering in the area below the heat exchanger with a liquid impermeable foil and absorbent paper.
  S80-0135
–  Open the hose clamps -1- and pull the coolant pipes out of the heat exchanger.
–  Remove the heat exchanger out of the heater unit.
Install
Installation is performed in the reverse order, pay attention to the following points:
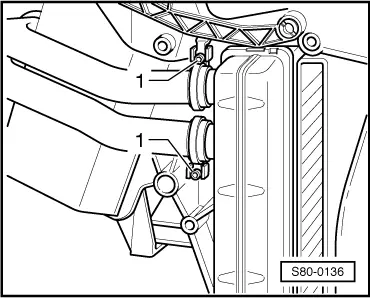
  S80-0136
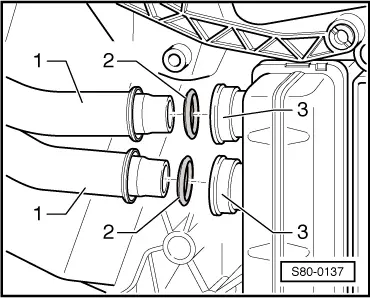
–  Moisten gasket rings -2- with coolant before installing.
–  Insert new gasket rings in the connections -3- of the heat exchanger.
–  Press the coolant pipes -1- into the connections -3-.
  S80-0137
–  Push the hose clamps -1- over the connection point. They must easily turn on the coolant pipes/flange-heat exchanger.
–  Hose clamps -1- must be attached as shown in the fig.
–  Tighten hose clamps -1- to 1.5 Nm.
  Note
t  Always replace the gasket rings.
t  In case of deformation of the hose clamps, these must be replaced.
t  Replace coolant after changing the heat exchanger.
  S80-0136
–  Screw in screw -1- between the heat exchanger connections.
   Make sure that the screw engages into the provided hole, if necessary press flange into the direction of the centre of the vehicle.
  S80-0134

Removing and installing heating element for additional air heatingZ35 > < Removing and installing parts of the heater unit - Part 3