Octavia Mk2
| Summary of components - Disassembling and assembling „Haldex coupling of the 2nd generation“ (final drive „02D/0AV“) |
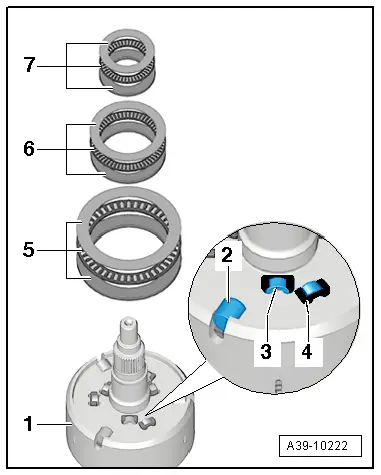
| 1 - | Plate clutch |
| q | Overview → Fig. |
| q | removing and installing → Chapter |
| 2 - | Screw, 6 Nm |
| 3 - | Pump for Haldex coupling -V181- |
| q | removing and installing → Chapter |
| 4 - | O-ring |
| q | Diameter 32 mm |
| q | for pump for Haldex coupling -V181- |
| q | moisten with oil for Haldex coupling and insert |
| q | always replace → Electronic Catalogue of Original Parts |
| 5 - | O-ring |
| q | Diameter 30 mm |
| q | for pump for Haldex coupling -V181- |
| q | moisten with oil for Haldex coupling and insert |
| q | always replace → Electronic Catalogue of Original Parts |
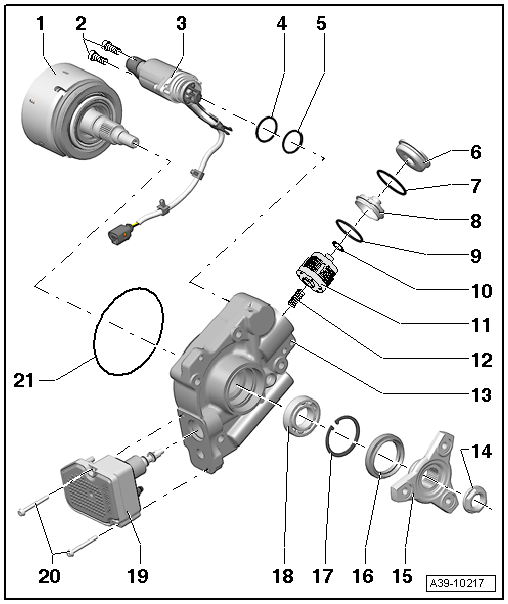
| 6 - | Screw plug, 35 Nm |
| 7 - | O-ring |
| q | moisten with oil for Haldex coupling and insert |
| q | always replace → Electronic Catalogue of Original Parts |
| 8 - | Oil filter carrier |
| 9 - | O-ring |
| q | moisten with oil for Haldex coupling and insert |
| q | always replace → Electronic Catalogue of Original Parts |
| 10 - | O-ring |
| q | moisten with oil for Haldex coupling and insert |
| q | always replace → Electronic Catalogue of Original Parts |
| 11 - | Oil filter |
| q | removing and installing → Chapter |
| 12 - | Over-centre helper spring |
| 13 - | housing for Haldex coupling |
| q | Removing and installing Haldex coupling completely → Chapter |
| q | remove from plate clutch → Chapter |
| 14 - | Snap nut, 210 Nm |
| q | always replace → Electronic Catalogue of Original Parts |
| q | secure with locking agent -D 000 600 A2- |
| 15 - | Flange of the Haldex coupling |
| q | removing and installing → Chapter |
| 16 - | Gasket ring for flange |
| q | removing and installing → Chapter |
| 17 - | Lock washer |
| q | removing and installing → Chapter |
| 18 - | Angular ball bearing |
| q | removing and installing → Chapter |
| 19 - | Four-wheel drive control unit -J492- |
| q | forms a single unit with the control valve for opening degree of coupling -N373- |
| q | with oil level and oil temperature sender -G437- |
| q | removing and installing → Chapter |
| 20 - | Screws, 6 Nm |
| 21 - | O-ring |
| q | moisten with oil for Haldex coupling and insert |
| q | always replace → Electronic Catalogue of Original Parts |