skoda Workshop Repair Guides

Skoda Workshop Service and Repair Manuals

Replace sealing flange on the gearbox side > < Replacing crankshaft seal on belt pulley side
Removing and installing the sealing flange on the belt pulley side
Special tools and workshop equipment required
t  Counterholder -T30004 (3415)- or Counterholer -MP 1-310 (3099)-
t  Assembly device -T10053-
t  Protective goggles and gloves
t  Sealant remover gasket stripper (bearing code GST, bearing article no. R 34402), manufacturer Retech s.r.o.
t  Cleaning and degreasing agent, e.g. -D 009 401 04-
t  Silicone sealant -D 176 404 A2-
Removing
l  Engine installed.
–  Removing toothed belt → Chapter.
   
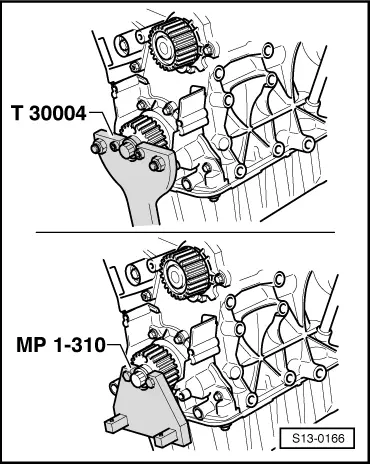
–  Remove crankshaft - toothed belt sprocket, to this end lock toothed belt sprocket with counterholder -T30004- or counterholder -MP 1-310-.
–  Drain engine oil:
t  Octavia II → BookletOctavia II.
t  Yeti → BookletYeti.
t  Superb II → BookletSuperb II.
–  Removing the oil pan → Chapter.
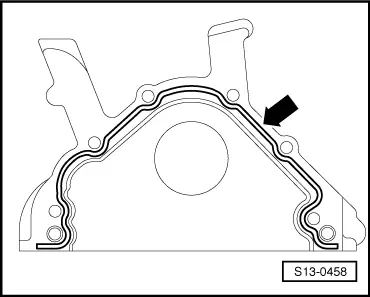
–  Unscrew the fixing screws of the front sealing flange and remove sealing flange, if necessary release by applying slight blows with a rubber-headed hammer.
–  Drive out the gasket ring from the removed sealing flange.
Install
Installation is performed in the reverse order, pay attention to the following points:
  WARNING
Wear protective gloves when working with sealant and grease remover!
–  Remove residual sealant from the sealing surfaces on sealing flange, cylinder block and on the oil pan with chemical sealant remover.
–  Degrease the sealing surfaces.
  Note
Pay attention to the use by date on the silicone sealant.
–  Cut off nozzle tube at the front marking (Ø of nozzle approx. 3 mm).
  S13-0166
–  Apply silicone sealant bead -arrow- to the clean sealing surface of the upper part of the sealing flange, as shown.
l  Thickness of sealant bead -arrow-: 2...3 mm.
  Note
t  The sealant bead must not be thicker than 3 mm otherwise excess sealant may get into the oil pan and clogg the strainer in the oil suction pipe.
t  The sealing flange must be installed within 5 minutes after applying the silicone sealant.
t  When installing the sealing flange with the gasket ring fitted place a guide sleeve -T10053/1- on the crankshaft journal.
–  Carefully push the sealing flange onto the dowel sleeves at the cylinder block and tighten new fixing bolts by hand.
–  Tighten the screws of the sealing flange alternately and crosswise to 15 Nm.
–  Installing the oil pan → Chapter.
–  Install the new gasket ring for the crankshaft on the belt pulley side → Chapter.
–  Installing the timing belt → Chapter.
–  Top up with engine oil and check the oil level:
t  Octavia II → BookletOctavia II.
t  Yeti → BookletYeti.
t  Superb II → BookletSuperb II.
  S13-0458

Replace sealing flange on the gearbox side > < Replacing crankshaft seal on belt pulley side