skoda Workshop Repair Guides

Skoda Workshop Service and Repair Manuals

Sliding roof > < Rear door - parts of the control/locking mechanism
Removing and installing the window pane of the rear door
Removing:
–  Remove rear door trim panel → Chapter.
–  Remove inner channel seal (Pos. 6) → Chapter. 6) → Chapter.
   
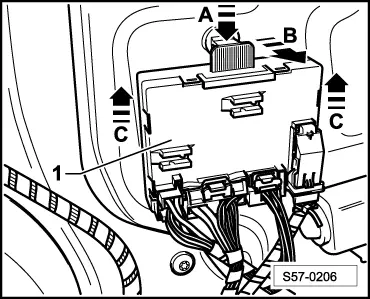
–  Press the retaining lug of the door control unit in -direction of arrow A-, swivel the control unit in -direction of arrow B- and pull the control unit in -direction of arrow C- out of the door assembly carrier.
t  The door control unit does not have to be removed. It can be tied up freely to the cables, while doing so pay attention to damage of the control unit, the plug connections and the cables.
  S57-0206
–  Unclip cap -1-.
–  Lower door window until adjusting pin -2- and straddling dowel -3- can be reached in the assembly carrier opening.
–  Screw an M5 screw (approximately 70 mm long) into the adjusting pin -2- and remove from straddling dowel -3-.
–  Screw an M8 screw (approximately 80 mm long) into the straddling dowel -3-.
  Note
Do not use excessive force when screwing the screw into the straddling dowel as it may fall into the door.
–  Withdraw the straddling dowel from the window lifter guide and hence from the door window pane.
–  Lower the window lifter as far as the stop.
–  Remove the outer trim panel for the door frame → Chapter.
–  Partially remove the window run seal (Pos. 4) → Chapter and take the rear window pane out of the door.
Installing:
–  Installation is carried out in the reverse order; pay attention to the following points:
  S58-0127
–  When securing the window pane in the power-window lifter observe the fitting position of the straddling dowel -3- and the straddle pin -4-.
1 - Window lifter
2 - Window pane
3 - Straddling dowel
4 - Adjusting pin
a = 0,75 ± 0.2 mm
  S58-0128

Sliding roof > < Rear door - parts of the control/locking mechanism