skoda Workshop Repair Guides

Skoda Yeti Workshop Service & Repair Manuals

Climatic, air conditioning system with manual control > < Repairing the air conditioning system - engine compartment
Removing and installing the air conditioning unit from the vehicle
(Climatic, air conditioning system with manual control and Climatronic)
Special tools and workshop equipment required
t  Hose clamp -T30096 (3093)-
t  Pneumatic gun, commercially available
  Note
t  Repairs must only be carried out in specialist service centres which have suitably trained personnel and are fitted out for working on the refrigerant circuit.
t  A second mechanic is required occasionally for removing and installing the air conditioning unit.
t  On certain engines remove the engine cover, the intake hose to the exhaust turbocharger, the DPF cover and if necessary the intake hose to the air filter for an easier access to the expansion valve → Engine, corresponding repair group.
Removing and installing
–  Drain the refrigerant circuit with the aid of the A/C service station.
–  Disconnect battery earth strap → Electrical System; Rep. gr.27.
–  Remove the centre console → Body Work; Rep. gr.68.
–  Removing the dash panel → Body Work; Rep. gr.70.
–  Remove bottom trim panel of pillar A on the front passenger side → Body Work; Rep. gr.70.
  DANGER!
The coolant temperature can be over 100 °C when the engine is warm. The cooling system is under pressure - risk of scalding!
Before repairs, reduce pressure and temperature if necessary.
–  Vehicles with cover plate in front of the expansion valve - remove cover plate for expansion valve → Chapter.
   
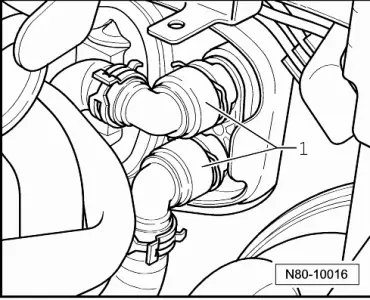
–  Secure the coolant hoses -1- to the heat exchanger with hose clamps (e.g. -T30096 (3093)-). If the coolant hoses are not secured, then the coolant must be drained.
  Note
If the heat exchanger is replaced, the coolant must be replaced. In this case, drain the coolant → Engine → Rep. gr.19.
–  Separate the quick couplings at the heat exchanger.
  N80-10016
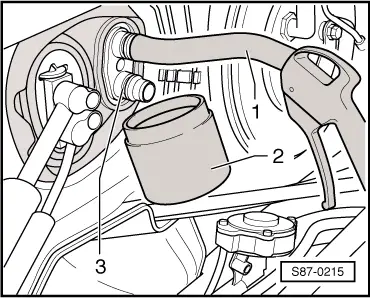
–  Place the hose -1- a little onto the upper connection.
–  Hold a container -2- below the lower connection -3-.
–  Carefuly blow with a pneumatic gun the remaining coolant out of the heat exchanger into the container -2-.
  S87-0215
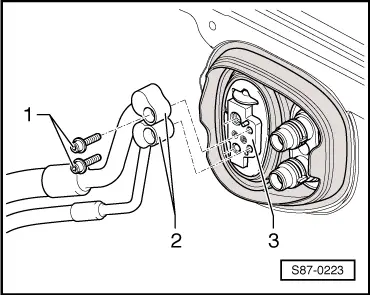
–  Release screws -1- of refrigerant lines -2-.
–  Remove the refrigerant lines from the expansion valve -3-.
–  Shut off the openings of the refrigerant lines and expansion valve.
–  Cover the floor covering in the vehicle interior with a liquid impermeable foil and absorbant paper.
  S87-0223
1 - Screw, 4.5 Nm
2 - Nut, 4,5 Nm
3 - Cable strap
4 - Air conditioning unit
q   Removing:
–  Remove the central pipe/dash panel - Pos. 8 → Body Work; Rep. gr.70.
–  Pull out and remove cable harnesses from the air conditioning unit.
–  Remove wiring loom from holder - Pos. 5.
–  Remove control unit for data bus diagnostic interface -J533- → Electrical System; Rep. gr.97.
–  Slightly swivel the air conditioning unit and remove from the rear duct towards the top.
–  Remove the air conditioning unit, while doing so carefully take out the wiring loom from the right cable strap.
q   Installing:
Installation is performed in the reverse order, pay attention to the following points:
–  First of all install the seal to the bulkhead from the passenger compartment and then guide the heat exchanger flange and the refrigerant connection through the seal → Fig..
–  Pay attention to the fitting position of the seal → Fig..
–  Ensure when installing the air conditioning unit that the water drainage connection is correctly fitted.
–  Remove the cover for the bore holes of the expansion valve.
–  Replace the O-rings of the coolant lines at the expansion valve.
–  Attach the refrigerant lines to the expansion valve → Chapter.
–  Top up coolant → Engine; Rep. gr.19.
–  Pay attention to the sequence when connecting the battery earth strap → Electrical System; Rep. gr.27.
–  Fill the refrigerant circuit with the aid of the A/C service station.
5 - Bracket, right
6 - Nut, 8 Nm
7 - Screws, 8 Nm
8 - Central pipe/dash panel
9 - Screws, 2 Nm
10 - Support
11 - Screws, 8 Nm
12 - Bracket, left
13 - Nut, 8 Nm

   
Install seal
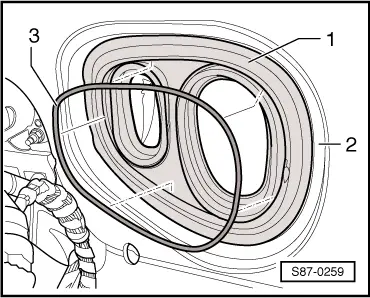
–  Insert the seal -1- from the passenger compartment into the bulkhead -2-.
   Pay attention to the correct positioning of the reinforcement (wire hanger) -3- in the seal -1-.
  S87-0259
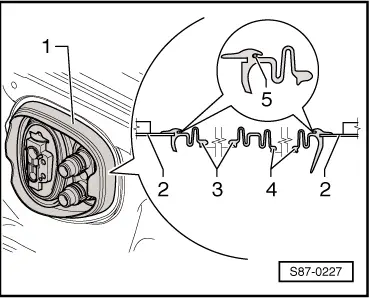
Seal for air conditioning unit/engine compartment
  Note
Pay attention to the fitting position of the seal -1-.
1 - Seal - it must be placed all around in the bulkhead
2 - Bulkhead
3 - Bead - it must be placed all around in the groove of the air conditioning unit
4 - Bead - it must be placed all around in the groove of the heat exchanger flange
5 - Reinforcement (wire hanger) - it must be placed all around in the groove of the seal
  S87-0227

Climatic, air conditioning system with manual control > < Repairing the air conditioning system - engine compartment