Drill away A-pillar Note: For easier access
to the row of spot welds on the lower sill, an area of the sill (1)
can be removed!
Install
Important: The door hinges on the
delivered A-pillar are only tack welded!
8.
Prepare A-pillar
•
Detach upper part of A-pillar Note: Do not damage top
of A-pillar.
•
Detach outer plate of sill panelling Note: Take care not to
damage it.
9.
Prepare A-pillar
•
Detach sill panelling reinforcement from new A-pillar at joint
flange
10.
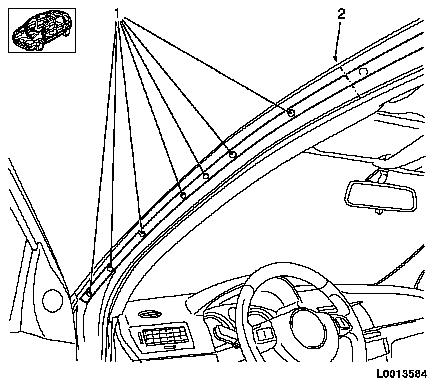
Prepare A-pillar Note: Pre-spot
operation: The number of spots is specified in the documentation
from the welding equipment manufacturer!
•
Incorporate 3x ( 8x24 mm ) slot
(1)
•
Make 7 slots (2) and (3) 6x20 mm
11.
Prepare sill panelling reinforcement on new A-pillar
•
Incorporate 3x ( 8x24 mm )
slot
12.
Prepare inner sill panelling and A-pillar Note: Pre-spot
operation: The number of spots is specified in the documentation
from the welding equipment manufacturer!
13.
Apply adhesive to bodywork flanges
14.
Adjust A-pillar to fit
Important: Observe special
parameter program!
15.
Weld A-pillar
16.
MIG-braze front A-pillar
17.
MIG-braze and PSO spot weld A-pillar reinforcement and sill
panelling reinforcement Note: Pre-spot
operation: See documentation from welding equipment
manufacturer!
Important: The old part that was
removed or the part cut off the A-pillar supplied can be used as a
filler for the sill panelling.
18.
Prepare sill panelling
•
Make slots 6 (8) x20 mm at
drilled spot welds Note: The number of
slots is equal to the number of drilled spot welds! The number of
slots depicted in the graphic is just an example!
19.
Apply adhesive from corrosion protection adhesive system to
sill panelling
20.
Adjust sill panelling to fit
21.
MIG-braze sill panelling Note: The number of
slots to be brazed is equal to the number of drilled spot welds!
The number of slots depicted in the graphic is just an example!
Important: Observe special
parameter program!
22.
Weld in sill panelling
23.
Apply adhesive from corrosion protection adhesive system 93 160
535/15 05 000 to upper A-pillar body flange
24.
Adjust upper part of A-pillar
25.
MIG-braze upper part of A-pillar
26.
Weld in upper part of A-pillar Note: Observe special
parameter program!
27.
Grind visible brazing seams to match contour
28.
Align and weld the tack-welded door hinges
29.
Fit rivet nut or plate nut for lower wing mounting in lower
A-pillar
30.
Cut rear mounting strip for roof frame additional seal to size
from new component and adjust
31.
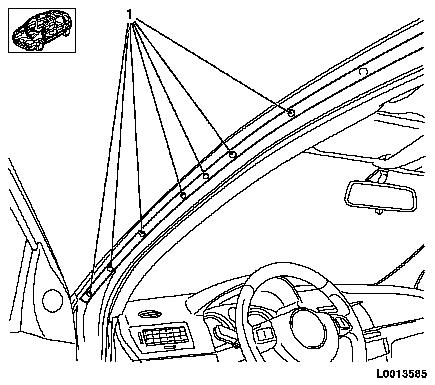
Drill fastening holes for roof frame additional seal strip
•
Fix mounting strip for roof frame additional seal with a
suitable tool
•
Drill 7x fastening hole for waterproof rivet through roof frame
additional seal strip and side panel (1)
32.
Install mounting strip for roof frame additional seal
•
Apply corrosion protection adhesive system 93 160 535 / 15 05
000 to mounting strip to provide additional seal to roof frame