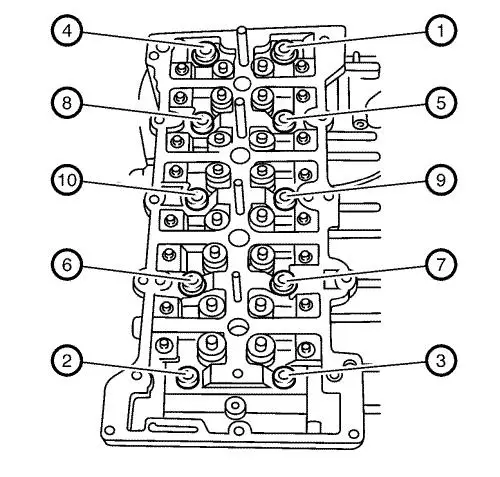
Cylinder Head Removal
| 1. |
Remove the 10 cylinder head
bolts as shown in sequence. |
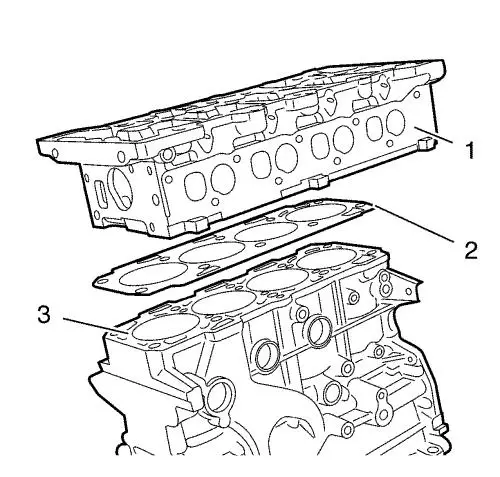
| 2. |
Remove the cylinder head
(1). |
| 3. |
Remove the cylinder head
gasket (2). |
| 4. |
Clean all of the gasket
surfaces. |
| 5. |
Use the following procedures
when cleaning the cylinder head and cylinder block surfaces
(3): |
|
Note: Do not use any other
method or technique to clean these gasket surfaces.
|
| |
|
|
| |
• |
Use a razor blade gasket
scraper to clean the cylinder head and cylinder block gasket
surfaces. Do not scratch or gouge any surface. |
|
Note: Be careful not to
gouge or scratch the gasket surfaces. Do not gouge or scrape the
combustion chamber surfaces. The feel of the gasket surface is
important, not the appearance. There will be indentations from the
gasket left in the cylinder head after all of the gasket material
is removed. These small indentations will be filled in by the new
gasket.
|
| |
|
|
| |
• |
Use a new razor blade for each
cylinder head and cylinder block. |
|
Note: Do not use a tap to
clean the cylinder head bolt holes.
|
| |
|
|
| |
• |
Hold the razor blade as
parallel to the gasket surface as possible. |
| 6. |
Clean the old sealer/lube and
dirt from the bolt holes. |
| 7. |
Clean the bolt holes with a
nylon bristle brush. |
|
Warning:
Wear safety glasses when using compressed air in
order to prevent eye injury. |
| 8. |
When cleaning the cylinder
head bolt holes use a suitable commercial spray liquid solvent and
compressed air from an extended-tip blow gun to reach the bottom of
the holes. |
|
