
Astra J
Control Valve Body Cover ReplacementRemoval Procedure
|
| 1. | Raise and support the vehicle. Refer to Lifting and Jacking the Vehicle . |
| 2. | Remove the front compartment insulator. Refer to Front Compartment Insulator Replacement . |
| 3. | Remove the radiator. Refer to Radiator Replacement . |
| 4. | Remove the transmission fluid cooler hose and seals. Refer to Transmission Fluid Cooler Hose Replacement . |
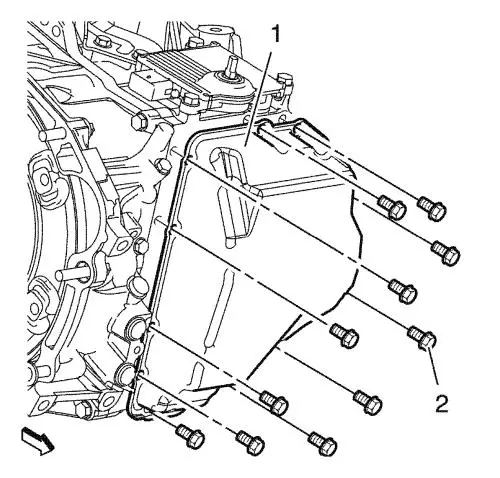
| 5. | Remove the 11 control valve body cover bolts (2). |
Note: Do not pry with a tool on the transmission control valve body cover, case or sealing surfaces. Release the valve body cover by gently tapping with a plastic hammer. Be careful not to damage the housing. |
| 6. | Remove the control valve body cover (1). |
| 7. | Remove the control valve body. Refer to Control Valve Body Replacement . |
Note: The valve body must be removed in order to prevent contamination when cleaning the sealing surfaces. |
| 8. | Clean the sealing surfaces and inspect the gasket mounting surface. |
Installation Procedure
| 1. | Install the control valve body. Refer to Control Valve Body Replacement . |
| 2. | Install a 3 mm (0.125 in) bead of sealer on to the control valve body cover. Refer to Adhesives, Fluids, Lubricants, and Sealers . |
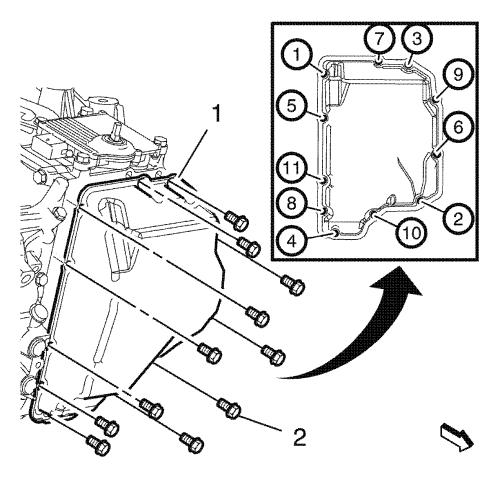
| 3. | Install the control valve body cover (2). |
| 4. | Install the 11 control valve body cover bolts (1) hand tight. Use locking agent on ALL bolts. |
Caution: Refer to Fastener Caution . |
| 5. | Tighten the control valve body cover bolts in sequence shown to 13 N·m (115 lb in) . |
| 6. | Install the radiator. Refer to Radiator Replacement . |
| 7. | Install the transmission fluid cooler hose and seals. Refer to Transmission Fluid Cooler Hose Replacement . |
| 8. | Check the transmission fluid level. Refer to Transmission Fluid Drain and Fill . |
| 9. | Install the front compartment insulator. Refer to Front Compartment Insulator Replacement |
| 10. | Lower the vehicle. |