|
End Shield, Disassemble and Assemble (F17+)
Note: Transmission
remains installed.
 Remove Remove
|
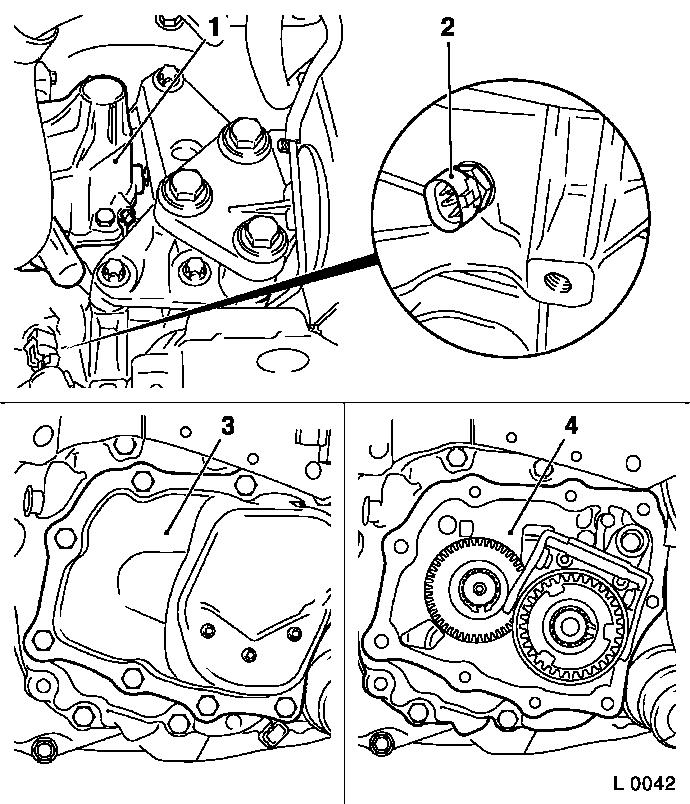
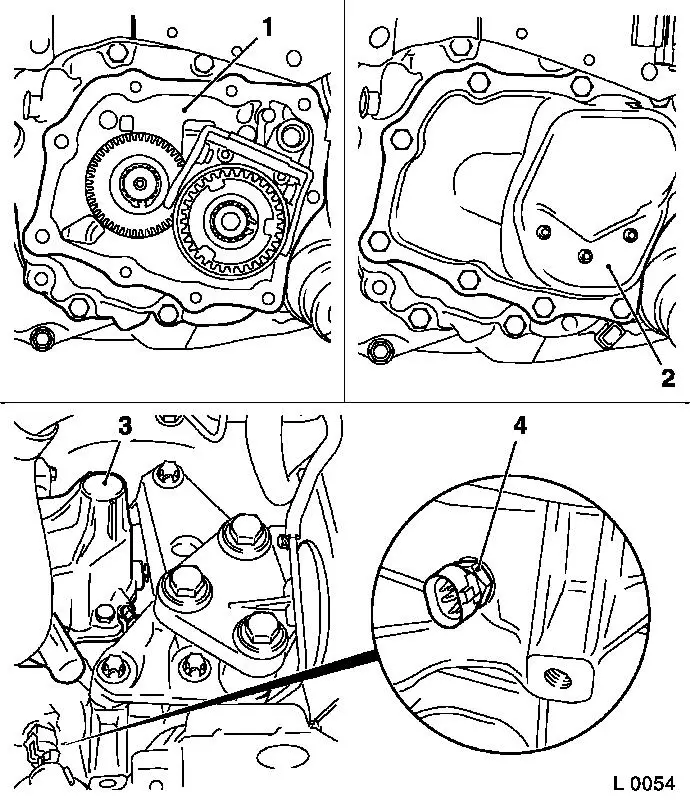
| 1. |
Remove shift mechanism cover (1)
|
| 2. |
Remove reversing lamp switch (2)
| • |
Disconnect wiring harness plug for reversing lamp switch
|
| • |
Unscrew reversing lamp switch
|
|
| 3. |
Remove end shield cover (3)
|
|
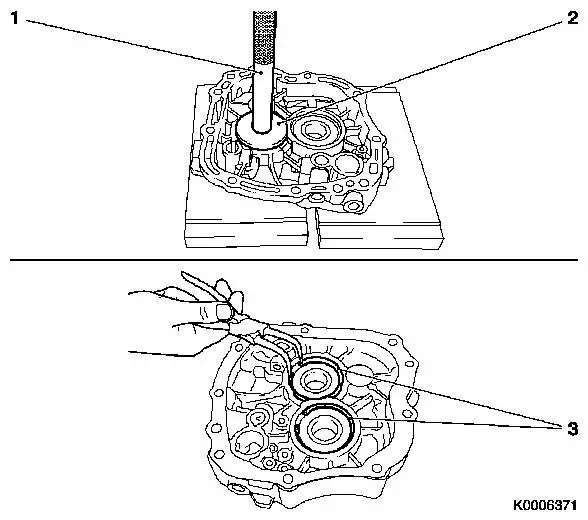
|
| 5. |
Attach end shield to KM-113-2
| • |
Attach end shield to KM-552 (2)
|
| • |
Attach end shield with KM-552 to
KM-113-2 (1)
|
|
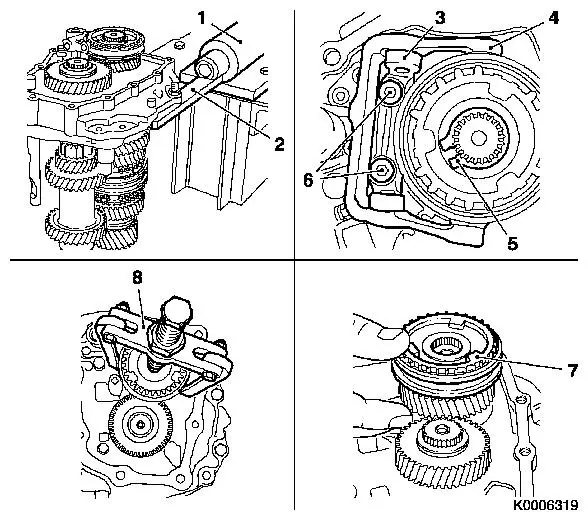
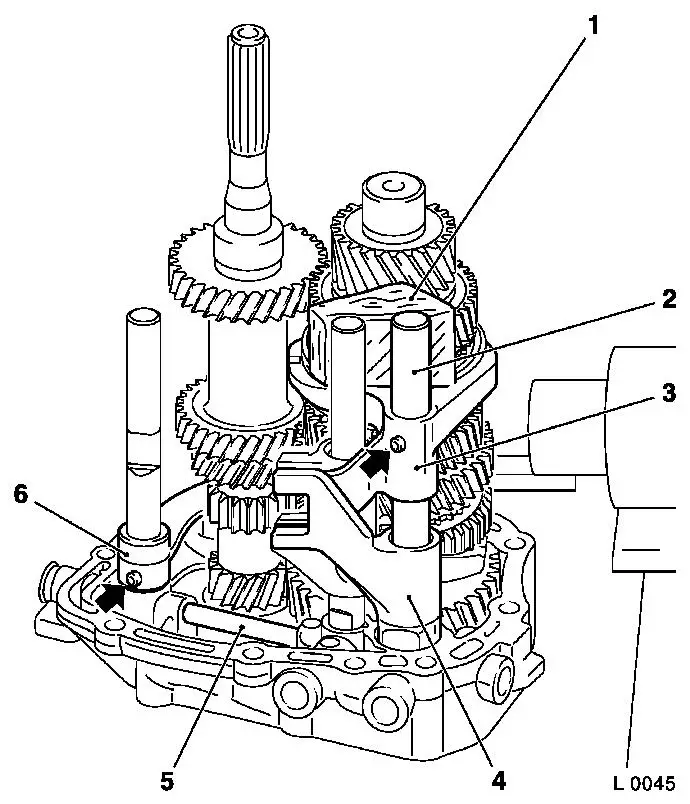
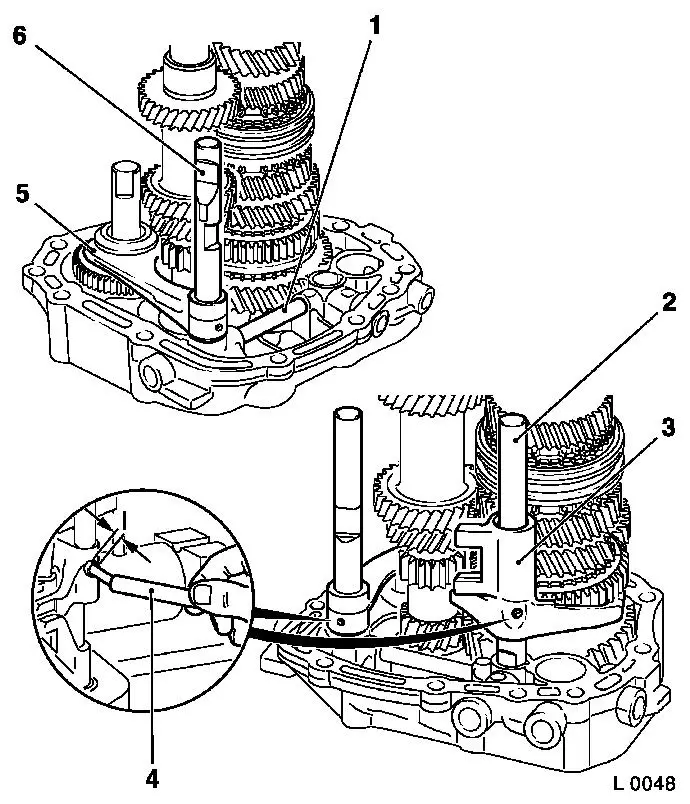
| 6. |
Remove bearing block (3) with pivoting lever (4) from end
shield
Note: Microencapsulated
bolts. If the bolts are difficult to move, heat the end shield to
approx. 80°C with an industrial hot-air blower.
|
| 7. |
Remove 5th gear gearwheel (driven)
| • |
Detach retainer (5) from synchro body
|
| • |
Pull 5th gear gearwheel and 5th gear synchro body from main
shaft using KM-559-A (8)
|
| • |
Remove both needle cages for 5th gear
|
|
|
|
| 8. |
Remove bearing block (2) with latch (1) from end shield
Note: Microencapsulated
bolts. If the bolts are difficult to move, heat the end shield to
approx. 80°C with an industrial hot-air blower.
| • |
Unscrew 2x bolt (arrow)
|
|
| 9. |
Engage 2 gears
| • |
Engage reverse gear and 4th gear so that transmission is
immobilized
|
|
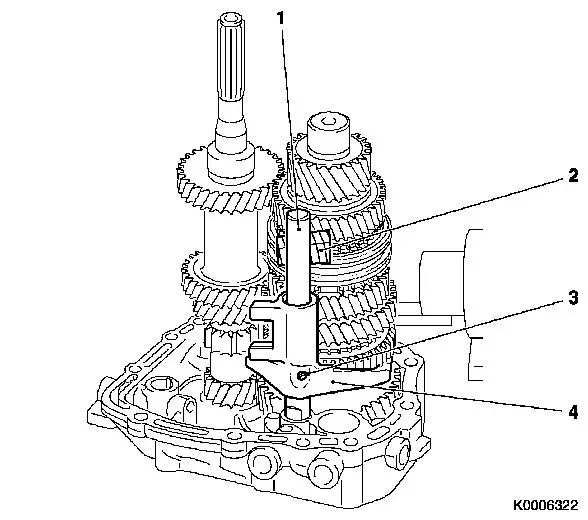
| 10. |
Remove 5th gear gearwheel (driving) (5)
| • |
Remove retainer(7) from drive shaft (6)
|
| • |
Set KM-553-A (4) with thrust piece
(3) on drive shaft and gearwheel
Note: Ensure that it is
correctly seated
|
| • |
Remove 5th gear gearwheel from drive shaft with KM-553-A
|
|
|
|
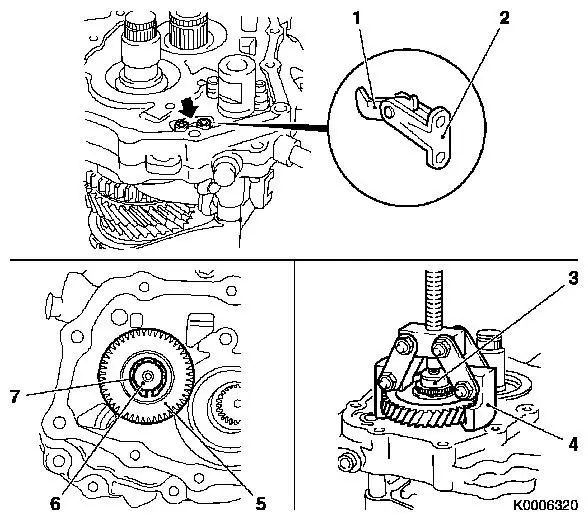
| 11. |
Remove locking plugs (arrows)
| • |
Pull plugs out of end shield with KM-727 (2) and KM-328-B
(1)
|
|
| 12. |
Remove bridge for locking bolts (3)
Note: Microencapsulated
bolts. If the bolts are difficult to move, heat the end shield to
approx. 80°C with an industrial hot-air blower.
| • |
Unscrew 2x bolt (4)
Note: Turn the end
shield on its side
|
| • |
Engage 2nd gear and 5th gear (with shift driver)
|
| • |
Engage 3rd gear and remove bridge
|
|
|
|
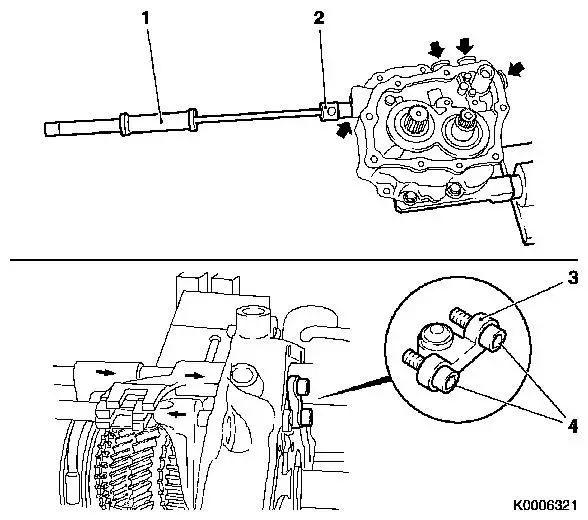
Important: Relieve the gearshift
rod guide by supporting the tops of the rods with a wooden wedge
(1)
|
| 13. |
Remove the shift forks for 3rd/4th gear and reverse
| • |
Knock out the locating pins from the 3rd/4th gear shift lever
(3) and the reverse gear lever (6), using KM-308
|
| • |
Remove shift rod (2), reverse gear shift rod and shift fork
|
|
| 14. |
Remove gear shift driver
| • |
Remove 5th gear shift driver (4) from end shield
|
|
| 15. |
Remove locking bolt (5)
| • |
Remove locking bolt from end shield
|
|
|
|
Important: Relieve the gearshift
rod guide by supporting the top of the rod (1) with a wooden wedge
(2).
|
| 16. |
Remove 1st/2nd gear shift fork
| • |
Knock out the locating pin (3) from the 1st/2nd gear shift
lever (4), using KM-308
|
| • |
Remove shift fork with shift rod
|
|
|
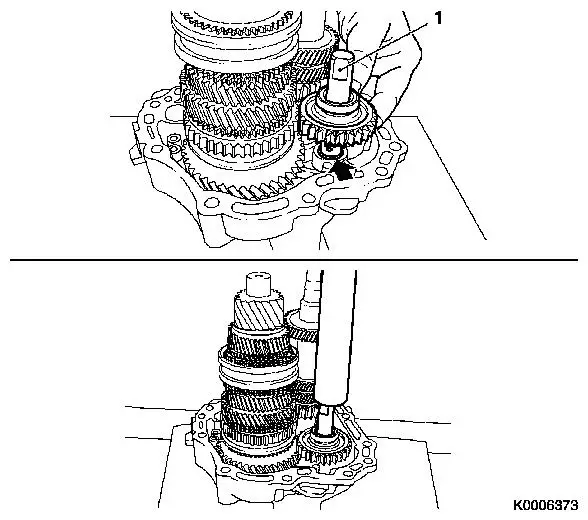
Warning: Remove main shaft, drive
shaft and reverse gearwheel.
|
| 17. |
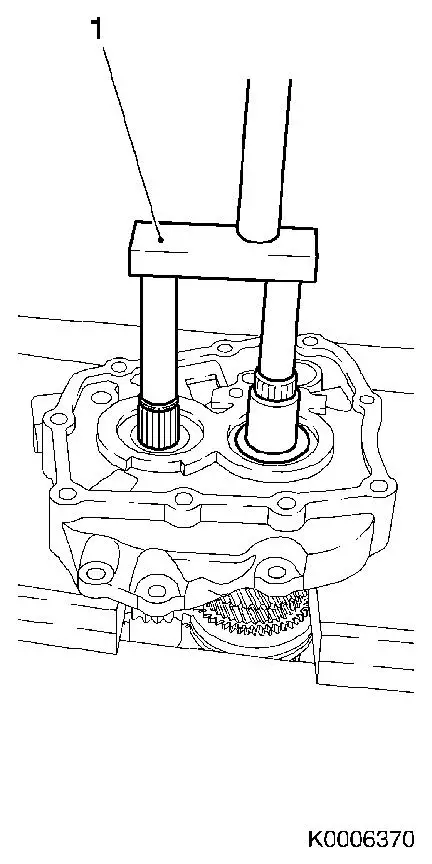
Dismantle main shaft and drive shaft
| • |
Detach end shield from KM-552
|
| • |
Push main shaft and drive shaft out as shown, using KM-6335 (1)
Note: In order to press
out both shafts simultaneously, apply more pressure with the press
on the side of the main shaft. Make sure that the 1st gear
gearwheel is not in contact with the press.
|
| • |
Collect main shaft, drive shaft and reverse gearwheel
|
|
|
|
|
Important: Note that retaining
ball is released.
|
| 18. |
Remove reverse gear wheel (1)
| • |
Tension reverse gear wheel axle with protective jaws in a
vice
|
| • |
Carefully knock out end shield with brass drift
|
|
| 19. |
Dismantle main shaft and drive shaft bearings
| • |
Press out 2x bearing with KM-500-5
(3)
|
|
|
 Install
| 20. |
Clean all parts and sealing surfaces
|
| 21. |
Inspect parts
| • |
Check all parts for wear, damage and signs of scuffing -
replace if necessary
|
|
|
Important: Coat the bearing,
running or seating surfaces of rotating parts and surfaces under
pressure with transmission fluid.
|
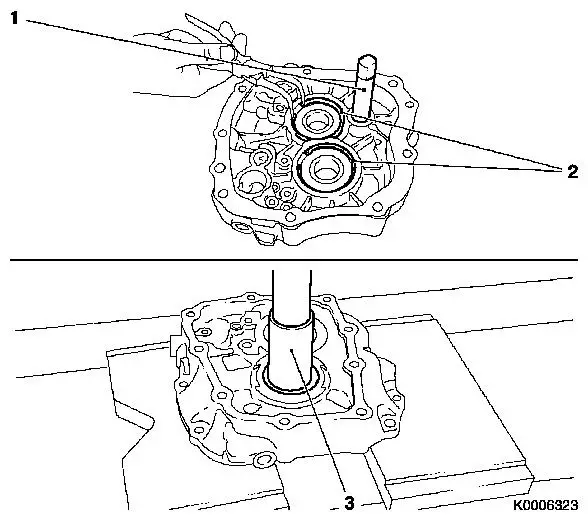
| 22. |
Install the main shaft and drive shaft bearings
| • |
Press in 2x bearing with KM-523-1 (1)
and KM-6336 (2)
|
| • |
Install 2x retainer (3)
Note: Ensure that the
retainers are correctly seated
|
|
|
|
Important: Ensure that the shafts
are correctly seated
|
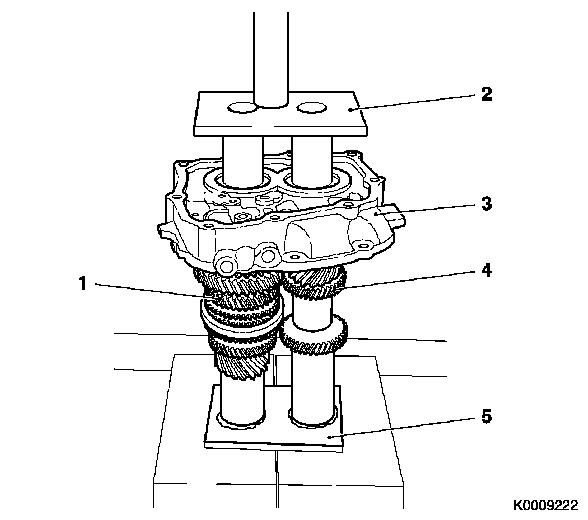
| 23. |
Install the main shaft and drive shaft
| • |
Set main shaft (1) and drive shaft (4) on KM-6337 (5)
|
| • |
Set end shield (3) on main shaft and drive shaft and press on
with KM-6338 (2)
|
|
|
|
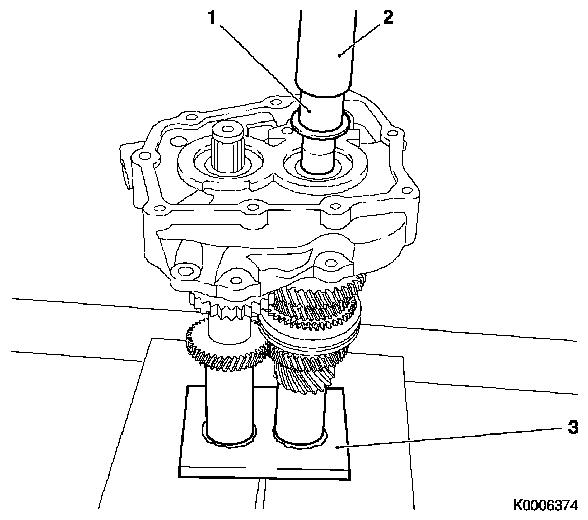
| 24. |
Install 5th gear bushing (1)
| • |
Place end shield on KM-6337 (3)
|
| • |
Push bushing with KM-6339 (2) onto
main shaft
|
|
|
|
Important: Note installation
position.
|
| 25. |
Install reverse gear wheel axle (1)
| • |
Place reverse gear wheel on axle
Note: Note position,
ensure that shift fork groove faces upwards
|
| • |
Press the reverse gear wheel axle, with the securing ball
inserted (arrow), until it comes to the stop in the end shield
|
|
|
|
| 26. |
Attach end shield to KM-113-2
| • |
Attach end shield to KM-552
|
| • |
Attach end shield with KM-552 to
KM-113-2
|
|
| 27. |
Fit locking bolt (1)
| • |
Insert locking bolts for 3rd/4th gear and reverse
|
|
| 28. |
Install shift fork for reverse gear
Important: Support shift rods
with a wooden wedge when inserting pins to relieve the gearshift
rod guide.
|
| • |
Insert shift fork (5) and reverse gear shift rod (6)
|
| • |
Insert new locating pin with KM-308
(4)
Note: Allow pin to
project approx. 2 mm (dimension I)
|
|
| 29. |
Install 1st/2nd gear shift fork
Important: To relieve pressure on
shift rod guides in end shield, support shift rods with wooden
wedge when securing with pin.
|
| • |
Insert 1st/2nd gear shift fork (3) and shift rod (2)
|
| • |
Insert new locating pin with KM-308
(4)
Note: Allow pin to
project approx. 2 mm (dimension I)
|
|
|

|
| 30. |
Insert 5th gear shift driver (4)
|
| 31. |
Install 3rd/4th gear shift fork
Important: To relieve pressure on
shift rod guides in end shield, support shift rods with wooden
wedge when securing with pin.
|
| • |
Insert gear shift fork (2) and shift rod (1) for 3rd/4th
gear
|
| • |
Insert new locating pin with KM-308
(3)
Note: Allow pin to
project approx. 2 mm.
|
|
| 32. |
Install locking plugs
| • |
Install 4x locking plugs (5, 6) and (7)
Note: Drive in as far
as the stop, using a plastic hammer or soft metal drift.
|
|
| 33. |
Move the gear shift forks to neutral position
|
|

|
| 34. |
Engage 2nd, 3rd and 5th gears
Note: Turn the end
shield on its side
|
| 35. |
Install bridge for locking bolt
| • |
Insert bridge for locking bolt (2) in end shield in order to
move the gear shift forks to neutral position
|
|
| 36. |
Attach bearing block (4) with latch (3)
| • |
Insert 2x screw (arrow) with locking compound
|
| • |
Tighten 2x bolts (arrow) 7 Nm
|
|
|
|
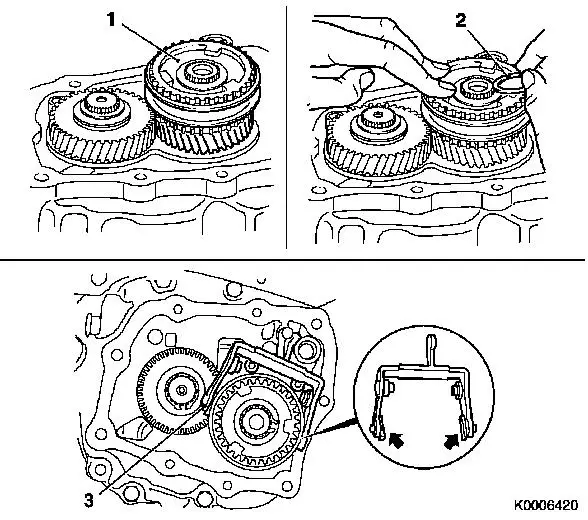
| 37. |
Attach 5th gear gearwheel (driving) (2)
Important: Observe direction of
installation. The long gearwheel hub points towards the end
shield.
|
| • |
Insert end shield with main shaft and drive shaft in KM-6337 (3)
|
| • |
Press on 5th gear wheel with KM-473
(1)
|
| • |
Fit new retainer (4)
Note: Retainer must
engage fully.
|
|
| 38. |
Attach 5th gear gearwheel (driven) (5)
| • |
Coat needle bearings (6) with transmission fluid and place on
main shaft
Note: Ensure that the
slotted needle bearings are correctly seated.
|
| • |
Place 5th gear gearwheel and 5th gear synchro ring on main
shaft
|
|
|
|
| 39. |
Push on 5th gear synchro body assembly
| • |
Insert end shield in KM-6337
|
| • |
Place synchro body assembly (1) on main shaft
|
Important: Lugs on synchro ring
must be flush with grooves on synchro body
|
| • |
Push synchromesh body in KM-473 onto
main shaft
|
| • |
Fit new retainer (2)
Note: Retainer must
engage fully.
|
|
| 40. |
Attach bearing block with pivoting lever
| • |
Insert 2x sliding shoe (arrow) in 5th gear shift fork (3)
|
| • |
Insert bearing block with pivoting lever in end shield
|
| • |
Insert 2x screw with locking compound
|
|
|
|
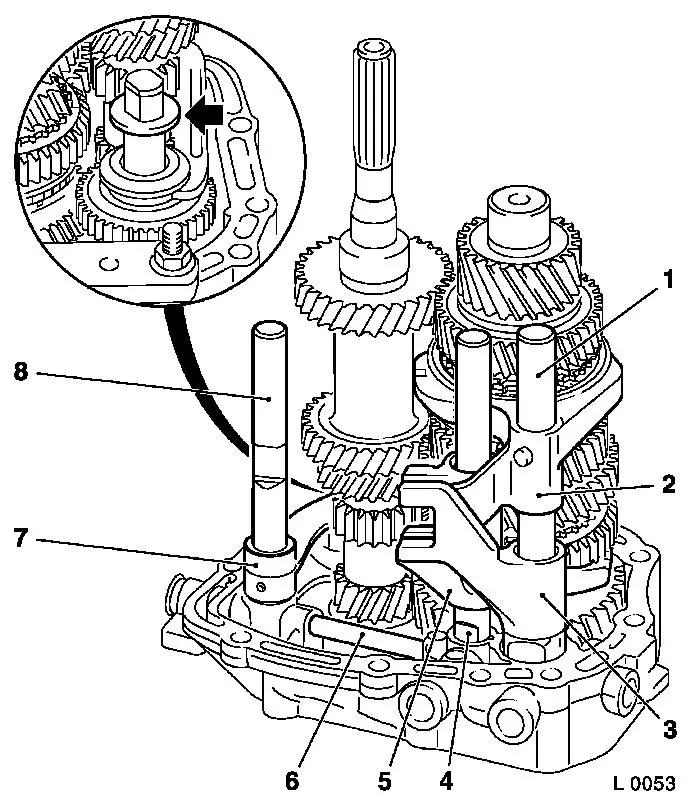
| 41. |
Install friction washer and magnet
| • |
Fit friction washer (arrow) on reverse gear axle with
grease
|
| • |
Insert magnet with grease
|
|
Important: Before installing the
end shield, check the position and seating of the following:
| 1. |
3rd/4th gear shift fork |
| 2. |
3rd/4th gear shift rod |
| 3. |
5th gear shift driver |
| 4. |
1st/2nd gear shift rod |
| 5. |
1st/2nd gear shift fork |
| 6. |
Lock pin for gear stop |
| 7. |
Reverse gear shift fork |
| 8. |
Reverse gear shift rod |
|
| 42. |
Detach end shield from KM-113-2
| • |
Detach end shield from KM-552
|
|
|
|
| 43. |
Install end shield (1)
Note: Observe the
magnet
|
| 44. |
Install end shield cover (2)
|
| 45. |
Install gearshift cover (3)
|
| 46. |
Transmission Fluid Level, Check and Correct
|
| 47. |
Install reversing lamp switch (4)
| • |
insert with new seal ring
|
| • |
Tighten reversing lamp switch 20
Nm
|
| • |
Connect wiring harness plug
|
|
| 48. |
Check ease of gear shifting
|
|
|
