|
Con-rod Bearing, Replace
 Remove Remove
| 1. |
Detach oil baffle plate
|
| 2. |
Set crankshaft to cylinder 1 TDC of combustion stroke
Note: Replace con-rod
bearings for cylinders 1 and 4 using the same procedure for removal
and installation. Then set crankshaft to TDC of cylinder 2
combustion stroke.
| • |
At torsional vibration damper flange bolt, turn in direction of
engine rotation until con-rod bearing journals of cylinders 2 and 3
are at TDC
|
|
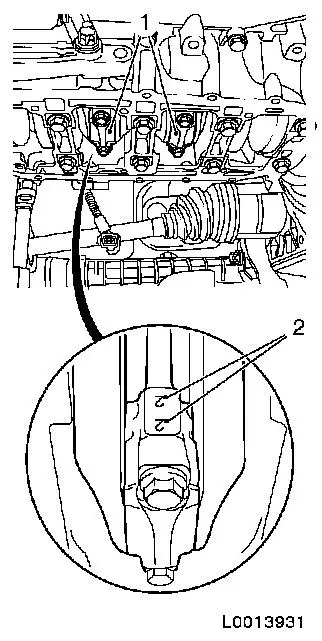
| 3. |
Remove con-rod bearing caps (1), cylinders 2 and 3
Note: Note marking (2)
on con-rod and con-rod bearing cap on intake side. If no marking is
there, mark them yourself.
Important: The shear surfaces of
the con-rod and the con-rod bearing cover form a unique fit and
must not be swapped or damaged. Do not lay down on the shear
surfaces!
|
| • |
Unscrew 4x bolts
|
|
|
|
| 4. |
Remove 4x bearing shells
Note: Note removal
sequence!
|
| 5. |
Visually check components
| • |
Con-rod bearing journal, con-rod bearing cap, bearing
shells
|
|
 Install
Important: Align con-rod bearing
shell centrally in the con-rod and con-rod bearing cap.
|
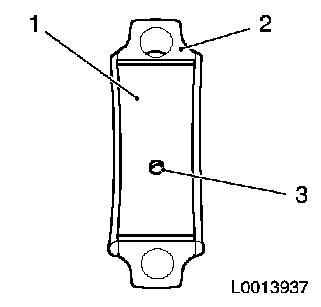
| 6. |
Insert 4x con-rod bearing shell (1)
| • |
In con-rod and con-rod bearing cap (2)
Note: Insert con-rod
bearing shell with oil bore (3) in con-rod bearing cap.
|
| • |
Grease 2x con-rod bearing journals
|
|
|
|
Important: Note order and
installation position. Marks on the con-rod and con-rod bearing cap
point to the intake side.
|
| 7. |
Attach con-rod bearing caps for cylinders 2 and 3
| • |
Wet con-rod bearing journal with engine oil
|
| • |
Tighten 4x new bolt 20 Nm + 40
°
|
|
| 8. |
Attach oil baffle plate
|
|
