|
Rear Window, Remove and Install or Replace - F69
with BO-46974
Note: This document
describes the removal of the rear window using the Glass Removal
System BO-46974 . Individual steps in the
operation for non-destructive removal of the rear window are
described as an addition to the existing video VT 54.
Warning: To avoid
injuries to the hand and eye area, always put on gloves and goggles
from the Tool Kit BO-46974 before
starting work.
The Tool BO-46974 is recommended for
non-destructive removal of the glass. You will find further
information in the video VT 54.
Note: Park vehicle on
a flat surface and move front wheels to the straight ahead
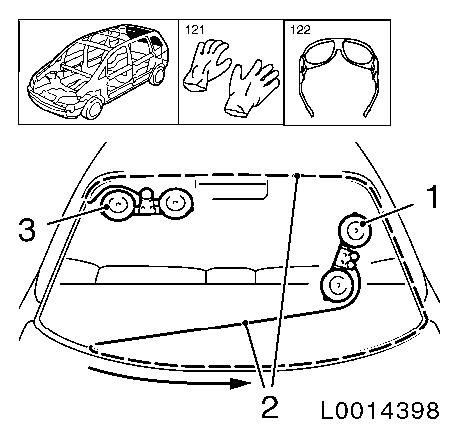
position.
 Remove Remove
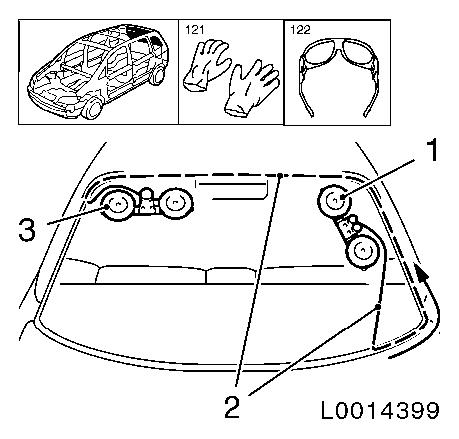
| 1. |
Remove head restraints
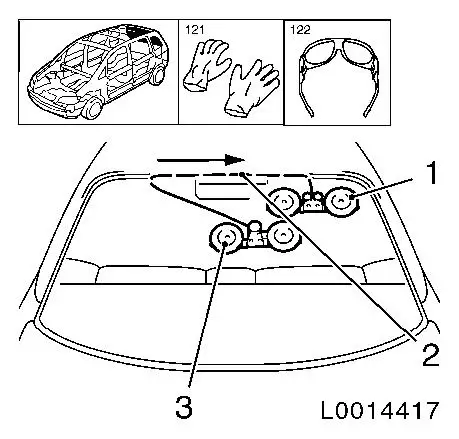
| • |
Unclip 3x head restraint
|
|
| 2. |
Detach C-pillar belt fastening
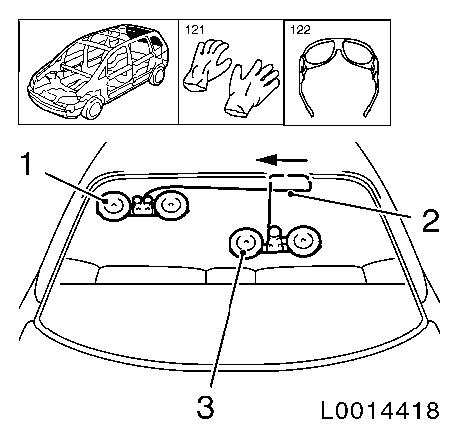
|
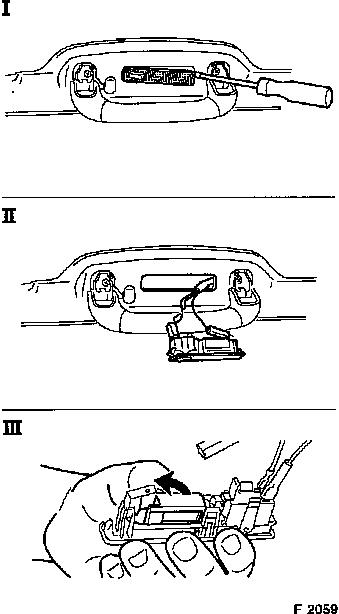
| 3. |
Detach interior light
| • |
Disconnect 6x wiring harness plug
|
|
|
|
|
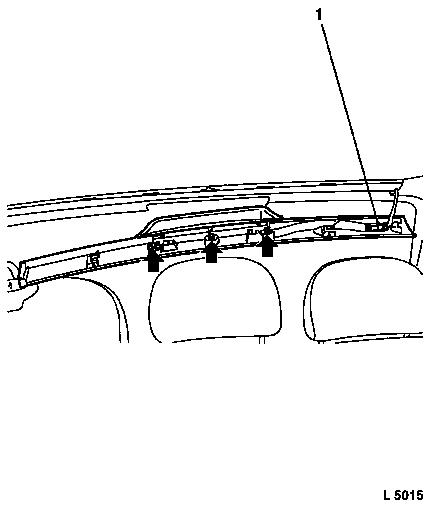
| 4. |
Detach roof frame inner panelling
| • |
Detach roof frame inner panelling from C-pillar inner
panelling
|
| • |
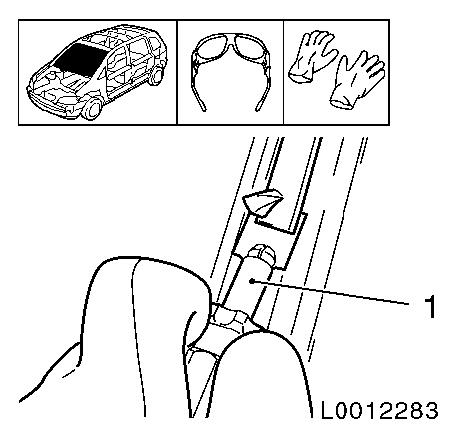
Unclip 3x clip for roof frame inner panelling (arrows)
Note: If present:
Release and disconnect auxiliary brake lamp wiring harness plug
(1).
|
|
|
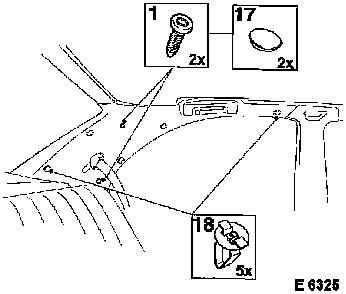
| 5. |
Detach rear handles, right and left
| • |
Prise off panels
| – |
Unscrew and remove 4x fastening screws
|
|
|
| 6. |
Detach inner panelling, C-pillars
| • |
Unclip 5x clip
| – |
Remove inner panelling, C-pillars
|
|
|
|
|
| 7. |
Detach wiring harness plug, heated rear window
| • |
Disconnect 2x wiring harness plugs for the heated rear
window
|
|
|
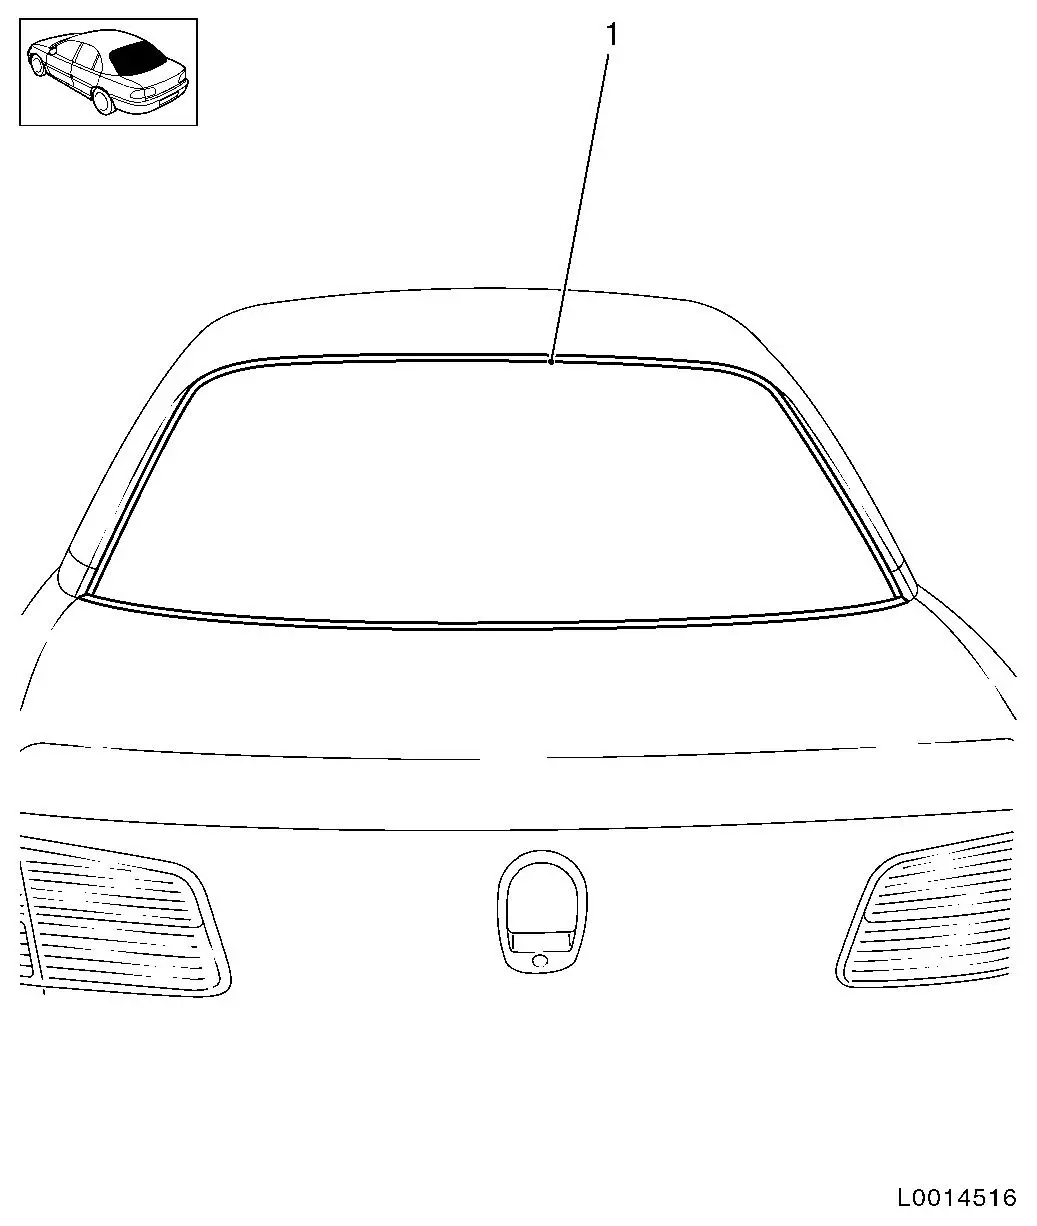
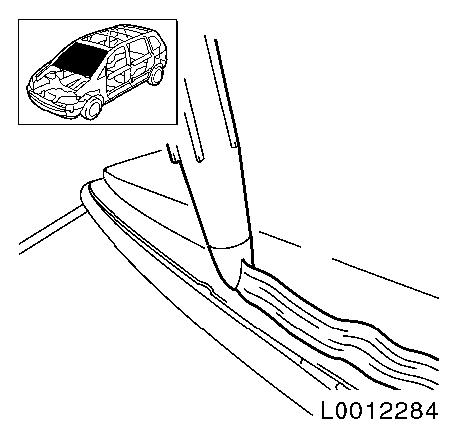
| 8. |
Pull away upper window trim strip (1)
|
|
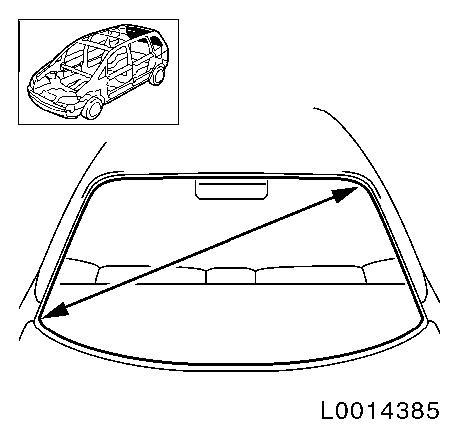
| 9. |
Measure rear window
Note: Measure the
diagonal length of the rear window and cut off the cutting wire at
four times the length, approx. 5240
mm . The circumference of the roll of wire is approx. 1
metre.
|
|
|
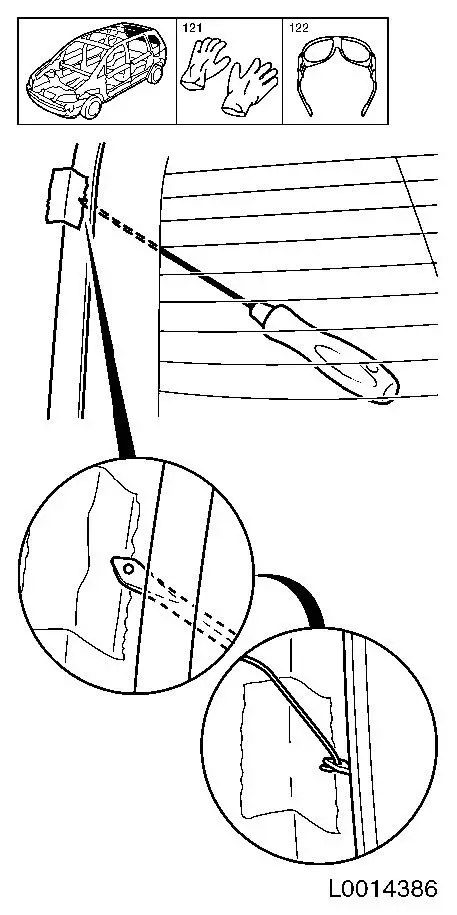
| 10. |
Heat awl with a suitable tool
|
| 11. |
Push awl through bed of adhesive
| • |
Push awl through the bed of adhesive in the upper left area of
the C-pillar
Note: Ensure that the
rear window is not damaged as otherwise stress cracks may occur in
the rear window. Mask off the area of the body with fibre tape
where the penetration is to be made.
|
|
| 12. |
Insert the cutting wire
| • |
Thread cutting wire into the bore in the awl and bend over
|
| • |
Draw cutting wire into the interior of the vehicle as far as
the centre of the rear window with the pointed awl
|
|
|
|
| 13. |
Lay cutting wire around the circumference under the rear
window
Note: On the rear
window, the cutting wire must be rolled in under the lower window
trim strip.
| • |
Pull the rest of the wire into the interior
|
|
| 14. |
Heat awl with a suitable tool
|
| 15. |
Push awl through bed of adhesive
Note: Ensure that the
rear window is not damaged as otherwise stress cracks may occur in
the rear window.
| • |
Push pointed awl through the bed of adhesive overlapping the
first entry point by approx. 1 cm
.
|
|
| 16. |
Pull in the second end of the wire
| • |
Thread cutting wire into the bore in the awl and bend over
| – |
Draw the rest of the wire into the interior with the pointed
awl
Note: Ensure that the
cutting wire is in contact with the bed of adhesive all round.
|
|
|
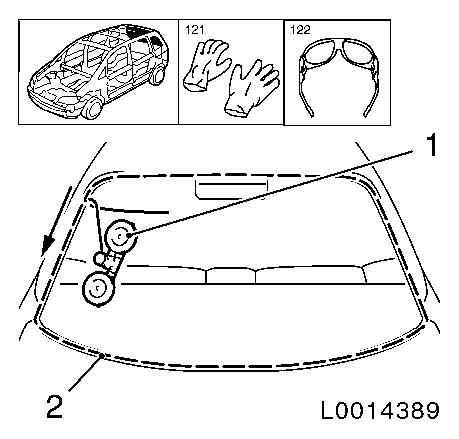
| 17. |
Position the winch with two reels in the vehicle
| • |
Position winch (1) in the left area of the rear window
|
| • |
Attach cutting wire (2) to winch
Note: Ensure the
cutting wire is laid correctly around the pulley of the winch
| – |
Insert ratchet and apply tension to the cutting wire
|
|
|
| 18. |
Cut out rear window
| • |
Cut out rear window until the cutting wire reaches the height
of the reel
| – |
Arrow shows the direction in which the cutting wire is
running
|
|
|
|
|
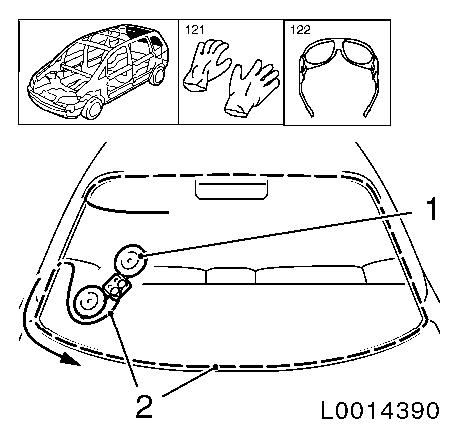
| 19. |
Position the winch with two reels in the vehicle
| • |
Position winch (1) in the lower left area of the rear
window
Note: Ensure the
cutting wire (2) is laid correctly around the pulley of the
winch.
| – |
Insert ratchet and apply tension to the cutting wire
|
|
|
| 20. |
Cut out rear window
Note: It is necessary
to apply additional tensioning force when cutting in the area of
the window radius. Use lubricant on the pulley.
| • |
Cut out rear window until the cutting wire reaches the height
of the reel
Note: Protect parcel
shelf from damage.
| – |
Arrow shows the direction in which the cutting wire is
running
|
|
|
|
|
| 21. |
Position both winches in the vehicle
| • |
Position winch with two reels (1) in the lower right hand area
of the rear window
|
| • |
Position winch with one reel (3) in the upper left area of the
rear window
Note: Ensure the
cutting wire (2) is laid correctly around the pulley of the
winch.
| – |
Attach cutting wire to winch
|
| – |
Insert ratchet and apply tension to the cutting wire
|
|
|
| 22. |
Cut out rear window
| • |
Cut out rear window until the cutting wire reaches the height
of the reel
Note: Protect parcel
shelf from damage.
| – |
Arrow shows the direction in which the cutting wire is
running
|
|
|
|
|
| 23. |
Position the winch with two reels in the vehicle
| • |
Position winch (1) in the right hand area of the rear
window
Note: Ensure the
cutting wire (2) is laid correctly around the pulley of the
winch.
Note: Winch with one
reel (3) remains in position.
| – |
Insert ratchet and apply tension to the cutting wire
|
|
|
| 24. |
Cut out rear window
Note: It is necessary
to apply additional tensioning force when cutting in the area of
the window radius. Use lubricant on the pulley.
| • |
Cut out rear window until the cutting wire reaches the height
of the reel
Note: Protect parcel
shelf from damage.
| – |
Arrow shows the direction in which the cutting wire is
running
|
|
|
|
|
| 25. |
Position the winch with two reels in the vehicle
| • |
Position winch (1) in the upper right hand area of the rear
window
Note: Ensure the
cutting wire (2) is laid correctly around the pulley of the
winch.
Note: Winch with one
reel (3) remains in position.
| – |
Insert ratchet and apply tension to the cutting wire
|
|
|
| 26. |
Cut out rear window
Note: It is necessary
to apply additional tensioning force when cutting in the area of
the window radius. Use lubricant on the pulley
| • |
Cut out rear window with both winches one after the other until
the cutting wire reaches the height of the reel
Note: Protect moulded
headlining from damage
| – |
Arrow shows the direction in which the cutting wire is
running
|
|
|
|

|
| 27. |
Position winch with one reel in the vehicle
| • |
Position winch (3) in the upper centre area of the rear
window
Note: Ensure the
cutting wire (2) is laid correctly around the pulley of the
winch.
Note: Winch with two
reels (1) retains its position.
| – |
Insert ratchet and apply tension to the cutting wire
|
|
|
| 28. |
Cut out rear window
| • |
Cut out windscreen until the cutting wire reaches the height of
the reel
Note: Protect moulded
headlining from damage
| – |
Arrow shows the direction in which the cutting wire is
running
|
|
|
|
|
| 29. |
Position the winch with two reels in the vehicle
| • |
Position winch (1) in the upper left area of the rear
window
Note: Ensure the
cutting wire (2) is laid correctly around the pulley of the
winch.
Note: Winch with one
reel (3) remains in position.
| – |
Insert ratchet and apply tension to the cutting wire
|
|
|
| 30. |
Cut out rear window
| • |
Cut out rear window until the cutting wire has cut through the
adhesive bed completely
Note: Protect moulded
headlining from damage.
| – |
Arrow shows the direction in which the cutting wire is
running
|
|
| • |
Remove cutting tool completely
|
|
|
|
| 31. |
Attach MKM-641
| • |
Remove rear window
Note: Second mechanic
required
|
|
| 32. |
Cut down the bead of adhesive on the vehicle
| • |
Using the tool supplied, remove the adhesive bead down to a
thickness of approx. 1 mm
|
|
|
|
| 33. |
Repair any damaged paint
| • |
Repair paint damage with a touch-up pen in the vehicle
colour
|
|
| 34. |
Cut down the bead of adhesive on the tailgate window
| • |
Using the tool supplied, remove the adhesive bead down to a
thickness of approx. 1 mm
|
|
 Install
| 35. |
Apply primer
Note: Only for new
windscreen.
|
| 36. |
Insert upper window trim strip
| • |
Attach window trim strip to removed window
|
|
| 37. |
Apply adhesive bead
| • |
Cut into the tip of cartridge in such a way that a bead of
adhesive approx. 13 mm thick is
produced.
|
|
|
|
| 38. |
Insert rear window
| • |
Insert rear window with MKM-641
Note: Second mechanic
required
|
| • |
Position with fibre tape
|
|
| 40. |
Attach wiring harness plug, heated rear window
| • |
Connect 2x wiring harness plug, heated rear window
|
|
| 41. |
Attach inner panelling, C-pillars
| • |
Insert inner panelling, C-pillars
|
| • |
Clip in 4x screw covers
|
|
| 42. |
Attach roof frame inner panelling
| • |
Attach roof frame inner panelling to C-pillar inner
panelling
|
| • |
Clip in 3x clip, roof frame inner panelling
Note: If present,
connect wiring harness plug for additional brake light
|
|
| 43. |
Attach rear handles, right and left
| • |
Tighten 4x fastening screws firmly
|
|
| 44. |
Attach interior lights
| • |
Connect 6x wiring harness plugs
|
|
| 45. |
Attach C-pillar belt fastening
| • |
Tighten 2x bolt
| – |
Clip 2x covering caps into position
|
|
|
| 46. |
Attach head restraints
| • |
Clip 3x head restraint into position
|
|
|
