|
Piston with Con-rod, Remove and Install
 Remove Remove
|
For vehicles up to MY '98:
Remove oil pan – see operation "Oil Pan (One-piece),
Remove and Install" or "Upper Part of Oil Pan, Remove and
Install"
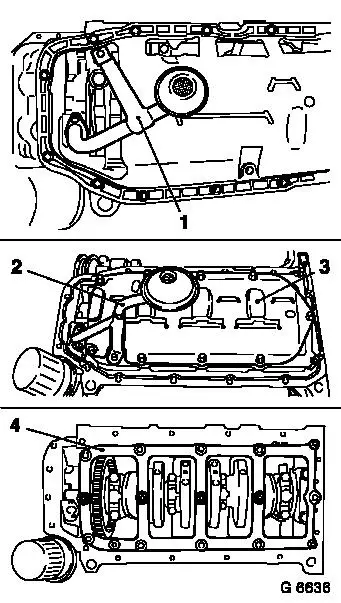
For version with single-piece oil pan: Remove oil intake pipe
(1) from oil pump and cylinder block. Remove oil baffle plate.
For version with dual-piece oil pan: Remove oil intake pipe (2)
from crankshaft bearing bridge and from oil pump. Remove oil baffle
plate (3) from crankshaft bearing bridge. Remove crankshaft bearing
bridge (4) from cylinder block.
For vehicles as of MY '98:
Remove engine – see operation "Engine, Remove and Install
(up to MY 2001)" and "Engine, Remove and Install (as of MY
2001)".
Install engine on Assembly Stands KM-412 with Adapters
KM-412-8-A – remove attaching parts as required.
Remove balancer shaft unit – see operation "Balancer Shaft
Unit (Differential) Remove and Install".
|
|
|
Remove cylinder head – see operation "Cylinder Head,
Remove and Install".
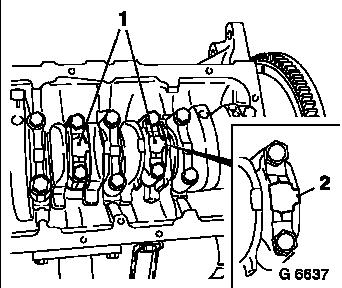
Mark order of con-rod bearing caps (1) – bead (2) of
con-rod bearing caps points to transmission side.
Remove con-rod bearing cap from con-rod.
Remove combustion residue from upper part of cylinder bore.
Push piston with con-rod upwards from cylinder bore.
|
|
 Install
|
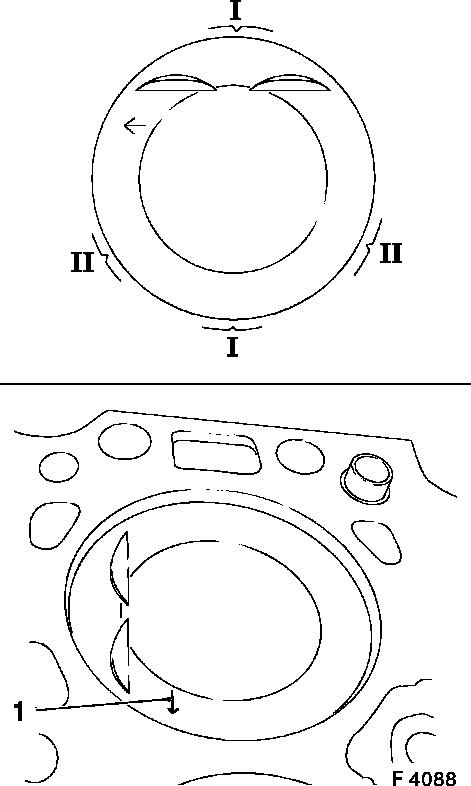
Piston ring position – piston rings (I) every
120°.
Oil scraper rings (II) – offset 25 to 50 mm from gap of
the intermediate ring to the left and right.
Coat piston rings with engine oil and compress with commercially
available piston ring compressor.
Push piston into cylinder bore with hammer shaft.
Caution
Installation position: Arrow (1) on piston head points to engine
timing side – bead on con-rod points to transmission
side.
|
|
|
Note sequence of con-rod bearing caps (1). Attach con-rod
bearing cap to con-rod with new bolts – con-rod bearing cap
bead (2) points to transmission side – tightening torque 35
Nm / 26 lbf. ft. + 45° + 15°.
|
|
Install
Install cylinder head – see operation "Cylinder Head,
Remove and Install".
For vehicles as of MY '98:
Install balancer shaft unit – see operation "Balancer
Shaft Unit (Differential), Remove and Install".
Remove engine from Assembly Stands KM-412, remove Adapter
KM-412-8-A from engine.
Install engine – see operation "Engine, Remove and Install
(up to MY 2001)" or "Engine, Remove and Install (as of MY
2001)".
For vehicles up to MY '98:
For version with dual-piece oil pan:
Attach crankshaft bearing bridge to cylinder block –
tightening torque 20 Nm / 15 lbf. ft. + 45°.
Attach oil baffle plate to crankshaft bearing bridge –
tightening torque 20 Nm / 15 lbf. ft. + 45°.
Attach oil intake pipe with new seal ring to oil pump –
tightening torque 8 Nm / 5.9 lbf. ft.
1) .
Connect oil intake tube to crankshaft bearing bridge –
tightening torque 20 Nm / 15 lbf. ft.
For version with single-piece oil pan:
Insert oil baffle plate and attach oil intake pipe with new seal
ring to oil pump – tightening torque 8 Nm / 6 lbf. ft.
1) .
Attach oil intake pipe bracket to cylinder block –
tightening torque 6 Nm / 4 lbf. ft.
Remove oil pan – see operation "Oil Pan (One-piece),
Remove and Install" or "Upper Part of Oil Pan, Remove and
Install"
1 ) Re-cut thread before re-use and insert bolts
with bolt locking compound (red). The installation time including
torque checking is max. 10 min.
|
