|
Electric Fuel Pump, Remove and Install (all
Engines)
Note: Operation also
includes the removal and installation of the pre-fuel feed pump in
the 25 DT, X 25 DT.
Caution
Observe safety precautions and national regulations.
Use draining equipment to drain the fuel tank. Draining
equipment – refer to Opel/Vauxhall Workshop Equipment
Catalogue. Store drained fuel in a suitable sealable container.
 Remove Remove
Open bonnet and disconnect battery
Remove panelling from luggage compartment floor, remove assembly
aperture cover from floor panel.
Detach fuel pump wiring harness plug, mark fuel hoses. Close off
fuel hoses with spring clamps. Detach fuel supply line and fuel
return line.
|
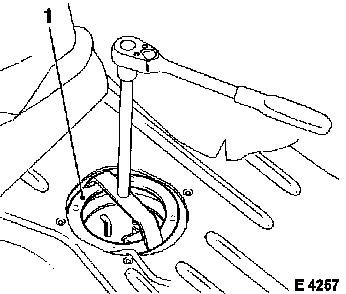
Remove fuel tank cover union nut with KM-673 (1).
|
|
|
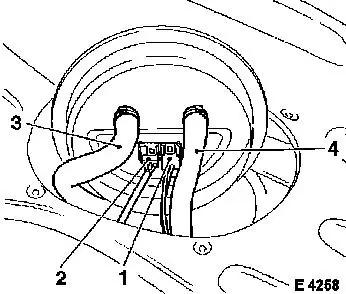
Raise fuel tank cover and detach wiring harness plugs (1) and
(2).
Detach fuel supply line (3) and fuel return line (4) from fuel
tank cover.
|
|
|
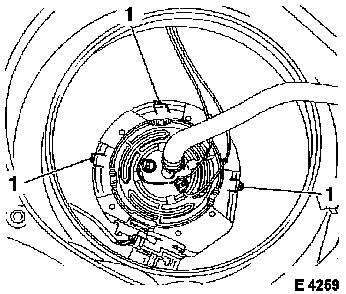
Press lock tabs (1) inwards and hold compressed.
|
|
|
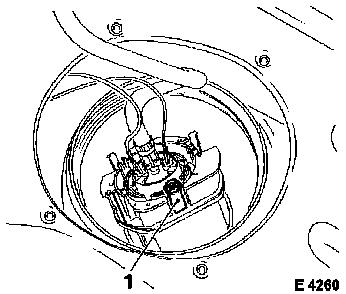
Remove fuel pump housing with lug (1) from storage pot using
suitable hook.
Keep suitable basin at hand and place fuel pump housing in
it.
|
|
|
Mark installation position of fuel screen (1) and remove from
fuel pump.
Detach wiring harness plug and fuel hose from fuel pump.
|

|
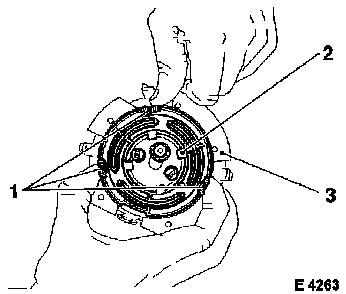
|
Press catches (1) inward and simultaneously slide lock ring (2)
out of fuel pump housing (3).
Remove locking ring and fuel pump from fuel pump housing.
|
|
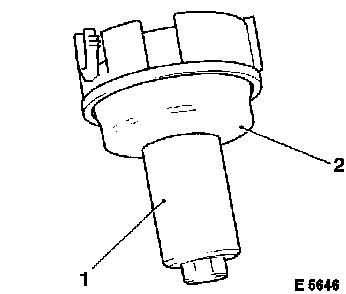
|
In 25 DT and X 25 DT: Pull fuel pump (1) from sealing sleeve
(2).
|
|
 Install
In 25 DT and X 25 DT: Insert fuel pump in sealing sleeve. New
seal ring at fuel pump housing.
All engines: insert fuel pump – fuel pump intake pipe
engages in recess in floor of fuel pump housing.
Insert locking ring in fuel pump housing – catches must
engage in lugs. Connect wiring harness plug to fuel pump –
note polarity of connections!
Fasten fuel hose to fuel pump. Fuel screen to fuel pump –
note installation position. Insert fuel pump housing in storage pot
– catches must engage audibly in storage pot.
New rubber seal ring to fuel tank cover. Connect wiring harness
plug and fasten fuel feed and return lines. Install fuel tank cover
union nut with KM-673 – 50 Nm / 37 lbf. ft. Attach fuel feed
and return lines to fuel tank cover – note installation
position. Remove spring clamps. Connect fuel pump wiring harness
plug.
Note: For Y 25 DT:
Hose clamp for supply hose has a green marking, hose clamp for
return hose has a black marking.
Attach assembly aperture cover to floor panel. Install panelling
in luggage compartment floor.
Refill with drained fuel. Observe safety rules and national
regulations!
For X 20 DTH, Y 22 DTH: Bleed fuel system – see operation
"Fuel System, Bleed (X 20 DTH, Y 22 DTH)".
In 25 DT and X 25 DT: Bleed fuel system – see operation
"Fuel System, Bleed (25 DT, X 25 DT)".
Connect battery, program volatile memories - see operation
"Volatile Memories, Program"
Close bonnet
|
