Subject:
Oil Leaks Between Cylinder Block, Oil Pan and Oil Pump.
Vehicles:
All above vehicle types with V6 DOHC petrol engines
(X 25 XE and X 30 XE). Both single-part and two-part
aluminium oil pans (transverse and longitudinal installation) are affected.
Condition:
The procedure for replacement of the oil pump and oil pan
gasket has been altered, because leaks have occurred repeatedly despite
replacement. The gaskets are now installed in production with an additional
sealing compound. This sealing compound must also be used in Service. The
sealing compound beads must be applied as shown in the following illustrations.
Important:
A precondition for a successful operation is that the sealing
surfaces are free from gasket residue, oil and grease.
|
Remedy:
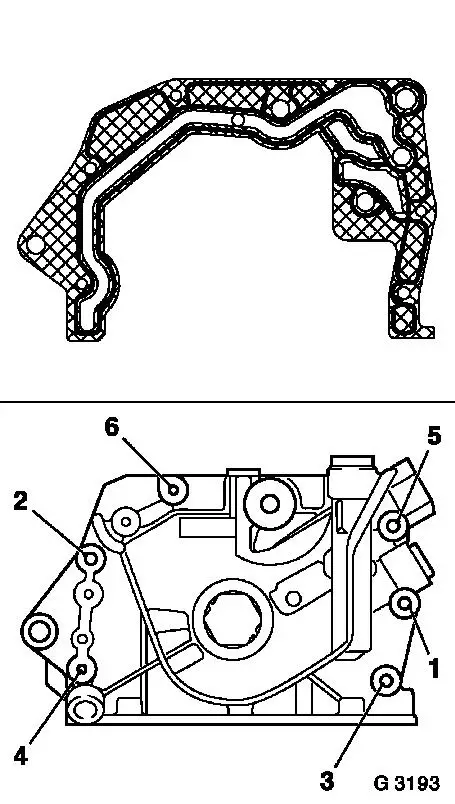
I Installation of Oil Pump
Before installing the oil pump, coat the hatched area of
the gasket on the pump side, as shown in illus. G 3193, evenly with
Sealing Compound 90 542 114 / 15 03 170.
Important:
Do not cover the oil ducts with sealing compound.
Note the tightening sequence (1-6) of the fastening
bolts - 8 Nm/6 Ibf. ft.
|

|
|
II Installation of Single-part
Aluminium Oil Pan (Transverse Installation)
Insert new elastomer shaped gasket in groove of oil
pan - ensure correct installation position.
Apply an approx. 3 mm/0.12 in. thick bead of
silicon sealing compound, as shown in illus. G 3194, to the inner side
of the sealing surface.
Attach oil pan to oil pump, cylinder block and transmission
housing.
Assembly sequence:
1 Tighten all bolts loosely
2 Tighten bolts to oil pump and cylinder block
15 Nm / 11 Ibf. ft.
3 Tighten bolts to transmission housing -
40 Nm / 29.5 Ibf. ft.
Important:
Application of the sealing compound and assembly of the oil
pan must be carried out within 10 minutes.
|

|
|
III Installation of Two-part
Aluminium Oil Pan (Longitudinal Installation)
First insert a bead of silicon sealing compound in the
bottom of the oil pan groove, as shown in illus. G 3195.
Then insert the new elastomer shaped gasket in the groove
of the oil pan - ensure correct installation position.
Note:
In contrast to the single-part oil pan, the silicon sealing
compound must be inserted in the bottom of the groove for the two-part oil
pan to prevent oil leaking through the upper bores, shown in illus.
G 3195.!
|

|
|
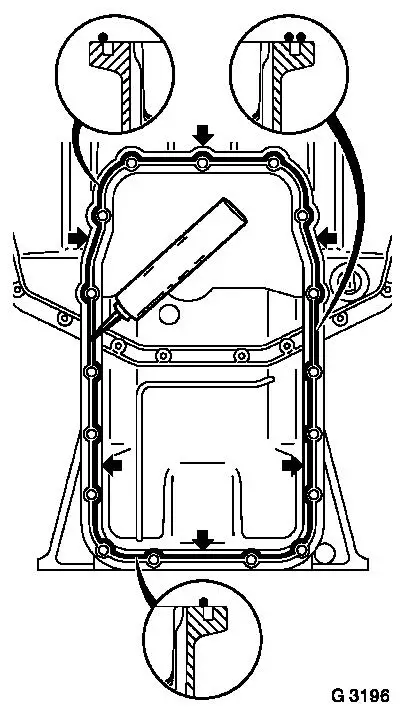
Then apply an approx. 3 mm/0.12 in. thick bead of
silicon sealing compound to the outer side (arrows, upper part) and inner
side (arrows, lower part) of the sealing surface, as shown in illus.
G 3196.
Attach oil pan to oil pump, cylinder block and transmission
housing.
Assembly sequence:
1 Tighten all bolts loosely
2 Tighten bolts to oil pump and cylinder block
15 Nm / 11 Ibf. ft.
3 Tighten bolts to transmission housing -
40 Nm / 29.5 Ibf. ft.
Important:
Application of the sealing compound and assembly of the oil
pan must be carried out within 10 minutes.
|
|
Parts:
|
|
Part no.
|
Catalogue no.
|
|
Oil Pump Gasket
|
90 572 461
|
06 46 288
|
|
Sealing Compound for Oil Pump
|
90 542 114
|
15 03 170
|
|
Oil Pan Gasket
|
09 128 256
|
06 52 612
|
|
Silicon Sealing Compound for Oil Pan
|
90 543 772
|
15 03 298
|
Time Allowance:
|
J 3155 00
|
|
Oil Pan - Remove and Reinstall
|
1.7 hrs
|
X 25 XE
|
Vectra-B
|
|
|
|
TC:
01, 03, 04, 06, 11, 12, 15, 27, 40, 42, 61
|
2.2 hrs
|
X 25 XE
|
Calibra
|
|
|
|
|
2.1 hrs
|
X 25 XE, X 30 XE
|
Omega-B
|
|
|
|
|
5.2 hrs
|
X 30 XE
|
Sintra
|
|
|
|
|
|
|
|
|
|
|
Add:
|
|
|
|
|
|
023
|
Remove and reinstall oil pump for vehicles with AC
|
7.1 hrs
|
X 25 XE, X 30 XE
|
Omega-B
|
|
|
|
|
|
|
|
|
|
|
|
|
|
|
|
J 3163 00
|
|
Oil Pump - Remove and Reinstall
|
5.7 hrs
|
X 25 XE
|
Vectra-B
|
|
|
|
TC:
01, 04, 06, 12, 15, 27, 30, 31, 40, 61, 62
|
4.8 hrs
|
X 25 XE
|
Calibra
|
|
|
|
|
7.1 hrs
|
X 25 XE, X 30 XE
|
Omega-B
|
|
|
|
|
9.1 hrs
|
X 30 XE
|
Sintra
|
|
|
|
|
|
|
|
|
|
|
Add:
|
|
|
|
|
|
004
|
For vehicles with AC
|
2.1 hrs
|
X 25 XE, X 30 XE
|
Omega-B
|
|
|
|
|
|
|
|
|
J 3165 00
|
|
Oil Pump - Overhaul
|
6.0 hrs
|
X 25 XE
|
Vectra-B
|
|
|
|
TC:
01, 04, 06, 12, 15, 27, 40, 42, 61
|
5.2 hrs
|
X 25 XE
|
Calibra
|
|
|
|
|
7.3 hrs
|
X 25 XE, X 30 XE
|
Omega-B
|
|
|
|
|
9.5 hrs
|
X30 XE
|
Sintra
|
|
|
|
|
|
|
|
|
|
|
Add:
|
|
|
|
|
|
004
|
For vehicles with AC
|
2.1 hrs
|
X 25 XE, X 30 XE
|
Omega-B
|
|
|
|
|
|
|
|
|
W 1000 00
|
|
Vehicle from Parking Place to Workplace
|
|
|
|
|
|
|
and Back
|
.2 hrs
|
|
|
|
|
|
TC: 99
|
|
|
|
The regular warranty procedure should be used for claiming
set-up time.
Note:
The adds for the main operations can be found in the
current LTG microfiche.
|
