-
‒ When lowering the assembly, ensure that clearance exists between assembly and drive shafts.
-
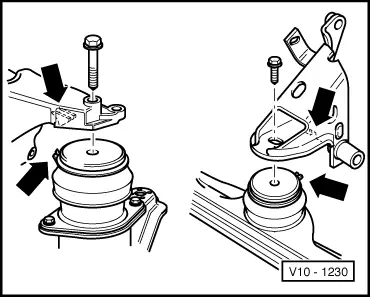
‒ →
When installing the engine mounting ensure that the recess on the rear console and the recess on the front console locates on the lugs of the bonded rubber mounting -arrows-.
-
‒ Align engine mountings stress-free by rocking.
-
‒ Installing P.A.S. vane pump:
=> Running gear; Repair group 48; Assembly overview: vane pump, reservoir, hydraulic pipes; Removing and installing power assisted steering vane pump
-
‒ Install ribbed belt
.
-
‒ Install air conditioner compressor, vehicles with refrigerant R12:
=> Heating, air conditioning; Repair group 87; Refrigerant R12 air conditioning with manual control; Removing and installing compressor bracket - 4-cyl. petrol engine
-
‒ Install air conditioner compressor, vehicles with refrigerant R134a:
=> Heating, air conditioning; Repair group 87; Refrigerant R134a air conditioning with manual control; Removing and installing compressor bracket - 4-cyl. petrol engine
-
‒ Installing lock carrier with attachments:
=> General body repairs; Repair group 50; Body front; Servicing lock carrier with attachments
Engine codes ATU, AWF, AWG
-
‒ Installing lock carrier with attachments:
=> General body repairs, Convertible; Repair group 50; Body front; Servicing lock carrier with attachments
Continuation for all vehicles
-
‒ Install ribbed belt => Page 13-16
.
-
‒ Fill with coolant => Page 19-18
Vehicles with manual gearbox
=> 5-Speed manual gearbox 020; Repair group 30; Servicing clutch control; removing and installing clutch cable
-
‒ Adjust throttle cable => Page 20-10
-
‒ Electrical connections and routing:
=> Electrical system; Repair group 97
-
‒ Perform the work sequence "Procedure after interrupting voltage supply".
Engine codes AEK, AFT, AKS
-
‒ Carry out idling check:
=> Repair group 24; Simos injection and ignition system; idling check
=> Repair group 24; Motronic injection and ignition system; idling check
Engine codes ATU, AWF, AWG
=> Repair group 24; Engine control unit; Procedure after interrupting voltage supply.
-
‒ Read out readiness code:
=> Repair group 01; Readiness code; Reading out readiness code
-
‒ If the fault memory has been erased or the engine control unit separated from the permanent positive, the readiness code must be generated again.
=> Repair group 01; Readiness code; Generating readiness code
Continuation for all vehicles
-
‒ Carry out a test drive and interrogate fault memory:
=> Repair group 01; Self-diagnosis; Interrogating and erasing fault memory
-
‒ Check headlight adjustment and adjust if necessary:
=> Maintenance booklet
|