volkswagen Workshop Repair Guides

Volkswagen Workshop Service and Repair Manuals

Removing and installing oil pump > < Dismantling and assembling oil filter housing
4cyl. Injection Engine, (2.0 ltr. Engine) (Mexico)
Removing and installing parts of the lubrication system
Removing and installing oil pan
 
W17-0030

Special tools, workshop equipment, testers, measuring instruments and auxiliary items required

  • ◆ 3185 Jointed wrench
  • ◆ T10058 Socket insert
  • ◆ V.A.G 1331 Torque wrench (5 ... 50 Nm)
  • ◆ Hand drill with plastic brush attachment
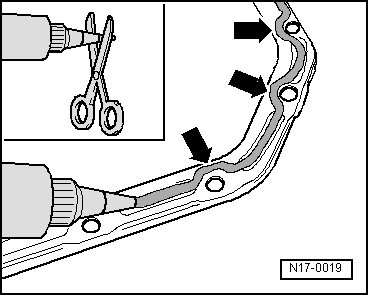
  • ◆ Silicone sealing compound D176404 A2

Removing

  • ‒ Remove centre and right-hand sound insulation:

=> General body repairs, exterior; Repair group 50; Noise insulation (petrol engine) - Assembly overview

  • ‒ Remove oil sump protection , fig. 2.
  • ‒ Drain engine oil.

Note:

Observe waste disposal regulations!
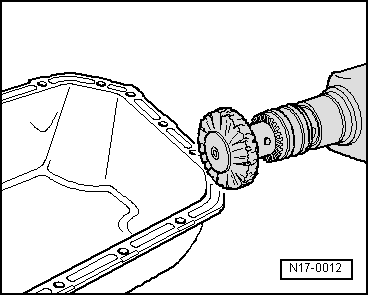
  • ‒ Unbolt sump.

Note:

Loosen bolts on flywheel end of sump with jointed wrench 3185 and remove with socket T10058.

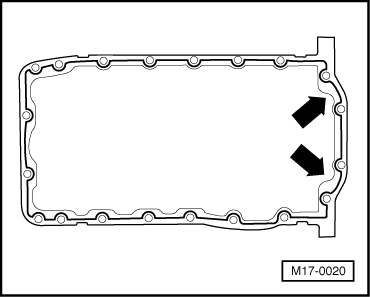
  • ‒ Remove oil sump. Remove oil sump, it may be necessary to release sump by using light blows with a rubber headed hammer.
  • ‒ Remove sealant residue from cylinder block with a flat scraper.
 
N17-0012
  • ‒ → Remove sealant residue from oil sump with a rotating brush, e.g. a hand drill with a plastic brush attachment (wear protective goggles).
  • ‒ Clean the sealing surfaces. They must be free of oil and grease.

Installing

Notes:

  • ◆ Observe the use-by-date of the sealant.
  • ◆ Sump must be installed within 5 minutes of applying silicone sealing compound.
 
N17-0019
  • ‒ → Cut off tube nozzle at the front marking (nozzle approx. 3 mm ø).
  • ‒ Apply silicone sealing compound, as shown, to the clean sump sealing surface. Sealing compound bead must be:
    • ‒ 2...3 mm thick.
    • ‒ and run on inside of bolt holes -arrows-.

Note:

The sealing compound bead must not be thicker, otherwise excess sealing compound will enter the sump and may block the oil suction pipe strainer.

 
M17-0020
  • ‒ → Apply the sealing compound bead carefully to areas marked by arrows.
  • ‒ Fit oil sump immediately and tighten bolts as follows:
  •      1 -     Tighten all sump/cylinder block bolts lightly using diagonal sequence.
  •      2 -     Tighten the three sump/gearbox bolts lightly.
  •      3 -     Tighten all sump/cylinder block bolts lightly using diagonal sequence again.
  •      4 -     Tighten all sump/cylinder block bolts to 15 Nm using diagonal sequence.
  •      5 -     Tighten the sump/gearbox bolts to 45 Nm.

Notes:

  • ◆ When installing the oil sump on an engine which is removed from the vehicle, ensure that the oil sump is flush with cylinder block on flywheel end.
  • ◆ The sealant must be allowed to cure for approx. 30 minutes after fitting the sump. After this time the engine may be filled with engine oil.

The rest of the assembly is basically in reverse order to the dismantling sequence.

Removing and installing oil pump > < Dismantling and assembling oil filter housing