
Golf Mk5
|
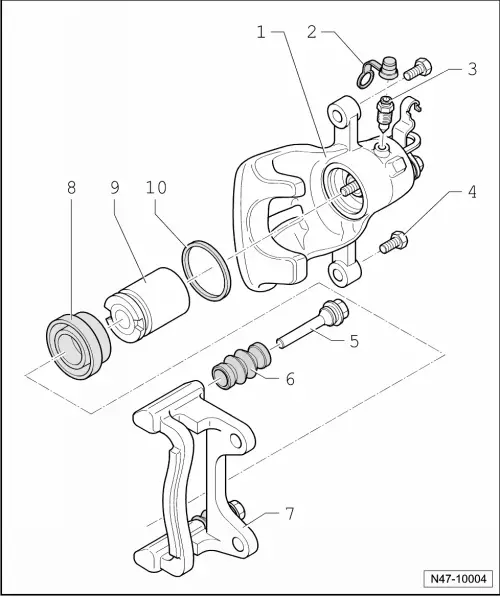
| 1 - | Brake caliper with handbrake cable lever |
| q | If there is a leak at handbrake cable lever, renew brake caliper. |
| q | Following repair work, pre-bleed brake caliper → Chapter. |
| 2 - | Dust cap |
| 3 - | Bleeder valve, 10 Nm |
| q | Apply thin coat of assembly paste G 052 150 A2 to thread before screwing in. |
| 4 - | Self-locking hexagon bolt, 35 Nm |
| q | Renew. |
| q | When loosening and tightening, counterhold on guide pin. |
| 5 - | Guide pin |
| q | Grease before fitting protective cap. |
| 6 - | Protective cap |
| q | Fit onto brake carrier and guide pin. |
| 7 - | Brake carrier with guide pin(s) and protective cap |
| q | Illustration for CII 38 brake |
| q | Supplied as genuine part, assembled with sufficient grease on guide pins. |
| q | If protective caps or guide pins are damaged, install repair kit. Use lubricant sachet supplied to lubricate guide pins. |
| 8 - | Protective cap |
| q | Pull on so that outer sealing lip goes over piston. |
| q | Removing and installing → Chapter. |
| 9 - | Piston with automatic adjustment |
| q | Removing and installing → Chapter. |
| q | Apply thin coat of assembly paste G 052 150 A2 to piston before installing. |
| 10 - | Sealing ring |
| q | Removing and installing → Chapter. |
|
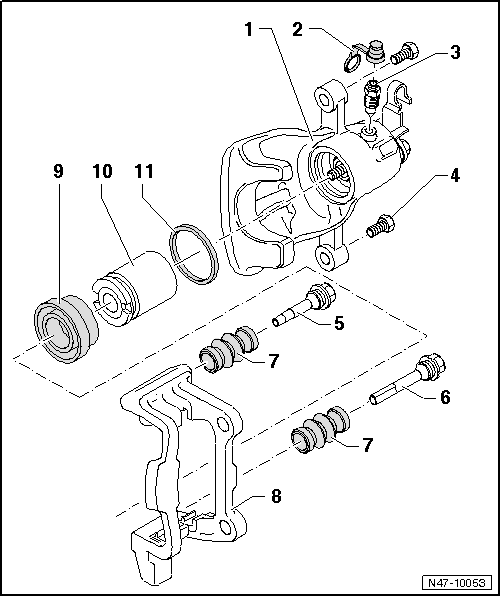
| 1 - | Brake caliper with handbrake cable lever |
| q | If there is a leak at handbrake cable lever, renew brake caliper. |
| q | Following repair work, pre-bleed brake caliper → Chapter. |
| 2 - | Dust cap |
| 3 - | Bleeder valve, 10 Nm |
| q | Apply thin coat of assembly paste G 052 150 A2 to thread before screwing in. |
| 4 - | Self-locking hexagon bolt, 35 Nm |
| q | Renew. |
| q | When loosening and tightening, counterhold on guide pin. |
| 5 - | Guide pins with steps |
| q | Shorter than item 6 |
| q | Grease before fitting protective cap. |
| 6 - | Guide pin |
| q | Longer than item 5 |
| q | Grease before fitting protective cap. |
| 7 - | Protective cap |
| q | Fit onto brake carrier and guide pin. |
| 8 - | Brake carrier with balance weight |
| q | Supplied as genuine part, assembled with sufficient grease on guide pins. |
| q | If protective caps or guide pins are damaged, install repair kit. Use lubricant sachet supplied to lubricate guide pins. |
| 9 - | Protective cap |
| q | Pull on so that outer sealing lip goes over piston. |
| q | Removing and installing → Chapter. |
| 10 - | Piston with automatic adjustment |
| q | Removing and installing → Chapter. |
| q | Apply thin coat of assembly paste G 052 150 A2 to piston before installing. |
| 11 - | Sealing ring |
| q | Removing and installing → Chapter. |