Volkswagen Workshop Service and Repair Manuals
HOME
FEATURES
MENU
INDEX
ABOUT US
Adjusting headlights >
< Assembly overview - headlight
Up!
Vehicle electrics
Electrical system
Lights, lamps, switches outside / Headlight
Removing and installing headlight
Removing and installing headlight
Removing and installing headlight
Special tools and workshop equipment required
t
Torque wrench -V.A.G 1331-
Note
t
It is not necessary to disconnect the battery earth wire.
t
The illustrations show removal and installation of the left headlight. The removal and installation of the right headlight follows the same principle.
t
If a headlight is removed, it should always be adjusted following installation
→ Booklet35.1
.
Removing:
–
Switch off ignition and all electrical loads, and pull out ignition key.
–
Remove front bumper cover
→ General body repairs, exterior; Rep. gr.63
.
–
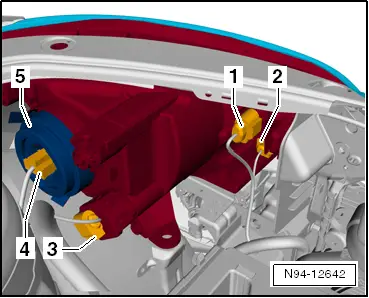
Release connectors
-1-
,
-2-
,
-3-
and
-4-
and pull them off.
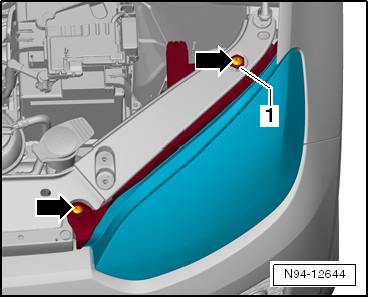
–
Undo and remove inner bolt and upper bolt
-arrows-
and remove adapter
-1-
under the upper bolt.
–
Undo and remove rear bolt
-arrow-
.
–
Remove headlight forwards out of body aperture.
Installing:
Installation is carried out in the reverse order. When installing observe the following:
–
Tighten all threaded connections to torque specified in assembly overview
→ Chapter
.
–
Check installation position so that shut lines/gaps around headlight are even.
If the shut lines/gaps around the headlight are uneven, the installation position must be adjusted
→ Chapter
.
–
Check functions of headlight.
Note
If a headlight is removed, it should always be adjusted following installation.
–
Checking headlight settings and adjusting headlight if necessary „Maintenance manual“
→ Booklet35.1
Vehicle electrics
Electrical system
Lights, lamps, switches outside / Headlight
Removing and installing headlight
Adjusting headlights >
< Assembly overview - headlight
 Note
Note
 Note
Note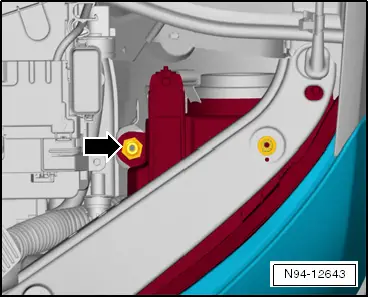
 Note
Note
Note
Note