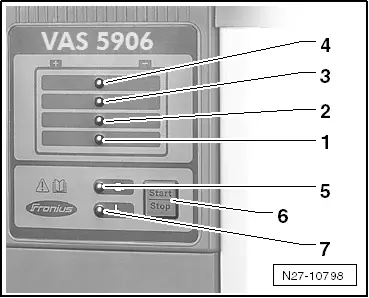
| Overview of operating panel: |
| 1 - | Charge condition display 25 %. |
| 2 - | Charge condition display 50 %. |
| 3 - | Charge condition display 75 %. |
| 4 - | Charge condition display 100 %. |
| 6 - | Start/stop and Setup buttons for interrupting and resuming charging process. Entry to Setup menu and selection of characteristic type (press for 10 s). |
| –
| Place charger in engine compartment or under vehicle. |
| –
| Connect mains cable to charger and plug it into mains. |
| Charger is in no-load operation - ready light is on. |

WARNING | Danger of injury! Observe warning notices and safety regulations → Chapter! |
|
| –
| Connect red charging cable to positive terminal „+“ on battery. |

Note | In vehicles with start/stop function and battery monitor control unit -J367- fitted, black terminal clamp must be connected to body earth. Connecting it to battery negative terminal will cause start/stop system to malfunction. |
| –
| Connect black charging cable to negative terminal „-“ on battery. |
| Charging starts after about 2 seconds. |
| Number of LEDs lit indicates charge condition of battery. Battery has been charged up once all lights are lit. |
| When battery is fully charged, battery charger -VAS 5906- automatically switches over to trickle charging. |

Caution | Danger of sparking if charging terminals are removed too soon. Terminate charging by pressing start/stop button. |
|
| –
| Press start/stop button to terminate charging. |
| –
| Disconnect black charging cable from negative terminal „-“ on battery. |
| –
| Disconnect red charging cable from positive terminal „+“ on battery. |
|
|
|
