
TL V6-3.2L (2004)
Brake Caliper: Service and Repair
Disassembly and Assembly
Rear Brake Caliper Overhaul
CAUTION: Frequent inhalation of brake pad dust, regardless of material composition, could be hazardous to your health.
-
Avoid breathing dust particles.
-
Never use an air hose or brush to clean brake assemblies. Use an OSHA-approved vacuum cleaner.
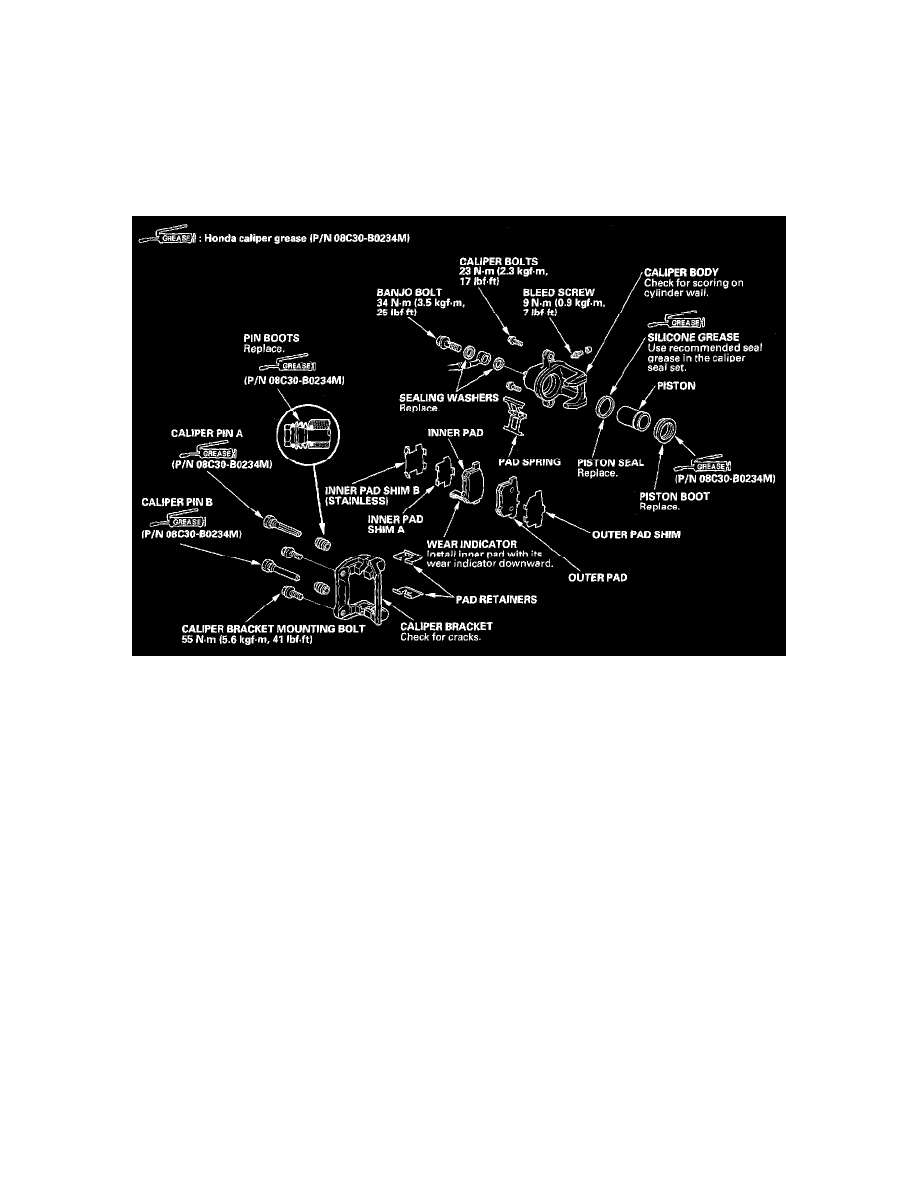
Remove, disassemble, inspect, reassemble, and install the caliper, and note these items:
-
Do not spill brake fluid on the vehicle; it may damage the paint; if brake fluid gets on the paint, wash it off immediately with water.
-
To prevent dripping brake fluid, cover disconnected hose joints with rags or shop towels.
-
Clean all parts in brake fluid and air dry; blow out all passages with compressed air.
-
Before reassembling, check that all parts are free of dirt and other foreign particles.
-
Replace parts with new ones as specified in the illustration.
-
Make sure no dirt or other foreign matter gets in the brake fluid.
-
Make sure no grease or oil gets on the brake discs or pads.
-
When reusing brake pads, always reinstall them in their original positions to prevent loss of braking efficiency.
-
Do not reuse drained brake fluid. Use only clean Honda DOT 3 Brake Fluid from an unopened container. Non-Honda brake fluid can cause
corrosion and shorten the life of the system.
-
Do not mix different brands of brake fluid as they may not be compatible.
-
Coat the piston, piston seal groove, and caliper bore with clean brake fluid.
-
Replace all rubber parts with new ones whenever disassembled.
-
After installing the caliper, check the brake hose and line for leaks, interference, and twisting.