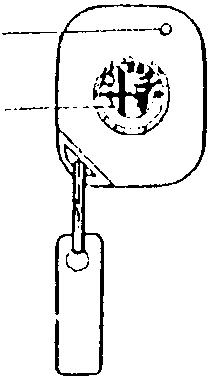
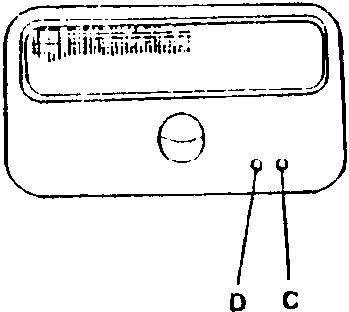
Each transmitter has a label with a four-figure number to protect the system from unauthorised programming (protected programming) which must be removed by the customer on delivery of the vehicle and kept in a safe place.
Transmitter
A - Luminous led
B - Control button
Receiver
C - Luminous led
D - Memorising button
SIMPLIFIED PROGRAMMING
Simplified programming is for use when no remote controller data has previously been entered in the memory and the system needs to accept all transmitters. i.e. when the memory has not yet been "locked" by protected programming.
In this programming mode as many codes as required are recognised, but only the last four are memorised.
Proceed as follows
press button D on the ceiling light: LED C flashes.
NOTE: if the led does NOT flash, check that the alarm system is de-activated or
that the receiver on the ceiling lamp is correctly powered.
2. keeping the receiver button D pushed, press the transmitter button B, point it towards the receiver, but at least 20 cm. from it: the led of transmitter A, must flash no more than once;
3. LED C lights continuously indicating that the code has been memorised. at this point the operator can release button D to end programming.
In the 3 sec. following the release of the button, it is possible to programme the country code to suit the country in which the car will be used. This is performed by pressing in quick succession the button of the receiver D, as shown in table 3.
If the button is not pressed, the country code defaults to E.E.C. In the event of further memory storage operations, the last one remains in the memory.
If the procedure has been carried out correctly, the LED on receiver C will flash 6 times, indicating that the code has been memorised on both the ceiling light receiver and in the control unit, if not, LED C will flash 18 times and it will be necessary to repeat the entire procedure starting from point 1 of simplified programming, after checking the correct connection between the control unit and the ceiling lamp
Table 3: Country Codes
No. of presses
Country
1
ITALY
2
GERMANY (*)
3
FRANCE
4
SWITZERLAND
5
UNITED KINGDOM
6
HOLLAND
7
USA
8
EEC
9 / 10
Others
(*) Not used in this country, because in this country a specific control unit with a special operating logic is foreseen. As it is not easy to carry out this procedure in such a short time as 3 seconds, a different procedure for entering the Country code is recommended. To do this, proceed as follows:
open the bonnet;
turn the ignition key from MARCIA to STOP: within 15 seconds the bonnet button must be pressed 7 times in quick succession in less than 10 seconds; 5 beeps will indicate entry in MANUAL DIAGNOSIS (see FAULT-FINDING). During these 5 beeps press the bonnet switch once again. A last long beep will signal the acceptance of this new operation;
keep the button pressed throughout the duration of the long beep. The latter signals entry into the country programming mode, thus the possibility to enter the country code;
release the switch and press it within 10 seconds the number of times mentioned in table 3 to select the operating mode of the country required (each press will have a feedback beep).
N.B. To enter another remote control repeat the operations from point 1 of simplified programming, provided that the memory has been "locked" as described below.
PROTECTED PROGRAMMING
To prevent unauthorised persons from entering their own code, it is necessary to protect ("lock") the memory; this operation takes place automatically after 256 activations/deactivations of the alarm system, or by entering the password (locking the memory manually)
Links open Amazon search results in a new tab. As an Amazon Associate I earn from qualifying purchases.
Help keep workshop manuals free
workshop-manuals.com provides free online workshop manuals.
If they helped you fix your car, please consider sharing or
making a small donation to keep the servers running.