
Checking rear wheel trim
- Make
- Alfa Romeo
- Model
- 155 Factory Service Manual
- Year
- 1992–1998
- Section
- Front trim › Checking rear wheel trim
Front suspensionChecking rear wheel trim
Calculate the difference between distance "B" and distance "A" and compare (see: TECHNICAL CHARACTERISTICS AND SPECIFICATIONS - CHECKS AND ADJUSTMENTS - FRONT TRIM) the resulting value with the specified values.
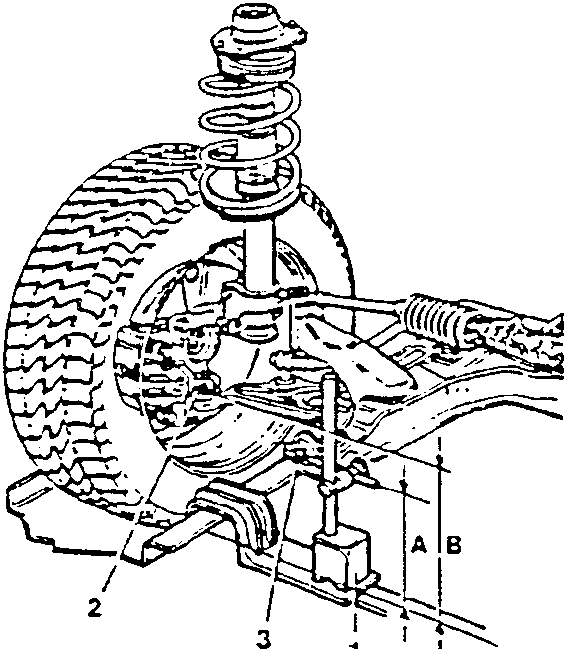
NOTE: If the values are incorrect, replace both the suspension springs.
CHECKING REAR WHEEL TRIM
PRELIMINARY OPERATIONS
Wheel trim should be checked after the following operations and checks have been completed:
- tyres inflated to the specified pressure (see: REPAIR INSTRUCTIONS - BODYWORK - GR. 28 - WHEELS AND TYRES).
- Vehicle placed on a lift.
- Vehicle set in accordance with one of the following loading conditions:
- running condition
- static load (specified refill quantities and weight distribution as shown).
- Rock the vehicle a few times to settle the suspension.
- Position the abutting tool on the resting plane of the vehicle.
- Using a surface gauge measure distance "C" between the resting plane of the vehicle and the fulcrum of the rear swinging arm.
- Using a millimeter rule measure the distance.
- Using the surface gauge measure distance "D" between the resting surface of the vehicle and the rear wheel centre line.
- Using a millimeter rule measure the distance.
- Calculate the distance between the distance "C" and distance "D" and compare (see: TECHNICAL CHARACTERISTICS AND SPECIFICATIONS - CHECKS AND ADJUSTMENTS - REAR TRIM) the resulting value with the specified values.
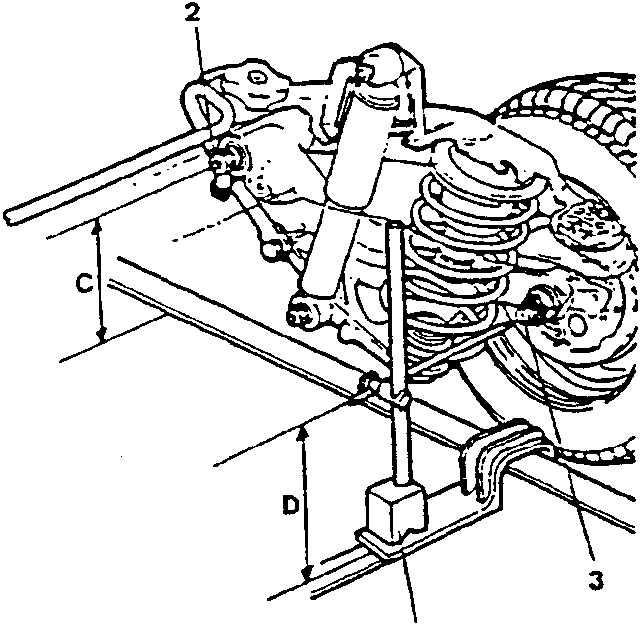
NOTE: If the values are incorrect, replace both the suspension springs.
CHECKING CHARACTERISTIC ANGLES
The characteristic angles should be checked after the following operations and checks have been completed:
- tyres inflated to the specified pressure (see: REPAIR INSTRUCTIONS - BODYWORK - GR. 28 - WHEELS AND TYRES).
- check that eccentricity and orthogonality of the wheels does not exceed:
- 1 mm for steel rims
- 0.3 mm for alloy rims.
- check that there is no clearance between wheel support and articulated pin of swinging arm.
- check that there is no axial play on the wheel bearings.
Parts & tools for this job For 1992 Alfa Romeo 155
- TOOLTrim removal tool kitSearch: trim removal tool kit
- PARTTouch-up paintSearch: Alfa Romeo touch up paint
- PARTPanel clip assortmentSearch: Alfa Romeo panel clips assortment
Links open Amazon search results in a new tab. As an Amazon Associate I earn from qualifying purchases.