
Workshop Manuals Factory service & repair Alfa Romeo
01 Introduction and contents02 Vehicle characteristics and maintenance03 Engine – mechanical (Twin Spark)04 Fuel system (Twin Spark)05 Ignition, starting and charging (Twin Spark)06 Engine cooling (Twin Spark)07 Engine – mechanical (V6)08 Fuel system (V6)09 Ignition, starting and charging (V6)10 Engine cooling (V6)11 Electrical diagnosis – introduction and wiring diagram guide12 Electrical 01 – Power supply13 Electrical 02 – Fusebox14 Electrical 03 – Location of grounds15 Electrical 04 – Sidelights16 Electrical 05 – Main and dipped beam headlights17 Electrical 06 – Headlight alignment adjustment18 Electrical 07 – Rear and front fog lamps19 Electrical 08 – Direction indicators and hazard warning lights20 Electrical 09 – Stop lights21 Electrical 10 – Reversing lights22 Electrical 11 – Day lights23 Electrical 11A – Dim-dip device24 Electrical 12 – Interior lighting25 Electrical 13 – Instrument panel26 Electrical 14 – Check panel27 Electrical 15 – Provision for radio28 Electrical 15A – Radio system29 Electrical 16 – Cigar lighter30 Electrical 17 – Horns31 Electrical 18 – Windscreen wipers and washers, headlight washers32 Electrical 19 – Heated rear window and heated door mirrors33 Electrical 20 – Boot release control34 Electrical 21 – Door locking system35 Electrical 21A – Remote control door locking36 Electrical 21B – Anti-theft device37 Electrical 22 – Front power windows38 Electrical 22A – Front power windows (one-touch version)39 Electrical 23 – Rear power windows40 Electrical 24 – Adjustable heated seats41 Electrical 25 – Sunroof42 Electrical 26 – Heating, ventilation and air conditioning43 Electrical 27 – Starting and charging44 Electrical 28 – Engine cooling fan45 Electrical 29 – Motronic ignition and injection46 Electrical 29A – Alfa Romeo CODE immobiliser47 Electrical 30 – ABS48 Electrical 31 – Controlled damping suspension49 Electrical diagnosis – components key50 Clutch51 Gearbox and differential52 Axle shafts53 Front suspension54 Brakes55 Steering56 Rear suspension57 Wheels and tyres58 Electrical system59 Instrument panel and electronic instruments60 Bodywork61 Doors62 Boot and bonnet63 Interior trim64 External trim65 Heating and ventilation
Alfa Romeo 155 Factory Service Manual (1992-1998)63 · Interior trim
63 · Body & interior

Complete seat

Make
Alfa Romeo
Model
155 Factory Service Manual
Year
1992–1998
Section
Front seats › Complete seat
Interior trimComplete seat

COMPLETE SEAT

Removal and refitting

  • Disconnect the negative (-) cable from the battery.
  • Slide the seat as far forward as possible.
  1. Disconnect the electrical services power supply connectors located on the seat (adjustment, heating, check panel sensor detecting fastening of seat belts).
  2. Loosen the two screws securing the side cover and remove it.
  3. Loosen the two rear screws securing the seat guides to the chassis.
  • Slide the seat as far back as possible.
  • Loosen the two front screws securing the seat guides to the chassis.
  • Unhook the seat by sliding them forward and lift it out.

When refitting reverse the procedure followed for removal and:

  • Before connecting the electrical connectors check that the electrical cables are correctly inserted into them.
  • After refitting the screws securing the seat guides to the chassis, tighten them to the specified torque.
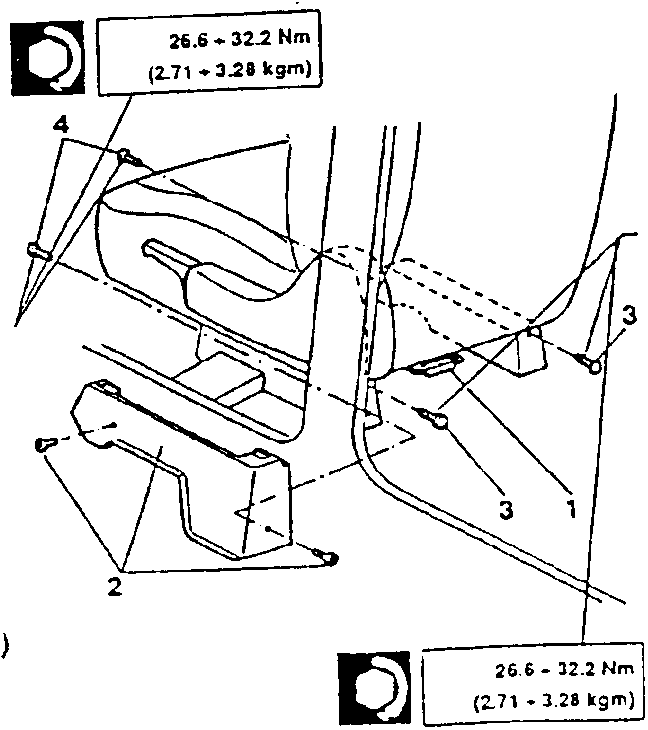
Diagram showing seat removal with torque specifications

26.6 - 32.2 Nm
(2.71 - 3.28 kgm)

26.6 - 32.2 Nm
(2.71 - 3.28 kgm)

HEADREST

Removal and refitting

  • Raise the headrest.
  1. Raise the rubber covering in one of the two pins of the headrest.
  2. Rotate the pin of the headrest through 90° to free the hook securing it to the locking mechanisms in the seat and in the headrest.
  3. Repeat the operation for the other pin.
  4. Lift out the headrest.

When refitting reverse the procedure followed for removal.
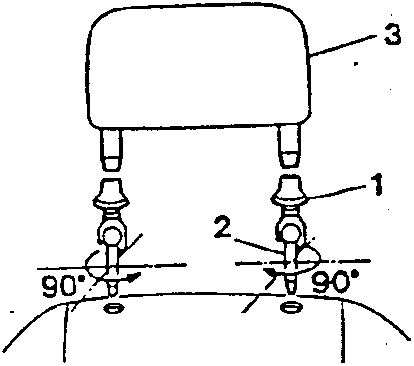
Diagram showing headrest pins at 90 degrees

Replacing the covering

  • Remove the headrest and pins (see Removal and refitting).
  1. Loosen the two screws securing the moulding located in the lower part of the headrest and remove the moulding.
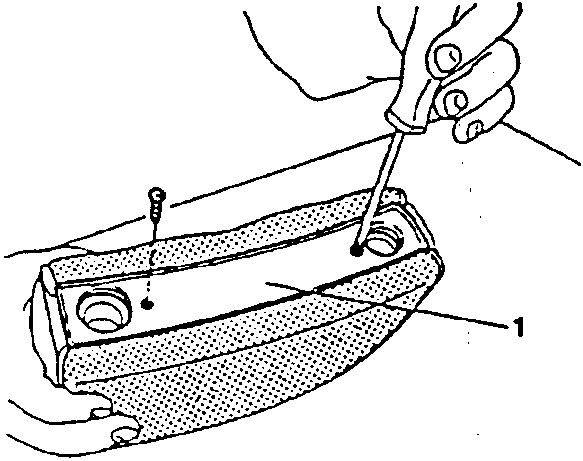
Diagram showing screw removal from headrest moulding

Parts & tools for this job For 1992 Alfa Romeo 155

Links open Amazon search results in a new tab. As an Amazon Associate I earn from qualifying purchases.