audi Workshop Repair Guides

Audi Workshop Service and Repair Manuals

Removing and installing brake servo (vehicles with TDI engine) > < Removing and installing brake master cylinder
Removing and installing brake servo
   
Removing and installing brake servo
Special tools and workshop equipment required
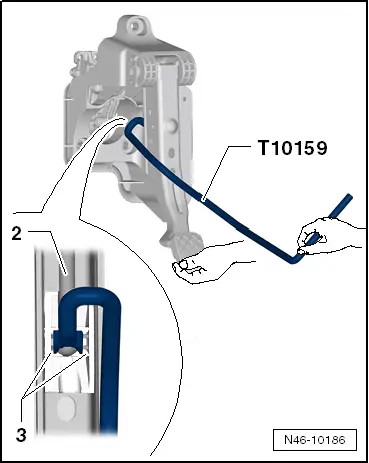
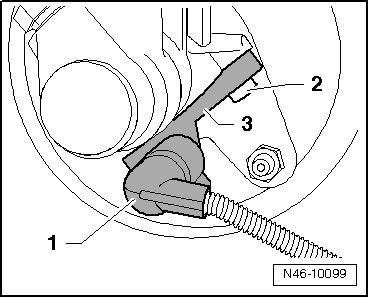
t  Hose clamps up to 25 mm diameter -3094-
t  Torque wrench -V.A.G 1331-
t  Upgrade kit and extraction unit -V.A.G 1869/4-
t  Brake filling and bleeding equipment -VAS 5234-
t  Adapter -VAS 5234/1-
t  Sealing plug repair kit, Part No. -1H0 698 311 A-

Removing
–  Switch off engine.
–  Press brake pedal repeatedly („pump the brake servo dry“) until there is no more servo assistance and the brake pedal is heavy.
   
–  Unplug connector -3-.
–  Remove air cleaner housing → Rep. gr.23.
–  Unplug electrical connector for brake fluid level warning contact --F34--.
–  Remove brake master cylinder → Chapter.
–  Unclip engine control unit and move to one side.
–  Detach vacuum line from brake servo.
–  Remove driver's storage compartment → Rep. gr.68.
–  Separate brake pedal from brake servo → Chapter.
–  First press brake pedal in direction of brake servo and hold.
  A23-10381
–  Insert release tool -T 10159- and pull in direction of driver's seat, while holding brake pedal firmly. (At this stage the brake pedal must not be allowed to move to the rear.) This will press the retaining lugs -3- of the mounting off the ball head of the push rod -2-.
2 - Push rod
3 - Retaining lugs
  N46-10186
–  Remove nuts for brake servo -arrows- on mounting bracket.
  Note
A heat shield is fitted on the brake master cylinder on some models.
–  Detach heat shield if fitted.
–  Remove brake servo from vehicle.
Installing
–  Fit brake servo in vehicle.
Ensure that seal is seated correctly.
–  Fit nuts.
  N47-10117
–  Tighten nuts for brake servo -arrows- on mounting bracket.
Attaching brake pedal to brake servo → Chapter
  N47-10117
–  Hold ball head of push rod in front of mounting and push brake pedal in direction of brake servo so that the ball head audibly locks into place.
–  Install driver's storage compartment → Rep. gr.68.
  Note
A heat shield is fitted on the brake master cylinder on some models.
–  Install heat shield if previously removed. Tightening torque for nuts: 20 Nm.
–  Push vacuum line into brake servo.
–  Install brake master cylinder → Chapter.
–  Plug in electrical connector for brake fluid level warning contact --F34--.
  N46-10185
–  Attach connector -1- on brake light switch.
–  Clip engine control unit into retainer on plenum chamber partition panel.
  N46-10099
–  Install air cleaner housing → Rep. gr.23.
–  Plug in connector -3-.
–  Fill up brake fluid reservoir to „MAX“ mark.
–  Bleed brake system → Chapter with brake filling and bleeding equipment -VAS 5234-.
–  Fill up brake fluid reservoir to „MAX“ mark.
  A23-10381
To prevent brake fluid from overflowing from the reservoir, the brake fluid level must not be above the „MAX“ mark -1-.
–  Carry out ESP road test and system test.
  Caution
Make sure that the brakes work properly before the vehicle is driven on the road.
  N01-10670

Removing and installing brake servo (vehicles with TDI engine) > < Removing and installing brake master cylinder