audi Workshop Repair Guides

Audi Workshop Service and Repair Manuals

Exploded view - LuK version clutch with one-piece flywheel > < Exploded view - Sachs version clutch
Removing and installing clutch (Sachs version)
   
Removing and installing clutch (Sachs version)
Special tools and workshop equipment required
t  Counterhold tool -3067-
t  Centring mandrel -3190 A-
t  Torque wrench -V.A.G 1331-
t  Grease for clutch plate splines -G 000 100-

l  Gearbox removed
–  Attach counterhold tool -3067- before loosening bolts.
To prevent the clutch pressure plate from becoming distorted during removal (causes clutch grab when driving off), always adhere to the following procedure when unbolting the clutch pressure plate:
   
–  Consecutively slacken off all 6 bolts in clockwise direction in 90° stages until the clutch pressure plate is released.
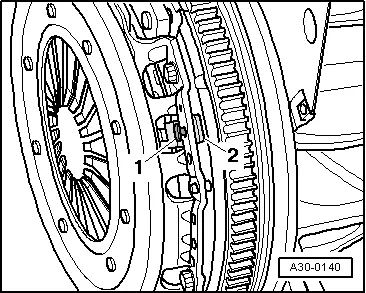
l  Stop -2- with pin -1- should come loose when the bolts are slackened.
l  If the stop does not come loose, push the pin towards the dual-mass flywheel.
–  Take off clutch pressure plate and clutch plate.
Installing
l  Tightening torque → Chapter „Exploded view - Sachs version clutch“
Installation is carried out in reverse sequence; note the following:
  Note
t  Observe notes → Chapter.
t  Clutch plate linings must make full contact with flywheel and friction surface of pressure plate before securing bolts are inserted.
t  Check that dowel sleeves for centralising engine/gearbox are in the cylinder block; install if necessary.
t  If the dowel sleeves are not fitted, this will lead to gear-change problems, clutch malfunction and in some cases gearbox noise (gears will make rattling noises).
  A30-0140
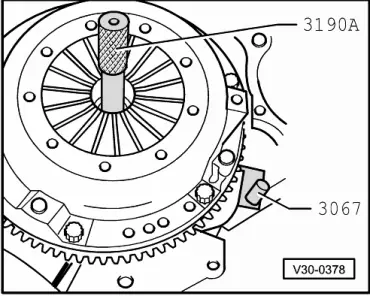
–  Use counterhold tool -3067-.
–  Position pressure plate on centring pins.
–  Use centring mandrel -3190 A- to centre clutch plate.
  V30-0378
To prevent the clutch pressure plate from becoming distorted during installation (causes clutch grab when driving off), always adhere to the following procedure when attaching the clutch pressure plate:
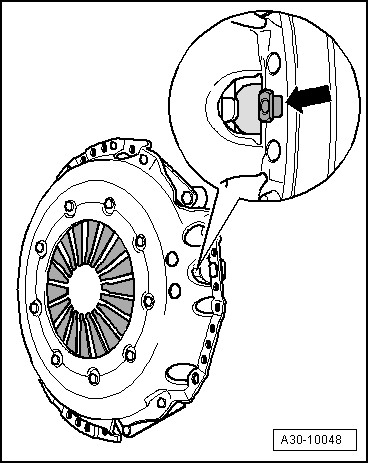
–  Make sure that the stop pin (position sensor) -arrow- is free to move.
–  Screw in all 6 bolts evenly by hand until bolt heads make contact with clutch pressure plate.
–  Tighten all 6 bolts consecutively in clockwise direction and in steps of 90° until the housing makes contact with flywheel.
l  The stop pin -arrow- should then lift away from the clutch pressure plate.
–  Tighten all 6 bolts to final torque consecutively in clockwise direction.
  A30-10048

Exploded view - LuK version clutch with one-piece flywheel > < Exploded view - Sachs version clutch